
Top 6 cross-platform mobile app development frameworks in 2025
Here, we'll discuss the top 6 cross-platform mobile app development frameworks you should use in 2025.
As developers, we’re always looking for ways to combine Flutter’s versatility with the unique features of other platforms.
Whether you’re building a cross-platform app that needs to integrate with native code or creating a plugin that extends Flutter’s capabilities, understanding Platform Channels is crucial.
In this article, we’ll cover:
After reading this article, you’ll be equipped with the knowledge to achieve the full potential of your Flutter apps.
Table of Contents
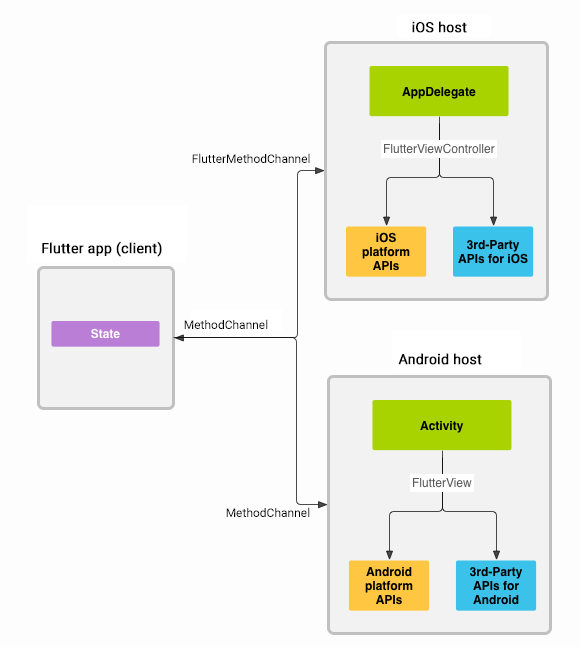
At its core, a Platform Channel is a bidirectional pipe that allows Dart code to communicate with platform-specific native code on iOS, Android, and web platforms.
Think of it as a bridge between Flutter and Native code.
This means you can use Dart to write most of your app, while still tapping into native features like camera access, file storage, or any other native API you need.
Source: Flutter
When you need to interact with the platform, Platform Channels provide a reliable way to send messages, pass data, and execute native code from within your Dart code.
We achieve this through the use of MethodChannels.
They’re used to invoke platform-specific methods and BinaryMessenger, which enables binary message serialization and deserialization.
In the following section, I’ll explain the practical implementations of Platform Channels. I’ll show you how to:
So let’s get to it.
As an example, let’s imagine a scenario where we need to know if the user is connected to WiFi or Cellular network.
We can get this information from both iOS and Android native APIs which makes it a perfect use case for a method channel in Flutter.
Establishing a Method Channel is simple:
const channel = MethodChannel('channel-name');
The only thing the channel needs is a unique name (String). You can establish as many channels as you like provided they all have a unique name.
When you invoke a method using Platform Channels, you’re essentially issuing a request to Flutter to perform an action on the native side of your app.
Regardless of whether you’re running on iOS or Android, Flutter will attempt to locate and execute the corresponding implementation on the native platform.
In my example, I want to see what type of network the user is connected to. This is the method call:
final String result = await channel.invokeMethod('getNetworkStatus');
“invokeMethod” expects a unique String which we’ll be using in the native implementations for Flutter.
That way we’ll know which piece of code we’ll be executing on the native side.
Let’s see an example with more context:
Future<void> _getNetworkStatus() async {
    try {
      final String result = await channel.invokeMethod('getNetworkStatus');
      setState(() {
        _networkStatus = result;
      });
    } on PlatformException catch (e) {
      setState(() {
        _networkStatus = "Failed to get network status: '${e.message}'.";
      });
    }
  }
When we’ve established a channel in Dart, we need to do the same in Kotlin and Swift. Let’s start with iOS.
Let’s go to the iOS/Runner/AppDelegate.swift in our app.
This is how we register the channel using that unique name from before and a binary messenger we get from a special FlutterViewController.
let controller: FlutterViewController = window?.rootViewController as! FlutterViewController
FlutterMethodChannel(name: “channel-name“, binaryMessenger: controller.binaryMessenger)
We already have access to all needed Flutter platform tools in Swift since Flutter apps come with preinstalled Flutter SDK.
To make this more separated, here’s how I did it in My AppDelegate.swift for this network status example:
@UIApplicationMain
@objc class AppDelegate: FlutterAppDelegate {
  override func application(
    _ application: UIApplication,
    didFinishLaunchingWithOptions launchOptions: [UIApplication.LaunchOptionsKey: Any]?
  ) -> Bool {
      GeneratedPluginRegistrant.register(with: self)
      let controller: FlutterViewController = window?.rootViewController as! FlutterViewController

      let channelHandler = ChannelHandler(messenger: controller.binaryMessenger)
      channelHandler.setMethodCallHandler()

      return super.application(application, didFinishLaunchingWithOptions: launchOptions)
  }
}
For Android implementation we need to go to: android/app/src/main/kotlin/com/example/your_app_name/MainActivity.kt.
We’ll use the channel registration tools provided by the Flutter SDK:
val methodChannel = MethodChannel(flutterEngine.dartExecutor.binaryMessenger, "channel-name")
As you can see, we need the binaryMessenger again which this time comes from flutterEngine. We’ll get it by overriding the configureFlutterEngine method.
This is how I did it for our network status example:
class MainActivity: FlutterActivity() {
    override fun configureFlutterEngine(flutterEngine: FlutterEngine) {
        super.configureFlutterEngine(flutterEngine)
        val channelHandler = ChannelHandler(this, flutterEngine)
        channelHandler.setMethodCallHandler()
    }
}
I’ll show the full implementation of the ChannelHandler class in the next step.
It can be just one of the handlers in your app. Sometimes you will need many channels and many handlers each doing a specific thing and all of them can be simply initialized in MainActivity.kt.
Now we come to the meat and potatoes of getting data from native back to Dart and Flutter.
I’ll create a separate class “ChannelHandler” for both platforms to not clutter AppDelegate.swift and MainActivity.kt respectively.
Let’s take a look at how to do it for both iOS and Android.
ChannelHandler class in Swift gets an initializer which will do the channel registration explained in the previous step. The ChannelHandler initializer will expect the FlutterBinaryMessenger as an argument.
init(messenger: FlutterBinaryMessenger) {
    methodChannel = FlutterMethodChannel(name: "channel-name", binaryMessenger: messenger)
}
Here’s the full class implementation with logic for getting the network status:
class ChannelHandler {

    private let methodChannel: FlutterMethodChannel

    init(messenger: FlutterBinaryMessenger) {
        methodChannel = FlutterMethodChannel(name: “channel-name”, binaryMessenger: messenger)
    }

    func setMethodCallHandler() {
        methodChannel.setMethodCallHandler(handle)
    }

    private func handle(call: FlutterMethodCall, result: @escaping FlutterResult) {
        switch call.method {
        case "getNetworkStatus":
            getNetworkStatus { status in
                result(status)
            }
        default:
            result(FlutterMethodNotImplemented)
        }
    }

    private func getNetworkStatus(completion: @escaping (String) -> Void) {
        let monitor = NWPathMonitor()
        let queue = DispatchQueue(label: "NetworkMonitor")

        monitor.pathUpdateHandler = { path in
            var networkStatus: String

            if path.status == .satisfied {
                if path.usesInterfaceType(.wifi) {
                    networkStatus = "Connected to Wi-Fi"
                } else if path.usesInterfaceType(.cellular) {
                    networkStatus = "Connected to Cellular"
                } else if path.usesInterfaceType(.wiredEthernet) {
                    networkStatus = "Connected to Wired Ethernet"
                } else {
                    networkStatus = "Connected to Unknown"
                }
            } else {
                networkStatus = "No connection"
            }

            completion(networkStatus)
            monitor.cancel()
        }

        monitor.start(queue: queue)
    }
}
The setMethodCallHandler is the method we call after initializing the ChannelHandler class while waiting for the call from Dart. “Call” contains info about the specific method that’s called from Dart (In this case it’s “getNetworkStatus”).
We defined the name of this method when we used “invokeMethod” in Flutter. In Swift, we can react to the call from that method using the switch method.
So we do the work when this case is satisfied as seen in a switch statement:
switch call.method {
case "getNetworkStatus":
    getNetworkStatus { status in
        result(status)
    }
default:
    result(FlutterMethodNotImplemented)
}
When the status is delivered from the getNetworkStatus(), we call result() passing the status.
I’ve taken a similar approach to the ChannelHandler class on Android. We have an initializer taking in the context and the dartEngine containing the binaryMessenger:
class ChannelHandler(private val context: Context, flutterEngine: FlutterEngine)
So we can set up the MethodChannel in a private val:
private val methodChannel = MethodChannel(flutterEngine.dartExecutor.binaryMessenger, "channel-name")
Here’s the full ChannelHandler class implementation if you’d like to follow along:
class ChannelHandler(private val context: Context, flutterEngine: FlutterEngine) {

    private val methodChannel = MethodChannel(flutterEngine.dartExecutor.binaryMessenger, "channel-name")

    fun setMethodCallHandler() {
        methodChannel.setMethodCallHandler { call, result ->
            when (call.method) {
                "getNetworkStatus" -> {
                    val networkStatus = getNetworkStatus()
                    result.success(networkStatus)
                }
                else -> result.notImplemented()
            }
        }
    }

    private fun getNetworkStatus(): String {
        val connectivityManager = context.getSystemService(Context.CONNECTIVITY_SERVICE) as ConnectivityManager
        val network = connectivityManager.activeNetwork
        val capabilities = connectivityManager.getNetworkCapabilities(network)

        return when {
            capabilities == null -> "No connection"
            capabilities.hasTransport(NetworkCapabilities.TRANSPORT_WIFI) -> "Connected to Wi-Fi"
            capabilities.hasTransport(NetworkCapabilities.TRANSPORT_CELLULAR) -> "Connected to Cellular"
            else -> "Unknown connection"
        }
    }
}
We call the setMethodCallHandler in MainActivity after initializing the ChannelHandler class.
It then takes care of the work by listening to the invokeMethod that happens in Dart and returning a value after the native platform did the work using the result.success()
Whatever we pass to the “result” will be delivered back to Dart in Flutter as a return value from invokeMethod().
In this case, we are returning a String to show the user which network connection their device is currently using. We can set up as many method invocations as we want per MethodChannel and send the result data back to Dart.
We can send primitive types back and forth. If needed we can also send json data as well to serialize objects.
Here’s more info including a table of supported types for all platforms.
Now that we’ve established a MethodChannel, and got some data back from Native Platforms (iOS & Android) using method call handlers, we can attempt to send data the other way — from Flutter to Native.
In other words. we’ve sent the cars over the bridge, and now we have to send them the other way.
Let’s add more functionality to our channel by invoking another method from Dart. However, this time we’ll give the method some arguments.
In this case, I’ll let the native side calculate a sum of two integers and send the result back to Dart:
final result = await platform.invokeMethod('calculateInNative', {
   'num1': num1,
   'num2': num2,
});
I gave the arguments using a Map<String, Int> type but other types are also supported.
In the next step, we’ll read the arguments in native platforms which will perform the calculation.
We’ll follow similar steps as before utilizing the arguments property of the “call” object so let’s add another case to the handler in our ChannelHandler :
case "calculateInNative":
    if let args = call.arguments as? [String: Any], let num1 = args["num1"] as? Int,
       let num2 = args["num2"] as? Int {
        let sum = num1 + num2
        result(sum)
    }
We need to do some typecasting since arguments are passed as dynamic.
For Android, we do a very similar thing by adding another case to the setMethodCallHandler:
"calculateInNative" -> {
            val num1 = call.argument<Int>("num1") ?: 0
            val num2 = call.argument<Int>("num2") ?: 0
            val sum = num1 + num2
            result.success(sum)
        }
We make sure that the types match and we’re ready to calculate the result and send it back to Flutter again.
When you know how to set up the method call handlers, it’s easy to send data to native platforms while invoking a method. Just be careful to typecast correctly.
Sending and receiving data using method channels is great, but what if you need to draw a view only available on a native platform?
I’ll show you how to do it on the most simple view — a label, but there’s no limit to how complex the view can be.
Using this method you can create all sorts of views, from a simple label, or image to a camera viewfinder to complex maps using specialized native SDKs etc.
When you know how to render a native label in Flutter, with dedicated platform knowledge, you’ll have all you need to render any native view in Flutter.
Let’s go back to Xcode and register a new view factory.
Create a new file for a new class like this:
class NativeLabelViewFactory: NSObject, FlutterPlatformViewFactory {
    private var messenger: FlutterBinaryMessenger
    init(messenger: FlutterBinaryMessenger) {
        self.messenger = messenger
        super.init()
    }
    func create(withFrame frame: CGRect, viewIdentifier viewId: Int64, arguments args: Any?) -> FlutterPlatformView {
        return NativeLabelView(frame: frame, viewIdentifier: viewId, arguments: args, binaryMessenger: messenger)
    }

    public func createArgsCodec() -> FlutterMessageCodec & NSObjectProtocol {
        return FlutterStandardMessageCodec.sharedInstance()
    }
}
The createArgsCodec() method is extremely important.
If you don’t have it, iOS will not recognize any arguments you send to define your Platform view. Don’t ask me how I know. Xcode will complain because you still don’t have the NativeLabelView defined.
Let’s do that real quick:
class NativeLabelView: NSObject, FlutterPlatformView {
    private var _view: UILabel
    init(frame: CGRect, viewIdentifier viewId: Int64, arguments args: Any?, binaryMessenger: FlutterBinaryMessenger) {
        _view = UILabel()
        super.init()
        createNativeView(view: _view, arguments: args)
    }

    func view() -> UIView {
        return _view
    }

    private func createNativeView(view: UILabel, arguments args: Any?) {
        view.text = (args as? [String: Any])?["text"] as? String ?? "Default Text"
        view.textAlignment = .center
        view.font = UIFont.systemFont(ofSize: 24)
    }
}
Then we need to register the factory in AppDelegate.swift:
let factory = NativeLabelViewFactory(messenger: controller.binaryMessenger)
registrar(forPlugin: "native-label")?.register(factory, withId: "native-label")
“native-label” String is important as we need to tell the factory the ID of the Platform view we want to render in Flutter which will happen when we define it in Flutter.
Similar thing happens with Android so let’s create the view factory and the view:
class NativeLabelViewFactory : PlatformViewFactory(StandardMessageCodec.INSTANCE) {
    override fun create(context: Context, id: Int, creationParams: Any?): PlatformView {
        return NativeLabelView(context, id, creationParams as Map<String?, Any?>?)
    }
}
What “args” are in iOS, “creationParams” are in Android. If we send data while defining the Platform View in Flutter, creationParams are how we retrieve them. Let’s create the view as well:
class NativeLabelView(context: Context, id: Int, creationParams: Map<String?, Any?>?) : PlatformView {
    private val textView: TextView = TextView(context).apply {
        textSize = 24f
        text = creationParams?.get("text") as String? ?: ""
    }
    override fun getView(): View = textView
    override fun dispose() {}
}
Last step is to register the view factory in MainActivity.kt:
flutterEngine
            .platformViewsController
            .registry
            .registerViewFactory("native-label", NativeLabelViewFactory())
Notice how we provide the “native-label” ID to the view factory registration method.
We now have defined native views in both platforms and we can use inbuilt Flutter widgets to render them wherever we want in our app. This is an example I called NativeView.
class NativeView extends StatefulWidget {
  const NativeView({
    required this.labelText,
    super.key,
  });

  final String labelText;

  @override
  State<NativeView> createState() => _NativeViewState();
}

class _NativeViewState extends State<NativeView> {
  String viewType = 'native-label';
  Map<String, dynamic> creationParams = {};
  final codec = const StandardMessageCodec();

  @override
  void initState() {
    creationParams = {'text': widget.labelText};
    super.initState();
  }

  @override
  Widget build(BuildContext context) {
    switch (defaultTargetPlatform) {
      case TargetPlatform.android:
        return AndroidView(
          viewType: viewType,
          layoutDirection: TextDirection.ltr,
          creationParams: creationParams,
          creationParamsCodec: codec,
          gestureRecognizers: const <Factory<OneSequenceGestureRecognizer>>{
            Factory<OneSequenceGestureRecognizer>(
              EagerGestureRecognizer.new,
            ),
          },
        );
      case TargetPlatform.iOS:
        return UiKitView(
          viewType: viewType,
          layoutDirection: TextDirection.ltr,
          creationParams: creationParams,
          creationParamsCodec: codec,
          gestureRecognizers: const <Factory<OneSequenceGestureRecognizer>>{
            Factory<OneSequenceGestureRecognizer>(
              EagerGestureRecognizer.new,
            ),
          },
        );
      default:
        return const Text('Platform not supported');
    }
  }
}
The “viewType” is the ID of the native side that expects to know which view to render. The creationParams are provided to configure the view on the native side.
In this case, just a String to fill out the label. But these params can be much more complex if needed.
We are targeting only iOS (UIKitView) and Android (AndroidView) in this case, but the switch here can be expanded to handle more cases.
I also set the “gestureRecognizers” in this example even though we don’t need them, but just to show you how to set them for other types of Platform Views.
For example, dragging or zooming the native map if that is the view you need etc.
More typecasting is happening on the native side while creating the view since we sent arguments/creationParams along to help define the view from Flutter.
In this case, the text for the label. However, you can send anything along, even entire configurations using json format.
There’s a lot you can do with Platform Channels and knowing how to do the basics we discussed here will set you on your way to creating apps. And you’ll be able to do it without having to rely on other people’s packages which might be outdated.
Now you can use native-only SDKs and provide the bridge for them to Flutter and create your apps.
If you need help writing native code, check out our other articles:
Android app development best practices
And if you’d like to learn more about cross-platform development:
Happy coding!

A mechanical engineer by trade, Viktor found his passion in coding. A self-taught developer, he started with web development before making the jump to iOS. At DECODE, he's expanded his skillset even further, now working with Flutter, React, and React Native to build seamless front-end experiences. Outside of work, you'll find him hitting the road for his next adventure, enjoying a good video game, or playing guitar.
Here, we'll discuss the top 6 cross-platform mobile app development frameworks you should use in 2025.

Learn how to make a Flutter app in our detailed guide.

Before developing an app, it’s important to note that there are different technologies you can employ, and be aware of the differences between them Whether you choose to build a native, hybrid, or cross-platform app, each of these technologies has its own pros and cons, depending on the nature of your project. In this article, we’ll offer you some insight into native and cross-platform technologies.