
The mobile app architecture guide
This article will discuss the basics of mobile app architecture and why it's important in app development.
Created by Google, Flutter is a game-changer for cross-platform apps, running seamlessly on Android, iOS, web, and desktop.
We’ll guide you through the process of creating a flutter app step-by-step, with an example app you could use for inspiration.
So whether you’re a newbie or a seasoned developer, if you’d like to make cross-platform apps, you’re at the right place.
We’ll create a simple step counter and weather forecast app to demonstrate how you should build a Flutter app.
By the end, you’ll have the fundamental knowledge you’d need to create a cross-platform app.
So let’s dive into it!
When we talk about Flutter, it’s important to understand its advantages from two perspectives:
The clients (business owners) and the engineers who build the apps.
For Clients:
For Developers:
In this article, we’ll start exploring app development with Flutter by building a simple app.
To create the project, you’ll need several things:
Flutter SDK
Make sure you have Flutter SDK installed on your machine.
You can download it from the official Flutter website and follow the installation instructions for your operating system.
IDE
An editor to write your app in. We recommend Visual Studio Code (VS Code) – a lightweight and extensible code editor developed by Microsoft. It offers excellent Flutter and Dart support through various plugins and extensions.
Verify Flutter setup
Run the following command to check if your Flutter project is set up correctly:
flutter doctor
This command verifies that all the necessary dependencies are installed and provides guidance for any missing components.
Now let’s take a look at how you can actually make the app. For this purpose, we’ll create a simple step counter app that also does weather forecast.
We start with creating a new project.
Open a terminal or command prompt and navigate to the directory where you want to create your Flutter project. Use the following command to create a new project:
flutter create <project_name_here>
The Flutter SDK will download the necessary files and dependencies to set up the project structure. It may take a bit, depending on your internet connection speed.
After the project is created, you can open it in VSC.
The flutter create command generates a standard project structure with various folders and files. Here’s a brief explanation of the most important ones:
android/ and ios/ folders:
These folders contain the Android and iOS-specific files and configurations for your Flutter app. They’re used for building and running your app on Android and iOS devices.
lib/ folder:
This is the main folder where you’ll write your Flutter app’s Dart code. It contains the entry point of your app, typically in a file named main.dart. You’ll create and organize your Flutter widgets, screens, logic, and other code files in this folder.
test/ folder:
This folder is meant for writing unit tests for your app. It provides a structure to create test files and directories to validate the functionality of your app’s code.
pubspec.yaml file:
This is an important file that manages your Flutter app’s dependencies and assets. Here, you define the packages you need, specify their versions, and include any additional assets like images, fonts, or configuration files.
.gitignore file:
This file specifies the files and directories that should be ignored by version control systems like Git. It’s useful to exclude generated files, build artifacts, and other temporary files from being tracked.
README.md file:
This is a Markdown file that serves as the main documentation for your Flutter project. You can write a brief description of your app, instructions for running or building it, and other important information.
pubspec.lock file: This file is automatically generated and managed by the Flutter tool. It tracks the specific versions of dependencies used in your project, ensuring that subsequent builds use the same versions of dependencies.
analysis_options.yaml file: This file contains linting rules and static analysis configurations for your project. It helps ensure code quality and adherence to best practices.
You can run the Flutter project on a connected device (emulator or physical device) by executing the following command in the project directory:
flutter run
main.dart file is the entry point of a Flutter app. It contains the main() function, which is the starting point of the app’s execution.
The generated main.dart file is a bit cluttered, so you can replace it with a simpler one:
// weather_step_counter/lib/main.dart
import 'package:flutter/material.dart';


void main() {
 runApp(const MyApp());
}
This code initializes the Flutter app by defining the main() function, instantiating the MyApp widget, and running the app with the runApp() function.
App.dart is the root widget of our app.
// weather_step_counter/lib/app.dart
import 'package:flutter/material.dart';


class App extends StatelessWidget {
 const App({super.key});


 @override
 Widget build(BuildContext context) {
   return MaterialApp(
     title: 'Decode Step Counter & Weather Forecast',
     home: HomeScreen(),
   );
 }
}
The file holds the App class, which extends StatelessWidget to represent our app.
Inside the build method, we return a MaterialApp widget, which acts as the container for our entire app.
We set the title to “Decode Step Counter & Weather Forecast” and set the home property to our Home widget, which we’ll create next.
In Flutter, widgets are the fundamental building blocks of the app’s UI.
In this section, we’ll explore the concept of widgets:
Widgets in Flutter represent the visual elements of an app’s UI.
They determine the appearance and behavior of the UI based on the current state and configuration. Whenever a widget’s state changes, it rebuilds its description.
Flutter then compares the new description with the previous one to determine the minimal changes it needs to render in the UI.
To define a widget in Flutter, we create a new class that extends either StatelessWidget or StatefulWidget.
A StatelessWidget represents a part of the user interface that remains unchanged over time.
It gets drawn once and doesn’t redraw unless external factors, such as its parent widget, trigger a re-render of the entire UI. It’s suitable for components that don’t require dynamic behavior.
On the other hand, a StatefulWidget can change over time. It maintains internal state data that can trigger a rebuild of the widget whenever the state changes. This allows for dynamic behavior in response to user interactions or other events.
Let’s take a look at an example of a simple widget in the context of our app:
// weather_step_counter/lib/features/core/presentation/screens/home/home_screen.dart
import 'package:flutter/material.dart';


class HomeScreen extends StatelessWidget {
 const HomeScreen({super.key});

 @override
 Widget build(BuildContext context) {
   return Scaffold(
     appBar: AppBar(
       title: const Text('Decode Step Counter & Weather Forecast'),
     ),
     body: const Center(
       child: Text(
         'Welcome to Decode Step Counter & Weather Forecast!',
         style: TextStyle(fontSize: 20),
       ),
     ),
   );
 }
}
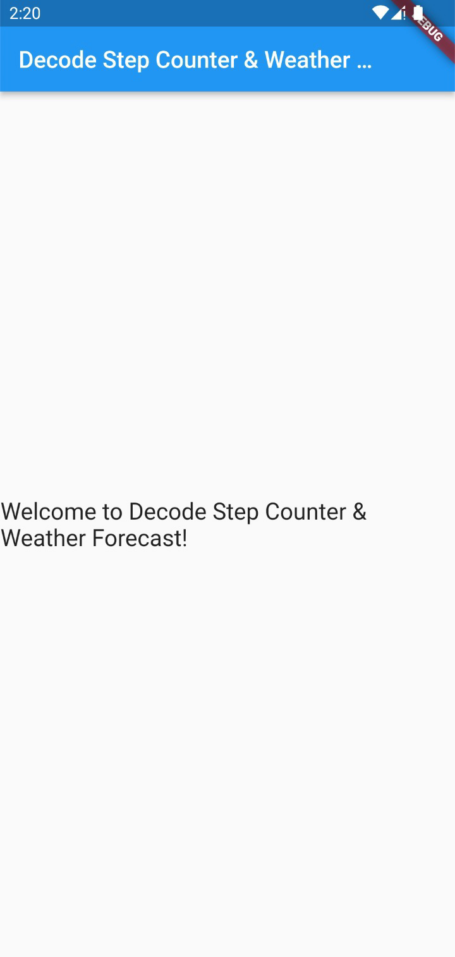
The widget above represents a custom widget that our app uses as the initial screen for our app – HomeScreen.
HomeScreen is a class that extends the StatelessWidget class provided by Flutter. By extending StatelessWidget, the HomeScreen class becomes immutable and its state cannot change once instantiated.
The build() method is overridden to define the UI hierarchy of the HomeScreen widget.
Inside the build() method, a Scaffold widget is returned. The Scaffold widget is a pre-built Flutter widget that provides a basic app structure with an app bar, a body, and other optional components.
The appBar property of Scaffold is set to an AppBar widget. It represents the app bar at the top of the screen. In this case, it has a title that displays the text “Decode Step Counter & Weather Forecast”.
The body property of Scaffold is set to a Center widget.
The Center widget is a layout widget that centers its child widget horizontally and vertically. In this case, it contains a Text widget as its child.
The Text widget displays the text “Welcome to Decode Step Counter & Weather Forecast!” at the center of the screen.
To make sure you can run the app, make sure you import the HomeScreen widget in app.dart file:
// weather_step_counter/lib/app.dart
import 'package:flutter/material.dart';
import 'package:weather_step_counter/features/core/presentation/screens/home/home_screen.dart';


class App extends StatelessWidget {
 const App({super.key});


 @override
 Widget build(BuildContext context) {
   return const MaterialApp(
     title: 'Decode Step Counter & Weather Forecast',
     home: HomeScreen(),
   );
 }
}
Finally, run the app and this is what you should see:
Now, we’ll create a widget that allows the user to increment the number of steps:
// weather_step_counter/lib/features/core/presentation/widgets/step_counter_widget.dart
import 'package:flutter/material.dart';


class StepCounterWidget extends StatefulWidget {
 const StepCounterWidget({super.key});


 @override
 State<StepCounterWidget> createState() => _StepCounterWidgetState();
}


class _StepCounterWidgetState extends State<StepCounterWidget> {
 int stepCount = 0;


 void incrementStepCount() {
   setState(() {
     stepCount++;
   });
 }


 @override
 Widget build(BuildContext context) {
   return Column(
     children: [
       Text('Step Count: $stepCount'),
       ElevatedButton(
         onPressed: incrementStepCount,
         child: const Text('Increment'),
       ),
     ],
   );
 }
}
The code above represents a custom widget called StepCounterWidget in a project.
StepCounterWidget is a class that extends the StatefulWidget class provided by Flutter. By extending StatefulWidget, the StepCounterWidget class becomes a mutable widget that can hold and update its own state.
The createState() method is overridden to create and return an instance of the _StepCounterWidgetState class, which is the corresponding state class for StepCounterWidget.
The state class holds the mutable data for the widget and is responsible for managing the state of the StepCounterWidget.
Inside the _StepCounterWidgetState class, an integer variable stepCount is declared to keep track of the number of steps.
The incrementStepCount() method is defined to increment the stepCount value by 1. It uses the setState() method provided by the State class to update the widget’s state and trigger a rebuild.
Inside the build() method, a Column widget is returned. The Column widget allows vertical arrangement of its children.
Inside the Column, a Text widget is added to display the current step count. The stepCount variable is converted to String type, and used to show current number of steps.
Below the Text widget, an ElevatedButton widget is added.
It serves as the increment button for the step count. It has an onPressed callback set to the incrementStepCount method, and its child is set to display the text “Increment“
Widget nesting is a powerful concept in Flutter that enables building complex UI layouts by combining and organizing smaller, reusable widgets into larger ones.
Each widget can have its own properties, behavior, and visual representation.
By nesting widgets, we can create rich and interactive user interfaces that consist of multiple components and subcomponents.
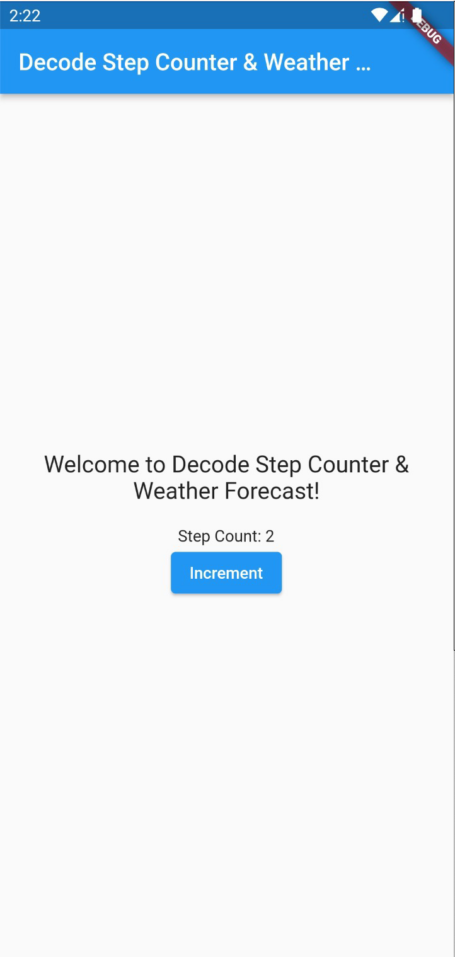
To illustrate the concept, we’ll nest our StepCounterWidget inside the HomeScreen widget, so our app could provide an interface for users to increase their number of steps, as well as to see how many steps they’ve already made.
// weather_step_counter/lib/features/core/presentation/screens/home/home_screen.dart
import 'package:flutter/material.dart';
import 'package:weather_step_counter/features/core/presentation/widgets/step_counter_widget.dart';


class HomeScreen extends StatelessWidget {
 const HomeScreen({super.key});


 @override
 Widget build(BuildContext context) {
   return Scaffold(
     appBar: AppBar(
       title: const Text('Decode Step Counter & Weather Forecast'),
     ),
     body: Column(
       mainAxisAlignment: MainAxisAlignment.center,
       children: const [
         Text(
           'Welcome to Decode Step Counter & Weather Forecast!',
           style: TextStyle(fontSize: 20),
           textAlign: TextAlign.center,
         ),
         SizedBox(height: 20),
         StepCounterWidget(),
       ],
     ),
   );
 }
}
In the above code, we made two important changes to the previous version of HomeScreen:
Instead of using just the Center widget, we replaced it with a Column widget to allow for multiple child widgets to be arranged vertically.
The reason for the second change was to accommodate the addition of the StepCounterWidget.
By using a Column widget, we can now include multiple child widgets within the body of the HomeScreen.
We now have three widgets inside the Column widget:
Here’s what your app should look like:
In the previous section, we used Flutter’s State class and setState widget to manage the app’s state. That’s fine for simple functionalities.
However, when we have complex apps that handle complex states, it’s better (and easier) to use specialized tools to handle state for us.
In this section, we’ll use FlutterBloc to handle the weather forecast state of our apps.
FlutterBloc is a state management library for Flutter that follows the BLoC (Business Logic Component) architectural pattern.
BLoC is a design pattern that separates the business logic of an app from its presentation layer. It helps in managing the state of the app by organizing the code into reusable components.
FlutterBloc consists of the following key components:
Bloc is a logical unit that contains the business logic of an app. It receives input events, processes them, and emits output states. It’s responsible for handling business logic and state management.
Event is a user action or an occurrence that triggers a state change in the app. Examples of events can be a button click, user input, or a network response.
State represents the current state of the app. It can be the loading state, success state, error state, or any other state relevant to the app’s business logic.
BlocBuilder is a Flutter widget provided by the FlutterBloc library that simplifies the process of building UI components based on the current state emitted by a bloc. It automatically rebuilds the UI whenever the state changes.
BlocProvider is a Flutter widget provided by the FlutterBloc library that allows the bloc to be accessible to the entire widget tree. It manages the lifecycle of the bloc and provides it to the widgets that need access to it.
We’ll use Flutter bloc to retrieve weather data for the city of Zagreb and provide received weather information to the UI.
First, we need to do a few things:
Dio is a library in Dart and Flutter that makes it easy to send HTTP requests and handle responses. It provides a simple and convenient way to interact with APIs and web services.
With Dio, we can:
Start by adding the dio package to your pubspec.yaml file:
dependencies:
 flutter:
   sdk: flutter
 dio: ^5.1.2
Run the command flutter pub get in your terminal to fetch and install the package.
Equatable is a Dart package that provides an easy way to implement value-based equality for Dart objects.
By extending the Equatable class and overriding the props getter, Equatable allows us to compare objects based on the values of their properties rather than their references.
Start by adding the equatable package to your pubspec.yaml file:
dependencies:
 flutter:
   sdk: flutter
 dio: ^5.1.2
 equatable: ^2.0.5
Run the command flutter pub get in your terminal to fetch and install the package.
The flutter_bloc package is a Flutter library that implements the BLoC (Business Logic Component) pattern.
It provides classes and utilities to help manage the state of your app and handle the communication between the UI layer and the data layer.
Start by adding the flutter_bloc package to your pubspec.yaml file:
dependencies:
 flutter:
   sdk: flutter
 dio: ^5.1.2
 equatable: ^2.0.5
 flutter_bloc: ^8.1.3
Run the command flutter pub get in your terminal to fetch and install the package.
Models are like blueprints that define how data should be structured and organized. When working with APIs, models help us make sense of the data we receive or send.
Here’s why we create models:
By creating models, we establish a consistent way of handling data, making our code more maintainable and efficient.
In the code snippet below, we created a model for weather data:
It also holds fromJson() constructor that parses JSON response received from the api, and creates an instance of the model.
// weather_step_counter/lib/features/weather/domain/models/weather/weather_model.dart
class WeatherModel {
 const WeatherModel({
   required this.locationName,
   required this.locationTempC,
 });


 final String locationName;
 final double locationTempC;


 factory WeatherModel.fromJson(Map<String, dynamic> json) {
   final Map<String, dynamic> location = json['location'];
   final Map<String, dynamic> current = json['current'];


   return WeatherModel(
     locationName: location["name"] as String,
     locationTempC: current["temp_c"] as double,
   );
 }
}
We’re now ready to create a bloc for the weather functionality.
A bloc consists of three components:
The Bloc State represents the different states that a Bloc can be in. It defines the data and status in a bloc at any given moment.
In the context of WeatherBloc, it holds information about the weather forecast.
We’ll define WeatherBlocState as being able to be in following states:
// weather_step_counter/lib/features/weather/presentation/blocs/weather/weather_bloc_state.dart


import 'package:equatable/equatable.dart';
import 'package:weather_step_counter/features/weather/domain/models/weather/weather_model.dart';


abstract class WeatherBlocState extends Equatable {
 const WeatherBlocState();


 @override
 List<Object> get props => [];
}


class WeatherBlocStateInitial extends WeatherBlocState {}


class WeatherBlocStateLoading extends WeatherBlocState {}


class WeatherBlocStateSuccess extends WeatherBlocState {
 final WeatherModel weatherModel;


 const WeatherBlocStateSuccess(this.weatherModel);


 @override
 List<Object> get props => [weatherModel];
}


class WeatherBlocStateFailure extends WeatherBlocState {
 final String errorMessage;


 const WeatherBlocStateFailure(this.errorMessage);


 @override
 List<Object> get props => [errorMessage];
}
Note that we’re extending the Equatable class when creating the state.
In the context of bloc states, Equatable helps us with comparing states; When emitting new states from a bloc, Equatable ensures that only states with different property values are considered as distinct states.
This helps to avoid unnecessary UI updates when the state remains the same.
Bloc Events represent the actions or events that trigger state change in a Bloc.
In our example, the only event defined is WeatherBlocEventFetch which will trigger when the user wants to fetch the weather forecast data. Other events could be added based on the requirements of the app.
// weather_step_counter/lib/features/weather/presentation/blocs/weather/weather_bloc_event.dart


import 'package:equatable/equatable.dart';


abstract class WeatherEvent extends Equatable {
 const WeatherEvent();


 @override
 List<Object> get props => [];
}


class WeatherEventFetch extends WeatherEvent {
 const WeatherEventFetch();
}
Finally, we create the WeatherBloc.
The bloc, as shown below, is able to receive the event for fetching weather data, upon which it uses Dio to retrieve weather information from a remote source, and provides it to UI.
Here’s the code:
// weather_step_counter/lib/features/weather/presentation/blocs/weather/weather_bloc.dart


import 'package:dio/dio.dart';
import 'package:flutter_bloc/flutter_bloc.dart';
import 'package:weather_step_counter/features/weather/domain/models/weather/weather_model.dart';
import 'package:weather_step_counter/features/weather/presentation/blocs/weather/weather_bloc_event.dart';
import 'package:weather_step_counter/features/weather/presentation/blocs/weather/weather_bloc_state.dart';


const String weatherApiUrl = 'https://api.weatherapi.com/v1/current.json';
const String weatherApiKey = 'DONT_KEEP_YOUR_API_KEYS_IN_SOURCE_CODE';
const String weatherApiCity = 'Zagreb';


class WeatherBloc extends Bloc<WeatherBlocEvent, WeatherBlocState> {
 WeatherBloc() : super(WeatherBlocStateInitial()) {
   _registerEventHandlers();
 }


 void _registerEventHandlers() {
   on<WeatherBlocEventFetch>(
     _onWeatherFetchEvent,
   );
 }


 Future<void> _onWeatherFetchEvent(
   WeatherBlocEventFetch event,
   Emitter<WeatherBlocState> emit,
 ) async {
   emit(WeatherBlocStateLoading());


   try {
     final Response<dynamic> response = await Dio().get(
       'https://api.weatherapi.com/v1/current.json',
       queryParameters: {
         'key': weatherApiKey,
         'q': weatherApiCity,
       },
     );


     if (response.statusCode != 200) {
       throw Exception('Failed to fetch weather data');
     }


     final dynamic weatherData = response.data;
     final WeatherModel weatherModel = WeatherModel.fromJson(weatherData);


     emit(WeatherBlocStateSuccess(weatherModel));
   } catch (e) {
     emit(const WeatherBlocStateFailure('Failed to fetch weather data'));
   }
 }
}
Here’s a detailed explanation of what’s happening in the code:
Since we’ve now created the logic to retrieve and provide weather information to our app, let’s create a widget that will use this data to present weather information to the user.
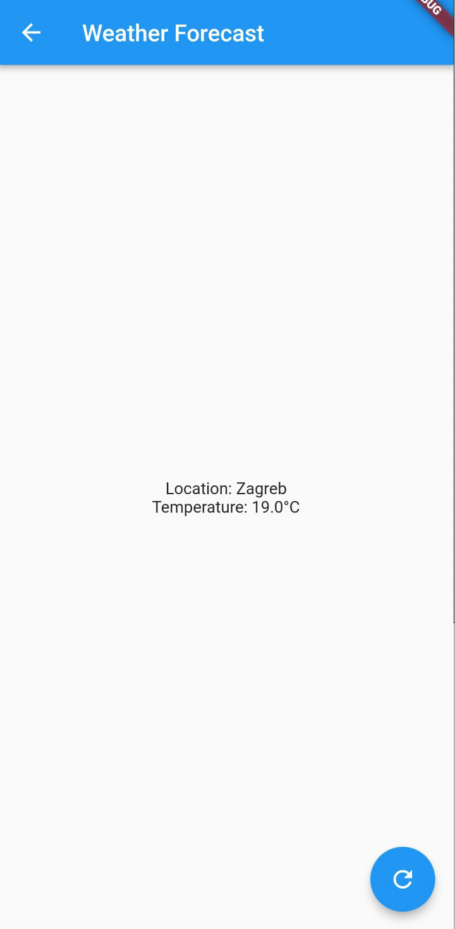
We’ll show the weather information in a simple widget – WeatherScreen, which is defined as follows:
// weather_step_counter/lib/features/weather/presentation/screens/weather/weather_screen.dart


import 'package:flutter/material.dart';
import 'package:flutter_bloc/flutter_bloc.dart';
import 'package:weather_step_counter/features/weather/domain/models/weather/weather_model.dart';
import 'package:weather_step_counter/features/weather/presentation/blocs/weather/weather_bloc.dart';
import 'package:weather_step_counter/features/weather/presentation/blocs/weather/weather_bloc_event.dart';
import 'package:weather_step_counter/features/weather/presentation/blocs/weather/weather_bloc_state.dart';


class WeatherScreen extends StatelessWidget {
 const WeatherScreen({super.key});


 @override
 Widget build(BuildContext context) {
   return BlocProvider(
     create: (context) => WeatherBloc(),
     child: Builder(builder: (builderContext) {
       return Scaffold(
         appBar: AppBar(
           title: const Text('Weather Forecast'),
         ),
         body: Center(
           child: BlocBuilder<WeatherBloc, WeatherBlocState>(
             builder: (context, state) {
               if (state is WeatherBlocStateLoading) {
                 return const Center(child: CircularProgressIndicator());
               } else if (state is WeatherBlocStateSuccess) {
                 final WeatherModel weatherModel = state.weatherModel;
                 return Column(
                   children: [
                     Text('Location: ${weatherModel.locationName}'),
                     Text('Temperature: ${weatherModel.locationTempC}°C'),
                   ],
                 );
               } else if (state is WeatherBlocStateFailure) {
                 return Text(
                     'Failed to fetch weather data: ${state.errorMessage}');
               } else {
                 return const Text('No weather data available');
               }
             },
           ),
         ),
         floatingActionButton: FloatingActionButton(
           onPressed: () {
             BlocProvider.of<WeatherBloc>(builderContext)
                 .add(const WeatherBlocEventFetch());
           },
           child: const Icon(Icons.refresh),
         ),
       );
     }),
   );
 }
}
The WeatherScreen widget is another stateless widget that displays the weather forecast UI.
It consists of:
Here’s what the screen should look like:
Important widgets in the code snippet are BlocBuilder and BlocProvider.
BlocProvider:
The BlocProvider widget is a Flutter widget provided by the flutter_bloc package that is used to provide an instance of a bloc to its descendant widgets.
It’s typically placed at the top of the widget tree to ensure that all descendant widgets can access the provided bloc.
In the code snippet, BlocProvider is used to provide an instance of the WeatherBloc to the WeatherScreen widget and its descendants.
It’s wrapped around the Scaffold widget, indicating that the provided bloc is available throughout the widget subtree.
The create parameter of BlocProvider is a callback function that is responsible for creating and returning the instance of the bloc.
In this case, WeatherBloc() is used to create a new instance of the WeatherBloc.
Using BlocProvider helps with managing the lifecycle of the bloc and ensures that only one instance of the bloc is created and shared among the widget tree.
It simplifies the process of providing and accessing the bloc within the app and promotes the separation of concerns between the UI and the business logic handled by the bloc.
BlocBuilder
The BlocBuilder widget is used to listen to state changes in a WeatherBloc instance. It takes two arguments:
The builder function is called whenever the state changes, and it receives the current context and state as parameters.
Inside the builder function, we check the type of the state using if-else conditions.
If the state is WeatherBlocStateLoading, we display a CircularProgressIndicator widget at the center of the screen, indicating that the weather data is being loaded.
If the state is WeatherBlocStateSuccess, we retrieve the WeatherModel from the state and display the location name and temperature.
If the state is WeatherBlocStateFailure, we display an error message along with the error message from the state.
If the state is none of the above, we display a default message indicating that no weather data is available.
One interesting part is the floatingActionButton widget.
This button triggers an onPressed event when pressed. Inside the event handler, we use BlocProvider.of<WeatherBloc>(builderContext) to access the currently active WeatherBloc instance in the BuildContext and dispatch a WeatherBlocEventFetch event.
This’ll make the bloc fetch the weather data from the API, as previously defined in the WeatherBloc class:
 void _registerEventHandlers() {
   on<WeatherBlocEventFetch>(
     _onWeatherFetchEvent,
   );
 }
Note that we passed builderContext to the of() method, instead of the top-most context.
This is because the top-most context does not hold an instance of the WeatherBloc, as the BlocProvider injects it only in widgets that are its direct descendants.
With this, we now have a way to know what the weather is like in Zagreb.
However, we still have a small problem: There is no way for us to reach the WeatherScreen from the HomeScreen.
Let’s fix that.
To navigate from the HomeScreen to the WeatherScreen, we need to add a button on the HomeScreen that will trigger the navigation event.
Flutter provides various navigation techniques, and in this case, we’ll use the Navigator widget to push the WeatherScreen onto the navigation stack.
Navigator is a class in Flutter that manages the navigation stack and facilitates the navigation between screens (routes) in a Flutter app.
It provides methods for pushing, popping, and replacing routes, allowing the user to move between different screens and maintain the history of visited screens.
The Navigator class operates on a stack-like structure called the “route stack” or “navigation stack”. Each route represents a screen or a page in the app.
When a new route is pushed onto the stack, it becomes the active route and is displayed on the screen. When a route is popped or removed from the stack, the previous route becomes active and is displayed again.
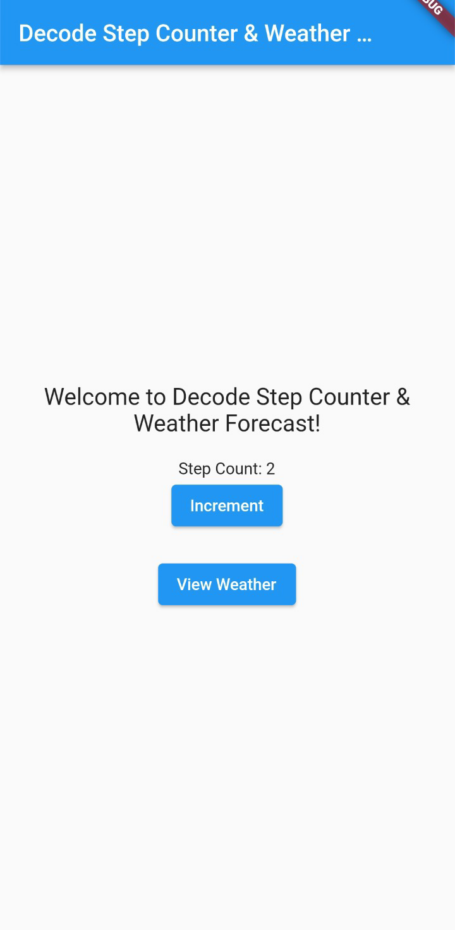
Inside the HomeScreen widget, we can add a button using the ElevatedButton widget. When the button is pressed, we’ll call Navigator.push to navigate to WeatherScreen:
// weather_step_counter/lib/features/core/presentation/screens/home/home_screen.dart
import 'package:flutter/material.dart';
import 'package:weather_step_counter/features/steps/presentation/widgets/step_counter_widget.dart';
import 'package:weather_step_counter/features/weather/presentation/screens/weather/weather_screen.dart';


class HomeScreen extends StatelessWidget {
 const HomeScreen({super.key});


 @override
 Widget build(BuildContext context) {
   return Scaffold(
     appBar: AppBar(
       title: const Text('Decode Step Counter & Weather Forecast'),
     ),
     body: Column(mainAxisAlignment: MainAxisAlignment.center, children: [
       const Text(
         'Welcome to Decode Step Counter & Weather Forecast!',
         style: TextStyle(fontSize: 20),
         textAlign: TextAlign.center,
       ),
       const SizedBox(height: 20),
       const StepCounterWidget(),
       const SizedBox(height: 20),
       ElevatedButton(
         onPressed: () {
           Navigator.push(
             context,
             MaterialPageRoute(
               builder: (context) => const WeatherScreen(),
             ),
           );
         },
         child: const Text('View Weather'),
       ),
     ]),
   );
 }
}
Navigator.push is a method provided by Flutter’s Navigator class. It is used to navigate from one screen (route) to another in a Flutter app.
The push method takes two parameters: the BuildContext and a Route object that defines the destination screen.
In the code snippet, Navigator.push is called when the “View Weather” button is pressed. It takes the current context and a MaterialPageRoute as parameters.
Here’s our HomeScreen with the new button:
The MaterialPageRoute is responsible for defining the destination screen, which in this case is the WeatherScreen.
By calling Navigator.push, the WeatherScreen is pushed onto the navigation stack and becomes the active screen.
MaterialPageRoute is a built-in Flutter class that represents a route for a new screen. It provides a transition animation and manages the lifecycle of the screen.
When creating a MaterialPageRoute, we specify the builder parameter, which defines the widget tree for the new screen.
In the code snippet, MaterialPageRoute is used to define the destination screen when navigating from the HomeScreen to the WeatherScreen.
The builder parameter is set to a callback function that returns an instance of the WeatherScreen.
Now, when the “View Weather” button is pressed on the HomeScreen, it will navigate to the WeatherScreen, where the weather forecast will be displayed based on the state of the WeatherBloc.
With this navigation setup, users can easily switch between the HomeScreen and WeatherScreen to view the weather information for Zagreb.
Throughout this article, we covered the basics of Flutter app development, including project setup, widget creation, and the use of Flutter Bloc for managing state.
By following the steps outlined in this article, you should now have a good foundation for building Flutter apps, understanding FlutterBloc for state management, and navigating between screens using the Navigator.
We explored the concepts of stateless and stateful widgets, and how they contribute to building dynamic user interfaces.
We also delved into the integration of FlutterBloc to provide weather information in our app, demonstrating how to create blocs, handle events and states, and consume bloc state changes using the BlocBuilder widget.
In conclusion, Flutter is a powerful framework for building cross-platform mobile apps with a single codebase.
It offers a rich set of widgets, efficient performance, and a reactive programming model. Flutter’s ability to provide a native-like user experience across multiple platforms makes it a popular choice for app development.
With Flutter’s flexibility, extensive widget library, and the powerful state management capabilities of FlutterBloc, you can create high-quality mobile apps for various platforms efficiently and effectively.
You can find the full code here.
Happy coding with Flutter!

This article will discuss the basics of mobile app architecture and why it's important in app development.

In this article, we'll discuss the common pitfalls of cross-platform development.

Before developing an app, it’s important to note that there are different technologies you can employ, and be aware of the differences between them Whether you choose to build a native, hybrid, or cross-platform app, each of these technologies has its own pros and cons, depending on the nature of your project. In this article, we’ll offer you some insight into native and cross-platform technologies.