

Wireframe vs. mockup vs. prototype: differences explained
This article will explain the differences between wireframe, mockup, and prototypes. It will also explain when you should use each.
Like art, app wireframes come in several flavors and levels of detail.
Some are mere rough sketches that probably took a few minutes to flesh out. Others are highly-detailed masterpieces that could be mistaken for a screenshot of the complete app.
But using one over the other isn’t down to preference alone.
It’s dictated by your current situation—where you are in app development, how much time you can commit to it, and the funds at your disposal.
In this article, we’ll talk about fidelities—the level of detail in your wireframe—and how to pick the right one for your project.
A wireframe is essentially a blueprint of your app. A basic 2D outline that gives you an idea of the elements and features that will appear in the final app.
The term most likely comes from the process of creating dolls and paper mache figurines.
Here, a rough skeleton of the figure is made using wires, which serve as the foundation where paint and other elements will be layered on.
Wireframe apps serve the same purpose. Here’s what one of them looks like:

The main focus of a wireframe is to visualize an app idea on paper. That allows other people to give feedback on it. The developer can then use these insights to refine the app idea further.
At the minimum, a wireframe must show the app’s structure, functionality, and layout. It should communicate to the users the main premise and the features that will deliver that.
Wireframes also typically illustrate the user flow or how someone would navigate from one screen to another.
This is crucial to spot any unnecessary steps and bottlenecks that could lead to friction and poor UX.

Wireframes should be built very rapidly despite the amount of information they need to convey. That way, you can quickly validate and refine your app idea with minimal time and effort.
Thus, wireframes tend to be on the simple side. A wireframe usually involves only simple shapes, such as boxes, to represent UI elements.
Colors and graphics are never used unless doing so serves a practical function.
This wireframe by Anami Chan is a good example. Notice how the colors serve to signal a spot’s weather condition instantly and not just for decoration.

Source: Anami Chan
Wireframes are often created digitally using graphics programs or dedicated wireframe tools like Figma.
However, they can also be fleshed out using nothing more than a pen and paper. This process is called paper prototyping.
Such sketches are beneficial because they are easy and quick, and you can draw them anywhere inspiration hits you. Plus, you don’t need to learn new software or tools to do it.

Now that we’ve cleared up what a wireframe is, let’s see why you need to bother with them in the first place.
Wireframes are perhaps the most crucial planning tool you have at your disposal. They allow you to rapidly validate and refine your app idea with input from multiple perspectives.
Aside from getting a quality product down the line, a wireframe can also help uncover issues before a developer writes a single line of code.
Plus, according to the 1-10-100 rule, the cost of fixing problems grows exponentially the later you do it in the process. Thus, wireframing can lower your development costs.

Wireframes are also essential for communicating your app idea in a way everyone understands.
See, you might intuitively understand that idea in your head, but others might not. And describing it to someone verbally isn’t always ideal or reliable.
But if you use a wireframe, you can communicate to your developers and team members exactly how you want the app to function.
It also acts as a reference point so that the entire team is always on the same page.
Adding annotations to a wireframe also helps lay out the app’s interactive behavior and actions you want to happen.
You can even give specific instructions so that developers don’t second-guess your expectations, as shown in the example below:
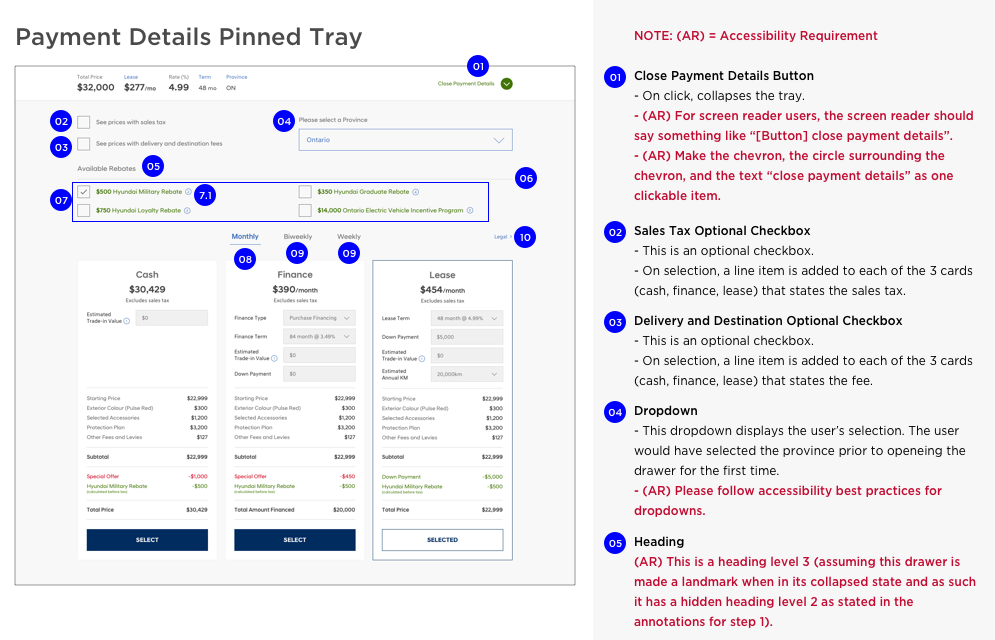
Source: Adobe
Lastly, wireframes are often the foundation for other planning tools, such as mockups and prototypes. This helps minimize the time and effort needed to create them.
Now would be a good time to introduce the concept of fidelities or the level of detail in your wireframe. You’ll generally encounter two types: low-fidelity and high-fidelity wireframes.
A low-fidelity wireframe is a simple outline that uses only basic shapes and text to represent UI elements.
They act as the initial blueprint or skeleton of the app, showing the core features and roughly where they are in the UI design.
Often, when someone thinks of a wireframe, they tend to have the low-fidelity variant in mind.

Due to their simplicity, low-fidelity wireframes often benefit from annotations. These are labels and instructions that give further context or clarification to UI elements in the wireframe.
Including them is vital for preventing misunderstanding and miscommunication.
Thanks to how minimal low-fidelity wireframes are, most of them can be sketched on paper.
Compared to digital wireframes, paper sketches can be fleshed out in a flash. And you can incorporate feedback from people just as easily.
However, it’s also vital not to underdo a low-fidelity wireframe. In other words, it shouldn’t be so simple that it fails to communicate the idea properly, such as this one below:
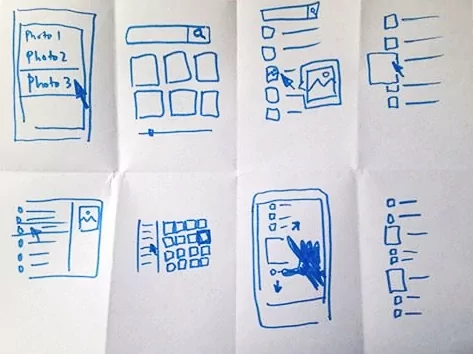
Source: Google Ventures Library
Chances are, the viewer won’t know each screen’s purpose or what your app’s entire point is. In this case, simple annotations would make a world of difference.
But despite how abstract they might be, low-fidelity wireframes can still deliver plenty of benefits down the road.
The polar opposite of a low-fidelity sketch is a high-fidelity wireframe. This type involves much more detail and often includes design elements like colors, fonts, and images.
Here are the two side-by-side to give you a rough idea of the difference in their detail levels.

While a low-fidelity wireframe deals with broader strokes, a high-fidelity wireframe is concerned with more granular details. This can include layout, information architecture, and spacing.
In some cases, a high-fidelity wireframe achieves a level of detail that makes it look like the final version of the app.
This is called a mockup, a planning tool used to illustrate the final UI design of the app.
High-fidelity wireframes could include interactive elements like clickable links or buttons.
At this point, such a wireframe becomes a prototype, which is used to test the usability of an app with end users.

But even if a high-fidelity wireframe involves more details, you shouldn’t get carried away. Only include elements that are necessary to convey your idea.
Remember, even a high-fidelity wireframe is still a wireframe, so you should create it as rapidly as possible. If it takes too long, it might make it difficult to test and optimize your app idea.
Now that we’ve covered the definition, let’s talk about when you should use each type of wireframe.
Low-fidelity wireframes are suitable when speed is much more desirable than details.
This is always the case at the beginning of the development process. At this stage, you’re still trying to refine your app idea.
The chief way to do that is to gather as much feedback as possible, incorporate those insights into your app design, and then repeat the process.
Low-fidelity wireframes, especially sketches, are naturally suited to this task. If you stick to a rough draft, you can easily polish an app idea quickly with multiple iterations.
Unsurprisingly, many successful apps and websites—such as Twitter—relied on low-fidelity wireframes during their early days.
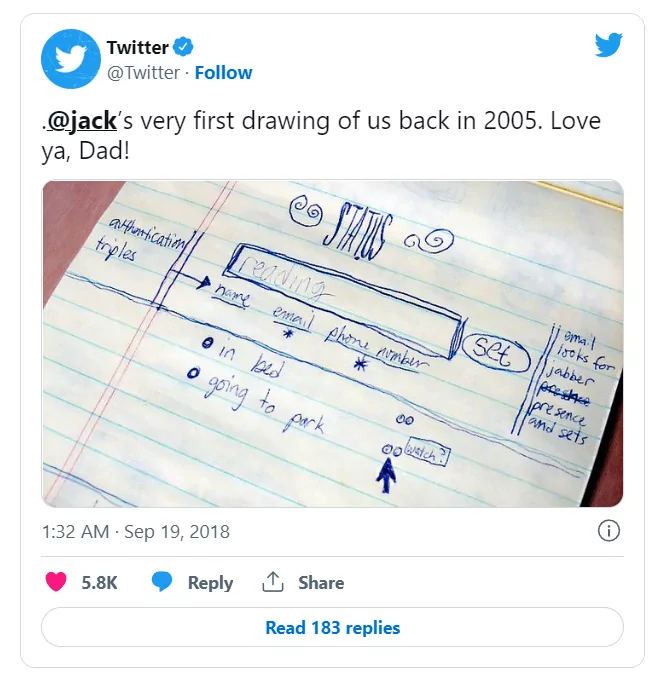
Source: Twitter
The speed of low-fidelity wireframes also makes them a great tool for visualizing complex apps with hundreds of screens.
That’s because creating a detailed outline of every screen would be tedious and time-consuming.
Low-fidelity wireframes are also a great foundation for your app development, which is why you’ll almost always start with them.
For example, you can start with a rough sketch to iron out your app idea, then slowly add elements to that and turn it into a mockup.
Add some interactive components, and you have a prototype.

Finally, a low-fidelity wireframe is a potential cost-saver. It allows you to nail down the exact requirements of your app first before committing the time and resources to a more detailed mockup.
Imagine spending days developing a detailed screen on your high-fidelity wireframe, only to realize it’s not needed after all.
That’s the kind of issue a low-fidelity wireframe can help you avoid.
Generally, a high-fidelity wireframe comes later in the process. Ideally, it would be best if you only considered it once you already have a finalized low-fidelity wireframe.
The reason is obvious—high-fidelity wireframes require more time and resources to create.
But thanks to more details in a high-fidelity wireframe, it’s invaluable for evaluating your app’s UI and UX design. It’s needed to spot and fix nuances and minor errors in your UI layout.
You can also use it to optimize your information architecture, content hierarchy, and navigation scheme.

High-fidelity wireframes and prototypes are also great for testing interactivity relatively fast.
That’s because, compared to a fully functional app, the response time of even the most detailed wireframe is still quicker.
High-fidelity wireframes are also essential if you need approval from stakeholders like clients and end-users.
The problem is that these people might not have the design skills to evaluate a low-fidelity sketch properly.
This can lead them to point out the wrong things or suggest inappropriate changes, prolonging the approval process.
A high-fidelity wireframe is also easier to judge because it requires minimal imagination and mental load. What the client sees is close to what they’ll expect from the final version of the app.
Plus, a high-fidelity wireframe makes a better first impression. After all, a rough sketch (like the one below) will probably not inspire confidence in potential investors.
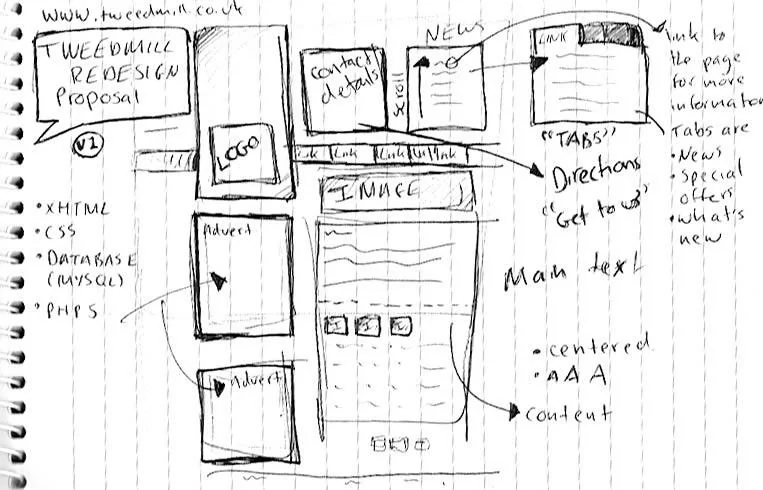
Source: Jakob Linowski
Of course, you can always stick with a high-fidelity wireframe if you have the time and funds to commit to it.
This is often the case when working on a personal project or an app for a large company.
The bottom line is that both high and low-fidelity wireframes have their place in app development.
Low-fidelity wireframes are great for getting things started right away.
Since they can be sketched out very rapidly, they’re best used when you’re just refining your app idea or if you have limited time and resources.
However, their biggest disadvantage is that they might be too simple. Thus, it might be challenging to communicate certain information with such little detail.
Conversely, a high-fidelity wireframe is suitable to convey more information and detail.
They allow people to see exactly what your app will look like, making it easy for stakeholders to visualize it with a minimal mental load.
Of course, a huge drawback with high-fidelity wireframes is that they take more time and money to create.
Such a wireframe might not be feasible in projects with tight schedules or limited funds.
But in the end, you should pick the right wireframe fidelity based on your situation and your current app stage. The truth is that they’re both very effective if used properly.
Whether low or high fidelity, wireframes are exceptionally valuable in helping you design a successful app.
However, wireframes are just one of several tools at your disposal, such as mockups and prototypes. Together, they allow you to evaluate your app idea from different perspectives.
For the best results, you should implement these methods in tandem.
And if you have no idea where to start learning about them, we have just the resources for you.
We recommend reading this article for a primer on creating app mockups. Once you’re done with that, you can also check out this excellent read on app prototypes.

Petar leads Shake (DECODE’s sister company) as CEO, delivering the product to a growing number of happy, innovative clients. Day-to-day, he ensures the engineering, design, product, marketing and sales teams all work in harmony. Before moving to Shake, Petar led DECODE. Although an engineer by schooling, his natural talent soon saw him making an impact on the marketing, sales and branding side of things. Petar’s passions include architecture, skiing, sailing, and a good glass of red wine.
This article will explain the differences between wireframe, mockup, and prototypes. It will also explain when you should use each.

Designing wireframes can be deceptively complex. To help you out and inspire you, we'll cover 20+ mobile app wireframe examples in this article.

If you're looking to create a mobile app, wireframing is one of the best ways to get started. To motivate you, we cover six benefits of app wireframing.