Mastering the fundamentals generally takes up to six months. And If you want to go deeper and learn best practices it could take up to a few years.
It may sound like a long time, but don’t worry.
We’ve listed all the fundamentals you need to know in order to successfully complete your journey to becoming an android developer
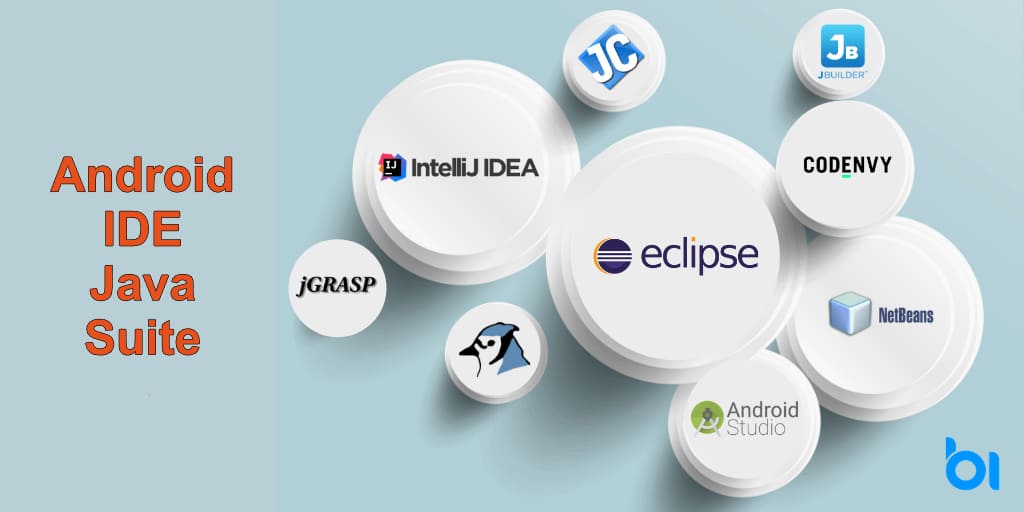
1. Choose an IDE for android development
The first step in your journey is to select an Integrated Development Environment, IDE.
An IDE is a software application that provides comprehensive facilities to computer programmers for software development.
When it comes to writing and editing source code, IDEs have great functionalities such as Syntax highlighting and autocomplete
When an IDE knows the syntax of your language, it provides a visual indication, which makes the code easier to read by visually clarifying different elements of language syntax as shown in the image below.
Source: ncube
It predicts what you’re going to type next, which is a great feature that helps in code writing.
It can complete the names of classes, methods, fields, and keywords within the visibility scope.
Now that we know what are some of the cool features provided by IDEs, let’s look at some of the most popular IDEs used for Android development.
Choosing the ideal IDE to write your app isn’t easy. There are multiple factors to consider before selecting one. However, this blog won’t cover each particular case.
Android Studio is the official IDE for Android development built on JetBrains IntelliJ IDEA software. It’s a software suite that was built by Google and has all the Android development tools built-in for a high-quality Android app.
Some of the most time-saving and productivity-enhancing features are:
Gradle based build system
Fast built-in emulator, but if you want you can use your own mobile device for testing
Built-in support for Google Cloud Platform
A unified environment where you can develop apps for all Android devices
Wide range of frameworks and testing tools
Possibility to push code and resource changes to your running app without restarting it (Apply Changes)
C++ support
Layout Editor
It’s completely free to use, with lots of features that will help you in developing your Android apps.
2. Pick a language
There are only two native Android development languages to choose from – Kotlin and Java.
The main question is: How do you choose?
Well, the answer is not easy. We’ll need to take a deeper look into both languages.
Java
Javahas been Android’s favorite for a decade until it was replaced with Kotlin in 2019. It’s an object-oriented, open-source, class-based programming language.
Although it’s old, there are reasons it was one of the most popular programming languages:
Works on almost every system
Used for websites and mobile apps
Open source
Available public fields
Object-oriented
For a junior developer, learning Java would be a great skill to possess but it isn’t necessary.
Let’s turn our attention to the other language.
Kotlin
Kotlin has taken over from Java as an official android development language. No surprises there. Developed by JetBrains in 2011 and it has been in constant development since then.
Here are the main characteristics of Kotlin:
Concise language
Clean
Lightweight
Combines features of both object-oriented and functional programming
Used for backend, iOS, android and web apps.
Final verdict: Kotlin beats Java.
Once you’ve decided on a language it’s time to get a deeper understanding of what an app actually is.
3. Get familiar with the anatomy of an app
Automotive engineers can’t make a car without knowing which parts it consists of. The same goes for android developers.
Let’s explore the components used to construct an app.
Activities
The best way to understand an activity is to look at an app screen. One app screen represents one activity and vice versa. It is an independent module of app functionality, fully reusable on other apps.
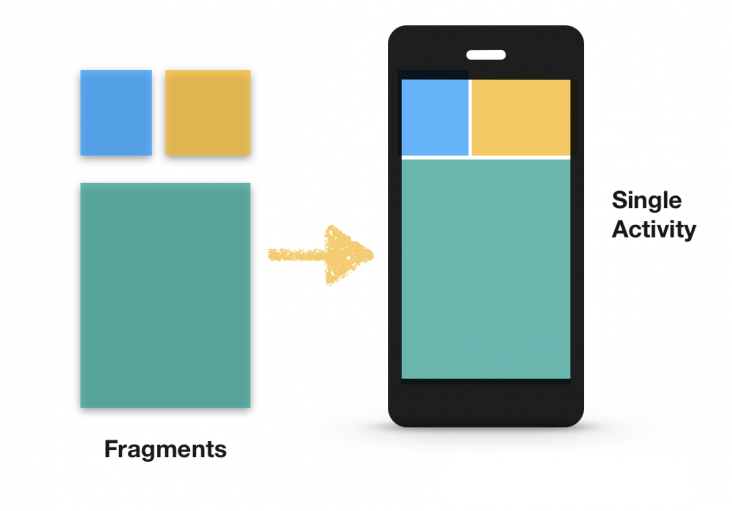
Fragments
While activities make up a single UI screen, fragments make up parts of an activity.
You can look at it as an activity broken into parts.
They’re a more efficient way of representing UI. Also, they’re great when you need to reuse an interface on different screens such as tablets.
In the image, we can clearly see activity being a container for fragments.
Intents
Think of intents as links between activities. They enable you to go from one activity to another or from one screen to another.
We have 3 different types of intents:
Explicit intent- requests launch of an activity by referencing its class name
implicit intent-requests launch of an activity without needing the class name
Broadcast intent- sends intents to all apps that are broadcast receivers
Services
These are all the processes without a user interface.
We have 2 types of services:
Background services
Foreground services
Background services are useful when the app needs to continue performing tasks even though the user’s not using them.
Foreground services can be interacted with, for example, the notification the user gets as they’re listening to music which they can use to control the app without an interface.
Application manifest
There’s an important file that lists all the major app parts. It’s called the AndroidManifest.xml. It lists components such as:
Activities
Services
Broadcast receivers
It’s the root of every android project set.
Resources
Resource files contain resources such as strings, fonts, colors, and images. You can use them for creating the user interface together with the representation of the user interface layouts.
4. Learn the basics of UI
The User interface is the face of your app. It’s also a means of communication between the app and the user. Calling it important would be an understatement.
Not to worry though, Android provides a lot of pre-built components which help in creating apps.
For example, you can build layouts using XML or Jetpack Compose.
The best way to understand the basics of UI is to understand the parts it consists of.
Layouts
The main components of UI are layouts. They define the structure of your app, such as an activity or a fragment.
The View draws the components of the UI, which the user can interact with. A ViewGroup acts as a container for the Views and other ViewGroup objects, as shown in the image above.
Widgets
Widgets/views are the basic building blocks of the UI. A view is a rectangle on the screen that shows some type of content. It can be an image, a piece of text, a button, or anything that an android application can display.
Most commonly used view classes are:
TextView
Button
ImageView
EditText
CheckBox
Spinner
RecyclerView
When it comes to displaying a larger amount of data like lists the RecyclerView component is the right choice.
Need to display some text on the screen? Use TextView Want to allow users to input their own values? Use EditText What if you need to enable some basic interaction? Use the Button component
Now that you know the layout basics you can explore all the other possibilities to use provided by the Android framework.
5. Learn the paradigm of asynchronous programming
It takes time to fetch a larger scale of data from an API or a local database. To reduce that time, asynchronous programming provides efficient validation of the data state.
For example, while fetching data from API we want to display a progress indicator
on the screen to inform the user that an action is in progress.
After the action is finished there are two possible outcomes: either the data was successfully loaded and displayed on the screen or an error message was displayed to inform the user to try again.
Some of the most common options when it comes to asynchronous programming on Android are:
RxJava / RxKotlin, contains a collection of classes and operators that help you reverse certain control flows without losing control of your data streams and events.
The whole concept rests on a combination of the classic Observer and Iterator patterns.
Kotlin Coroutines
As Kotlin progressed it introduced a new option called Kotlin coroutines. The concept of coroutines is not that new, a lot of programming languages had them already.
What’s cool about coroutines is that they allow you to write asynchronous code in a way that looks similar to synchronous. Coroutines are blocks of code that can be suspended.
6. Explore the fundamentals of Android Jetpack
Android Jetpack was introduced back in 2018., and it brought great changes related to building Android apps.
It is a suite of software components and libraries that helps developers to:
Follow best practices
Reduce boilerplate code
Write code consistent with all android versions and devices
In order to understand what Android Jetpack actually does, we’ll take an in-depth look into some of the more important components.
LiveData
LiveData is a Lifecycle aware component and an observabledata holderclass.
An observable object notifies other objects when something in its data changes and that allows the user interface to always match the latest data.
Live data works well in resolving issues such as:
Removes the leaks caused by the interfaces/callbacks that send results to the UI thread.
De-couples tight integration between data, mediator, and the UI layers.
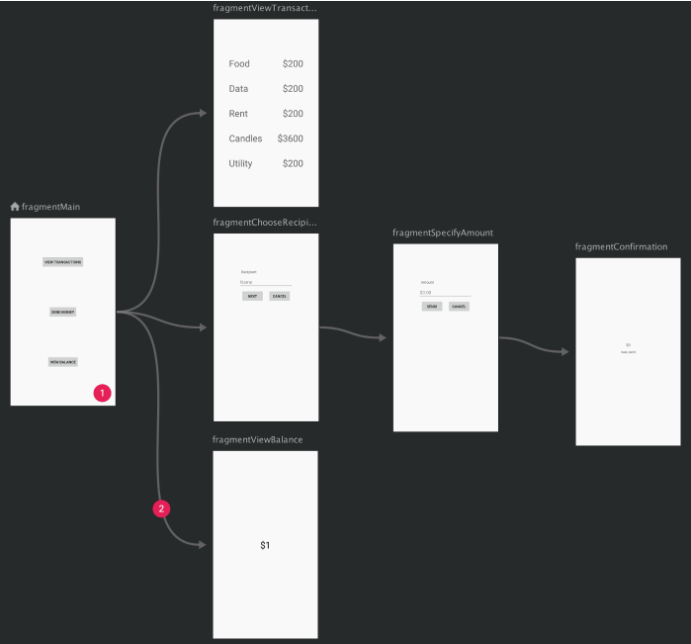
Navigation
Very few Android apps today consist of just a single screen. Most apps contain multiple screens through which the user navigates using screen gestures, button clicks, and so on.
Before the introduction of Android Jetpack, the implementation of navigation within an app was mostly a coding process with no easy way to view and organize potentially complex navigation paths. This situation has improved considerably, with the introduction of the Navigation component.
Source: Android developers
As can be seen from the image, the navigation component makes navigation look easy.
Dagger (Hilt)
In this section, we will not see any practical implementation, just the main benefits and reasons why to use dependency injection (DI) We will cover the basics of Hilt which is a useful and simple-to-learn tool built on top of Dagger that makes DI easy. Another cool tool used for DI on Android is Koin but it works only with Kotlin code.
First let’s solve the question: what is DI?
In software engineering dependency injection is a technique in which one object supplies the dependencies of another object.
So basically what that means is when class X uses some functionality of class Y, it’s said that class X has a dependency on class Y.
This is where Dagger (Hilt) comes into play because it will create all the jobs for us in the need of creating required dependencies which we can then normally use in different places.
Why use DI?
A key goal of software engineering is to produce code that is clean and easy to maintain. The code is clean when it is simple, readable, and understandable. This is not the case with code where dependency injection isn’t used.
One of the best ways of ensuring that your program doesn’t blow up is testing it with unit tests. If you’re not testing your code, you’re doing it wrong.
But sometimes, testing can be difficult and messy. The problem is that dependencies can be hard to mock. Dependency injection can be a huge help in making unit testing work for you.
It’s no secret that software development is hard. The code is complex and constantly changing. Developers are always looking for ways to make development easier. One technique to improve code maintainability is by using dependency injection.
Hilt is built on top of the popular DI library Dagger so benefits from the compile-time correctness, runtime performance, and scalability are well preserved.
It defines a standard way to do DI in your application by providing containers for every Android class in your project.
Hilt automatically generates components for the integration of Android framework classes, scope annotations, and predefined bindings. And one of the main features is that it is integrated with Jetpack libraries so it provides a direct injection of ViewModels, Navigation, WorkManager, and Compose.
DI is a very important part of software development and you should take it seriously because it will make your life easier.
7. Choose where to store your data
There are several options to pick from when it comes to storing your data. First, you need to specify which type and the amount of data you want to store.
If it’s necessary to just store one String or a Boolean value you can use DataStore.
On the other hand, if you want to store a larger amount of complex data, SQLite and Room are the right choices.
Preferences DataStore
DataStore is the way to go if you’re saving primitive data as key-value pairs. It requires a key, which is a String, and the corresponding value. The value can be any of the following: a Boolean, Float, Int, Long, or another String. DataStore is the successor of Shared Preferences.
Benefits of using Preferences DataStore instead of Shared Preferences?
Exposes a Flow representing the current state of data
You don’t have to use apply() or commit() functions to save the changes
It is safe to call on the UI thread because it uses Dispatchers.IO under the hood
Room
Room is designed to store and handle significant amounts of structured data locally. Under the hood, Room is a persistence library, which provides an abstraction layer over the SQLite database.
Key elements of the Room persistence library:
Room Database – the database object provides the interface to the underlying SQLite database. An application should only have one room database instance, which may then be used to access multiple database tables.
Data Access Object (DAO) – contains the SQL statements required to insert, retrieve and delete data within the SQLite database.
Entities – typically a data class that defines the schema for a table within the database and defines the table name, column names, and data types, and identifies which column is to be the primary key.
8. Connect your app to the internet
Network requests are used to retrieve or modify API data from a server. This is a very common task in mobile app development.
So we’ll cover some of the most popular libraries that will make your network handling on Android easy.
Retrofit
Retrofit is a type-safe REST client for Android, which aims to make it easier to consume RESTful web services. It is built on top of OkHttp. Retrofit makes it easy to consume JSON or XML data which are parsed into Plain Old Java Objects (POJOs).
It has many features such as easy to add custom headers and request types, through which we can reduce boilerplate code in our apps and consume the web service easily.
To describe individual API endpoints and ultimately, the handling of requests we use annotations on the methods, such as @GET, @POST, @PUT, and @DELETE. These are just annotations for basic CRUD operations, there are a lot more of them that you can use.
Gson
Gson is a Java library that can be used to convert Java Objects into their JSON representation. It can also be used to convert a JSON string to an equivalent Java object. It works the same way with Kotlin data classes.
Moshi
Moshi is a modern JSON library for Android, Java and Kotlin. It makes it easy to parse JSON into Java and Kotlin classes.
9. Choose the right application architecture
Until the introduction of Android Jetpack Google didn’t recommend a specific approach to building Android applications but only provided tools and development kits while letting developers choose what worked best for a particular project.
At the most basic level, Google now advocates single activity apps where different screens are loaded as content within the same activity.
Also, the recommendation is to separate different areas of responsibility within the app into separate modules known as “separation of concerns”.
The architecture gives you a roadmap and best practices to follow when building an application so that you end up with a well-structured app.
Some of the most popular Android application architectures are:
In this blog we won’t go in-depth about every possibility but we will focus on the most popular one which is MVVM.
MVVM
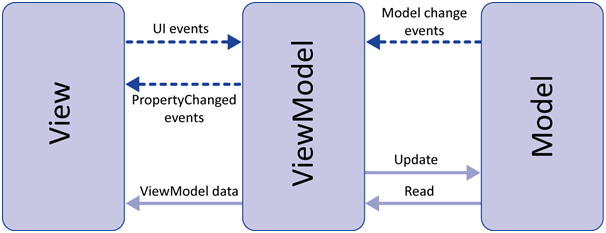
Model – View – ViewModel (MVVM) is the industry-recognized software architecture pattern that overcomes all drawbacks of MVP and MVC design patterns. MVVM suggests separating the data presentation logic (UI) from the core business logic part of the application.
The three separate code layers of MVVM are:
MODEL – holds application data. They are usually structures of simple data. Model and ViewModel work together to get and save the data.
VIEW – displays visual elements on the screen and notifies the ViewModel about user interactions.
VIEWMODEL – transforms model information into values that can be displayed on the view.
Furthermore, if you want to simplify and centralize the need for data access in the MVVM architecture, you should implement a repository pattern that will represent the so-called Single Source of Truth (SSOT).
With the repository pattern, you can hide the details of how the data is eventually stored or retrieved to and from the data store or how the data is retrieved or sent by the API service.
The next step is a very important part of your software developer journey
10. Don’t forget to test your code
Testing is a fundamental part of the software development life cycle (SDLC).
By running tests against your app consistently, you can verify your app’s correctness, functional behavior, and usability before you release it.
Testing also offers the following advantages:
Saves money
Improves security
Improves product quality
Types of tests on Android
There are different types of tests depending on the subject:
Functional testing
Performance testing
Accessibility testing
Compatibility testing
Tests also vary depending on size, or degree of isolation:
Unit tests
End to end testing
Medium tests
The last step we’re going to cover is the basics of how you can manage your application build.
11. Configure your application build
The Android build system compiles app resources and source code and packages them into APKs that you can test, deploy, and distribute.
The Android Studio uses Gradle, an advanced build toolkit, to automate and manage the build process. Gradle and the Android plugin run independently of Android Studio. This means that you can build your Android apps from within Android Studio, the command line on your machine.
Some of the main aspects available to configure in your build are:
Build variants
Build types
Product flavors
Dependencies
Manifest entries
Conclusion
Through this blog, we covered all the major sections that are gonna help you become an Android developer
Of course, that was just the basic explanation of main topics like activities, fragments, or popular Android Jetpack libraries.
The learning curve at the beginning will be hard. You will continuously learn and explore new possibilities with different programming concepts and programming paradigms such as reactive programming.
If this is what you want to learn and do in your life, stick to your goal and you will achieve it. take a look at our other tech blogs …
There are different ways to create your Views: the good old option of creating them programmatically, using XIBs, or the latest Apple-provided format, Storyboard. There’s quite a lot of discord over what the best method is, and there is no universal answer.
Apparently, millennials are getting sick and tired of the carefully manicured social media profiles and are looking to shake things up. Make them more authentic, so to speak.
The media has long been looking for ways to disrupt the industry, and they’ve tried on just about every channel there is: You can get your news via short videos on Instagram, as disappearing snaps on Snapchat or even via Viber.