
Quality assurance vs. quality control
This article explains the main differences between quality assurance and quality control.
There’s no shortage of examples of software failures throughout history, from the Mt. Gox Bitcoin hack that cost $500 million to the $10 million a minute Knight trading glitch. Every industry, including aviation and hospitality, have their fair share of software bug horror stories.
But the common factor between them is that the software was probably not tested enough.
Testing is a fundamental part of the software development life cycle (SDLC). That’s because even a single bug can crash an entire system down.
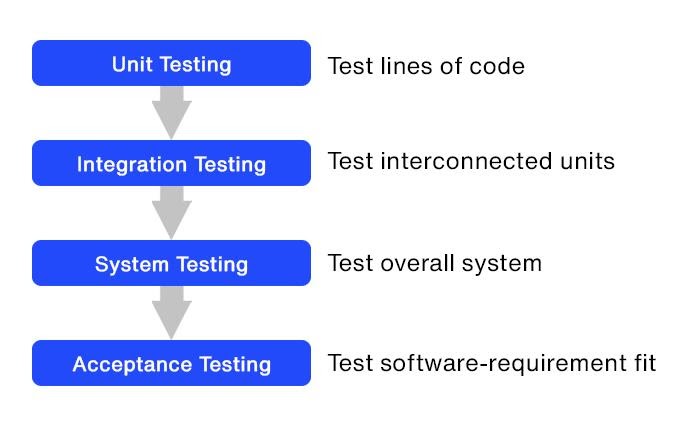
To guarantee a thorough regimen, we recommend that your app goes through the four levels of software testing:
Going through these stages ensures that you test every aspect of your app from planning to release.
Unit testing is the first and fundamental software testing you’ll do. It deals with the smallest units of any software – the methods, classes, and lines of code that make it up.
The goal is to ensure that each of these components works as intended before moving on to other testing procedures.
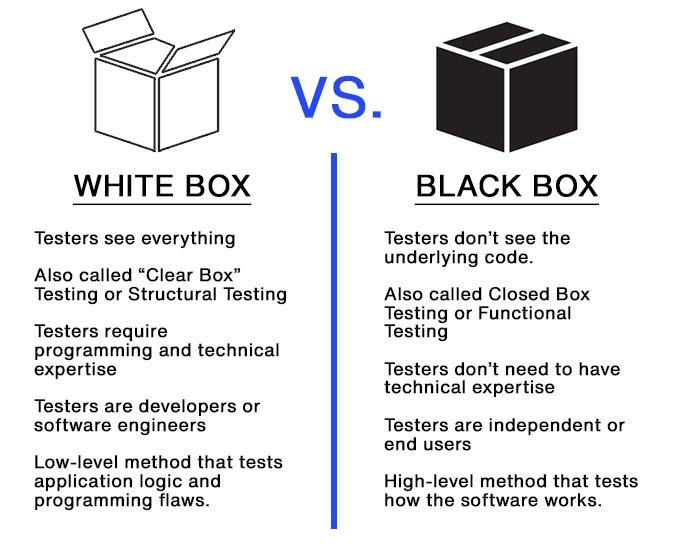
It’s mostly a type of white box testing. These are testing procedures that require the tester to know the internal workings of the object they are evaluating.
By the way, we’ll be mentioning both white and black box testing here in this article, so here’s a visual reminder of their differences:
Source: DECODE
Unit testing is crucial because it forms the foundation of all the other testing you’ll do. If a piece of code contains errors that can be otherwise fixed with unit testing, then sending it further down the testing pipeline is a waste of time and effort.
It’s often the developer’s primary responsibility to perform unit testing. They can do this while adopting a “test as you code” approach using various automated testing tools.
This is the preferred method since it’s fast, plus errors don’t tend to pile up that might complicate testing.
Developers can use the UnitTest Framework to create automated test cases.
Typically, this requires inserting a few lines of code and inputting the test case criteria as parameters. The program automatically logs and reports the results of each test case during execution.
Here’s how a unit testing framework looks like in JUnit, a Java unit testing tool:
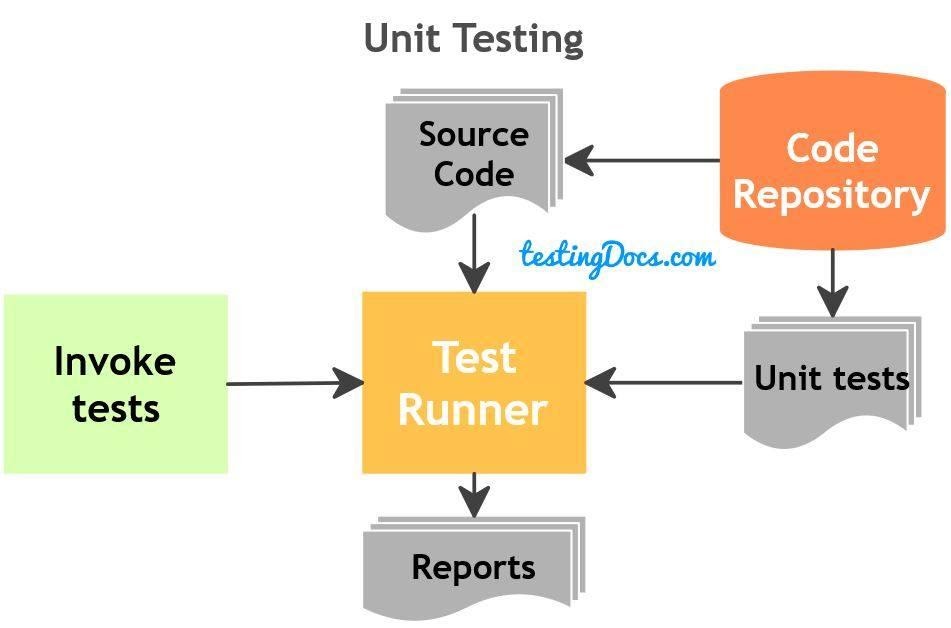
Source: TestingDocs.com
In some cases, a developer might want to assess critical sections of their code further. They can do this by copying and pasting that portion into a dedicated testing environment for a more rigorous procedure.
Doing this also reveals any unnecessary dependencies with other areas of the program.
There are various unit testing tools available, and there’s likely one for every programming language out there. PHP, for instance, uses the PHPUnit tool. Meanwhile, NET programmers have the NUnit framework.
The key to making the most of unit testing is focus. It should only work on one code, function, or class at a time. This makes isolating and fixing errors that much easier. Resolve all bugs detected, then re-run tests as necessary.
Don’t proceed until you’ve resolved all issues during unit testing.
Unit test cases should also not touch on integrations and interconnections with other modules.
By definition, unit testing must be independent, and it should be unaffected by any changes to software requirements.
Your unit test should also satisfy code coverage requirements. This is a metric that tells you how many lines of code you tested in your software: the higher the coverage, the more thorough the testing.
Code coverage is vital because most software has code sections that trigger only rarely.
For example, think of the if part of a conditional statement that only exists to catch errors. These can be easily missed out during testing, which means they can be potential hiding spots for bugs:
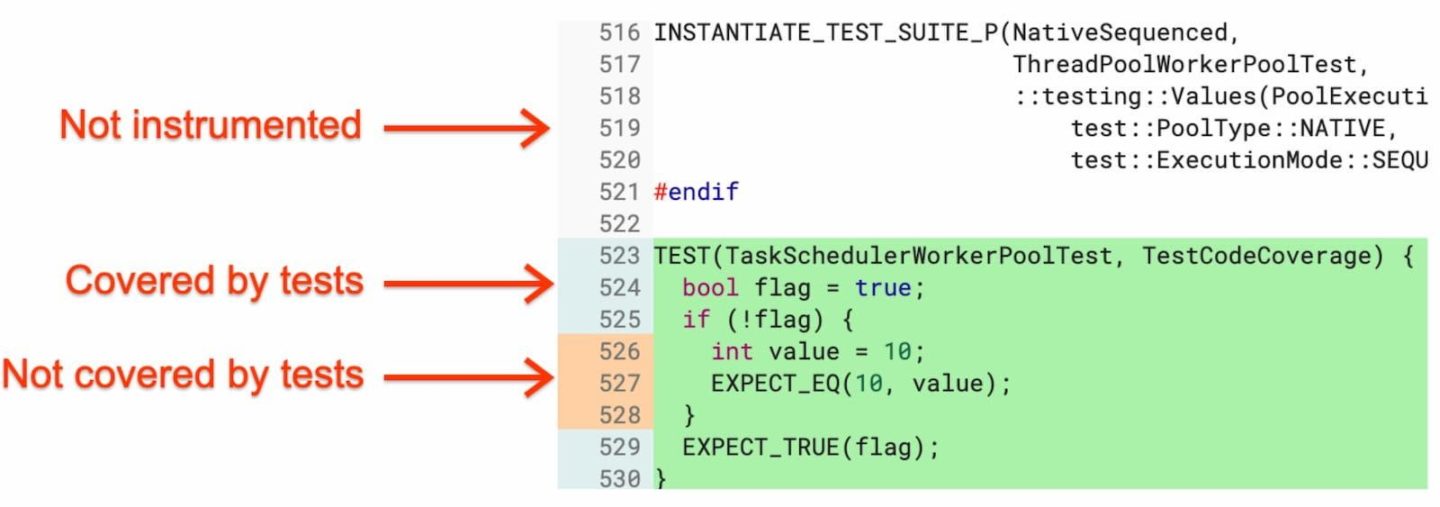
Source: Chrome Developers
Designing test cases that hit as many blind spots as possible is key to achieving high coverage.
As a rule of thumb, though, it’s best to aim for around 80% code coverage while testing. Anything more can be costly without necessarily providing added benefits.
Once you’re confident that individual components of your software are working, it’s time to see how they function when combined. This is the scope of our following testing method.
Integration testing is the next step, where you evaluate how well two or more components function when interconnected.
Like unit testing, it’s mainly a white box test, but it can also be adopted for black-box tests.
Here’s what it looks like.
Say you’re developing a streaming app. You have three modules that passed unit testing: the login page, the video player, and a search function.
On their own, each of these works with zero bugs.
But during integration testing, you realize that the video player isn’t functioning correctly because the login page is somehow not passing the correct data. Or, the search function has a critical error when connected to the video player.
The above scenario happens all too often and for a variety of reasons.
But the most common one is that most modules are written by different individuals and teams, who might have varying approaches and programming techniques.
In addition, some of their code might also be incompatible with your database or device hardware during certain conditions.
Source: DECODE
Integration testing attempts to find the bugs that prevent these disparate components from unifying seamlessly.
It’s also possible that system requirements have changed right after a module passed unit testing. There might be enough time to re-test them, which is where integration testing steps in.
So, how do you do integration testing?
There are three basic approaches.
The simplest type is called Big Bang Testing. Here, all the individual components are lumped together and tested as a unit. It has the advantage of speed and ease of setup, making it ideal for smaller systems.
Source: QA Test Lab
However, the main drawback of this method is that it can be harder to pinpoint the source of an error, which can prolong debugging. Also, since the module is treated as a whole, there is no way to prioritize testing for critical components.
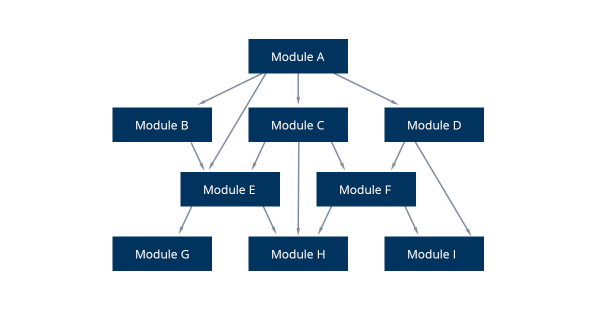
Because of these issues, the preferred method is incremental testing.
Instead of testing the entire system, you start with just a few related modules. You combine them, run test cases, then fix errors as needed.
To stand in for missing features, you use stubs and drivers to simulate data flow to and from these modules.
Once this group is tested and integrated correctly, you add more modules and repeat the process. You do this incrementally until you’ve gone through the entire app.
There are two ways to do incremental testing: the top-down approach or the bottom-up approach.
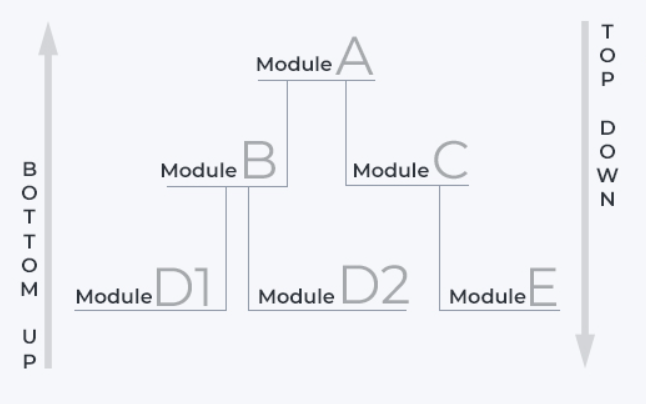
Source: QA Test Lab
In a bottom-up setup, you start with lower-level modules and work your way to higher-level ones. With the top-down method, it’s the opposite.
Regardless of the approach, the main advantage is that errors are easier to isolate, making debugging less complicated.
You should already have an integrated app with major bugs fixed and documented at the end of integration testing.
System testing involves evaluating the pre-launch software with all of its components. The goal here is to make the app ready for its intended user.
It’s mostly a black box testing approach, as it involves testers who don’t know the app’s underlying structure.
System testing looks at every aspect of your app, including security, usability, performance, and adherence to business requirements. Because of this, it involves dozens of tests that are a mix of both functional and non-functional testing.
By the way, here’s a quick summary of what functional and non-functional means:
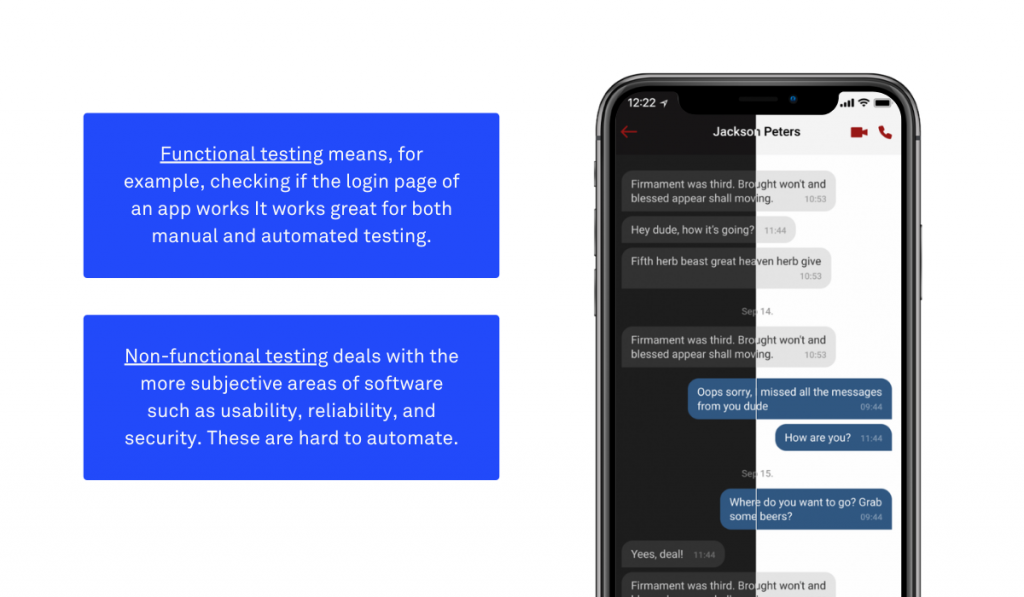
Source: DECODE
Performance testing is perhaps one of the most essential non-functional approaches you’ll do in system testing. It determines if your app has the stability, capacity, and response speed to handle the expected user load.
This type of test is especially vital for mission-critical software like digital banking, investment apps, and even social media.
That’s because even a few minutes of slowdowns can be expensive and catastrophic. For example, Facebook’s recent six-hour global shutdown cost them a whopping $230 million.
There are also sub-tests you can do to ensure optimal performance.
Scalability testing, for instance, can tell you how many concurrent users your app can handle before it fails. This data helps anticipate surges in demand, such as an e-commerce app during Black Friday.
Stress testing is also a vital test, so you’ll know how the system will react when it encounters a critical error.
This is where tools like Shake Crashes are beneficial to help you track such occurrences.
This is just a sampling of the many system tests you can do. However, not all software projects have the time and resources needed to do all of them.
As such, it might be wise to pick only the system tests relevant to your app. You can also look into automating some of these tests to help you save time and manpower.
System testing is also the phase where you’ll most likely bring in third-party, independent testers and QA teams.
To facilitate smoother testing, it’s crucial that you design test cases correctly. The challenge is creating test cases that are easy to follow and cover every possible scenario to achieve 100% coverage.
At the end of system testing, you’ll have an app that’s ready for release. But before you can do that, you need to get a green light from the most critical stakeholder of them all – your target users.
This is the purpose of user acceptance testing.
User acceptance testing (UAT), commonly known as beta testing, allows the end-user or client to evaluate the app to meet business requirements. It’s the final testing phase before an app gets deployed into the Apple App Store or Google Play.
The goal of UAT is to get acceptance from your beta testers. And the idea here is that if it gets their approval, then there’s a high chance your user base will, too.
UAT also helps you achieve an excellent UX for your app. Getting insights from your actual end-users allows you to refine your UI and UX further, helping develop a user-friendly app.
The overall process for doing UAT testing isn’t all that different from the other testing we’ve seen so far. The only difference is that the test criteria involve business requirements and not software-related metrics.
Here’s an overview of the process.
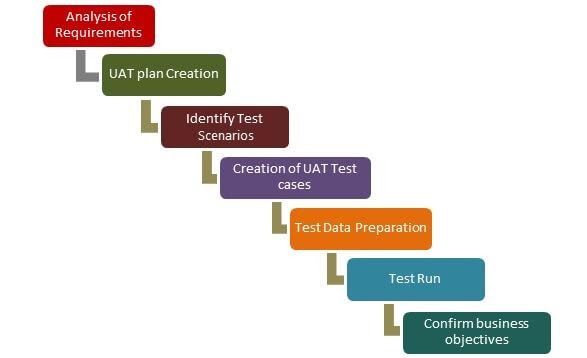
Source: Guru99
A few best practices can help you make the most out of your UAT.
Even though it’s the last testing stage, you should prepare your UAT test cases early in the software development life cycle.
After all, you already know your app’s business requirements from the planning stage.
It’s also crucial that your beta tester is a true unknown user.
The person should have no idea of the project until they are testing it. This guarantees feedback that’s independent, fresh, and unbiased.
You can also prepare for UAT as early as the system testing stage with a usability test.
You can conduct it with team members to iron out the most glaring UX problems right away before going into the UAT proper. An app prototype is fantastic for this purpose.
The bottom line is that UAT polishes your app from a functional and UX standpoint. This eliminates any surprises and ensures a higher rate of adoption with your target market.
As we’ve covered in this article, thorough testing is the only way to ensure that apps are working 100% as intended.
We take this philosophy to heart in DECODE. That’s why we implement strict testing procedures in every software project we do.
And it’s so far produced an impressive track record of successful app projects in various industries, from fintech to healthcare.
Interested in working with us? Contact us today, and let’s talk about your next big app idea!

Skilled in React Native, iOS and backend, Toni has a demonstrated knowledge of the information technology and services industry, with plenty of hands-on experience to back it up. He’s also an experienced Cloud engineer in Amazon Web Services (AWS), passionate about leveraging cloud technologies to improve the agility and efficiency of businesses. One of Toni’s most special traits is his talent for online shopping. In fact, our delivery guy is convinced that ‘Toni Vujević’ is a pseudonym for all DECODErs.
This article explains the main differences between quality assurance and quality control.

Manual testing and automated testing both have their unique advantages to support your testing strategy. Here's what you need to know to choose the best approach for your project.

We hope this article will give you an idea of which testing techniques work best in your project.