
The best frameworks for Android app development
Discover the top frameworks for Android app development that can help you build high-quality, scalable, and feature-rich applications.
From generative AI to cutting-edge 3D graphics, the bar is constantly rising on what makes a good Android app.
Nevertheless, the fundamentals of how to create one remain unchanged. And if you want your Android app to be the next big thing, familiarizing and following these guidelines is key.
Here are the steps you should take to build an Android app.
Research is perhaps the most critical step in creating an Android app.
Many people, however, skip this step entirely. They are so sure they have a killer idea that they rush to implement it before someone else beats them to the punch.
The question is—how do they know it’s actually a good idea?
Without a thorough understanding of the market, they can’t.
Take the case of the British taxi app Hailo.
The developers wrongfully assumed that the taxi service in New York worked in the same way as it did in London.
Hint: it didn’t—not only did the famous urban grid in the Big Apple make it less necessary for the drivers there to rely on an app to find their way around, but the competition there was much more fierce than in Europe.
This, combined with technical difficulties, meant that the app failed in America as a result.

Source: Apptunix
Doing thorough market research can avoid this because you’ll validate your app idea before devoting considerable resources to it.
One of the most useful steps here is product discovery.
Product discovery aims to understand the market your app is trying to solve and validate if they’re a right fit.
The most important question product discovery answers is—what’s the problem my app is trying to solve?
If a problem exists and your app idea can solve it, you have an opportunity worth chasing.
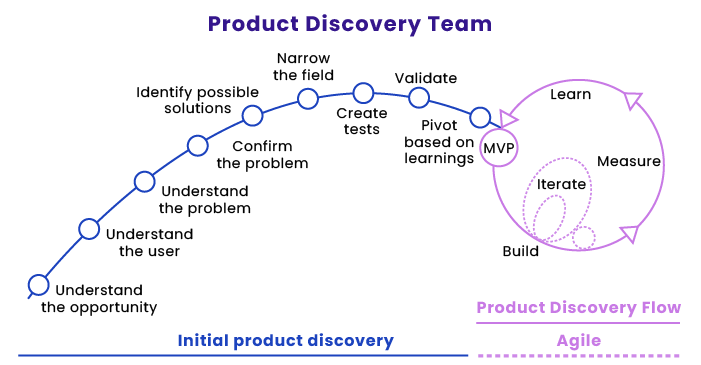
Source: Ruby Garage
There are multiple ways to approach product discovery. For example, the DECODE team uses a four-step process that takes around 4-10 weeks. You can click here for more details.
Aside from this, it’s also useful to do a competitive analysis.
This lets you look at the current players in the niche, evaluate their strengths and weaknesses, and find ways to improve on them.
By the end of your research phase, you should have an app idea that your audience needs and that no other competitors offer.
Monetization is something that most developers neglect to think of until much later. But unless you’re only creating an app as a hobby, you need to figure out how you’ll earn from it ASAP.
That’s because it’ll be more difficult to implement monetization later, especially if you already have a user base. Integrating it tightly with your app model as much as possible is best.
There are multiple ways to monetize an app. Which one you’ll use depends on your app idea and niche.
Here are some common ones:
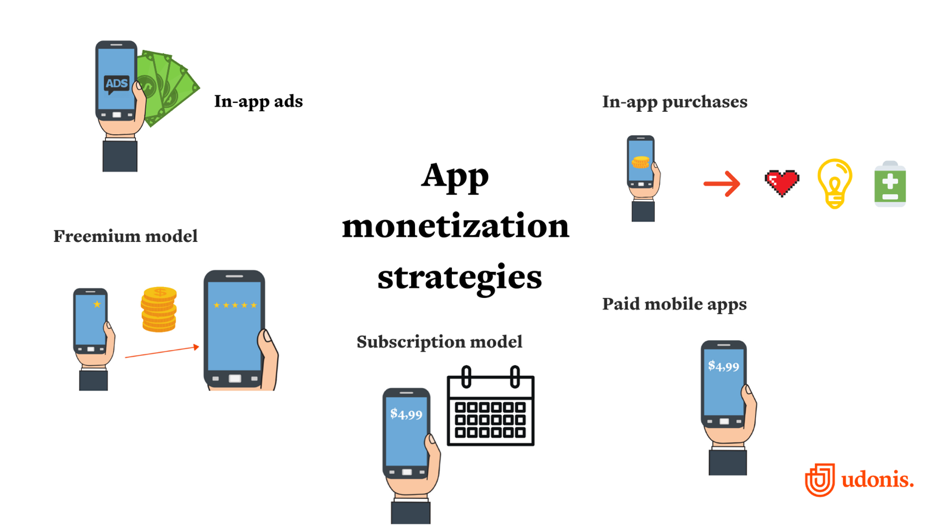
Source: The Manifest
In-app ads are perhaps the most popular and widespread method because they allow users to download the app for free.
That’s great for quickly growing a user base. You earn revenue by displaying ads from third parties, while attracting users with a free app.
More users means more impressions and earnings.
Another tried and tested method is the freemium model. Here, users download a basic version of the app for free to try it.
They can then choose to upgrade to a paid version or subscription with more advanced features.
However, a freemium model only works if there’s an exceptional value to upgrade. It’s also a numbers game.
Don’t expect all users to upgrade, but your goal is to convert enough paid users to support the whole operation.

Source: Business Model Toolbox
An alternative to this is offering in-app purchases. It works especially well in games because it encourages users to make smaller transactions more often.
Lastly, you can use the paid app model, where the user must pay for downloading your app outright. This is the most straightforward monetization method.
However, you’ll need to do more work convincing people to fork over their money before trying your app.
One last note is that you can actually combine multiple monetization methods. For example, many apps use ads in their free app, removing them when users opt for a paid subscription.
Once your app idea is finalized, the next step is to create the software requirements specification (SRS).
Think of an SRS as the blueprint of your Android app. It lists all the information and requirements needed to create the final product.
That makes it your foundation document on which other documents, like contracts and statement of work (SOW), are based.
Because of this, you must create the SRS in close collaboration with the client. This ensures that what you’re including accurately reflects the client’s project needs.
To give you an idea, here are the essential parts that an SRS document should contain:
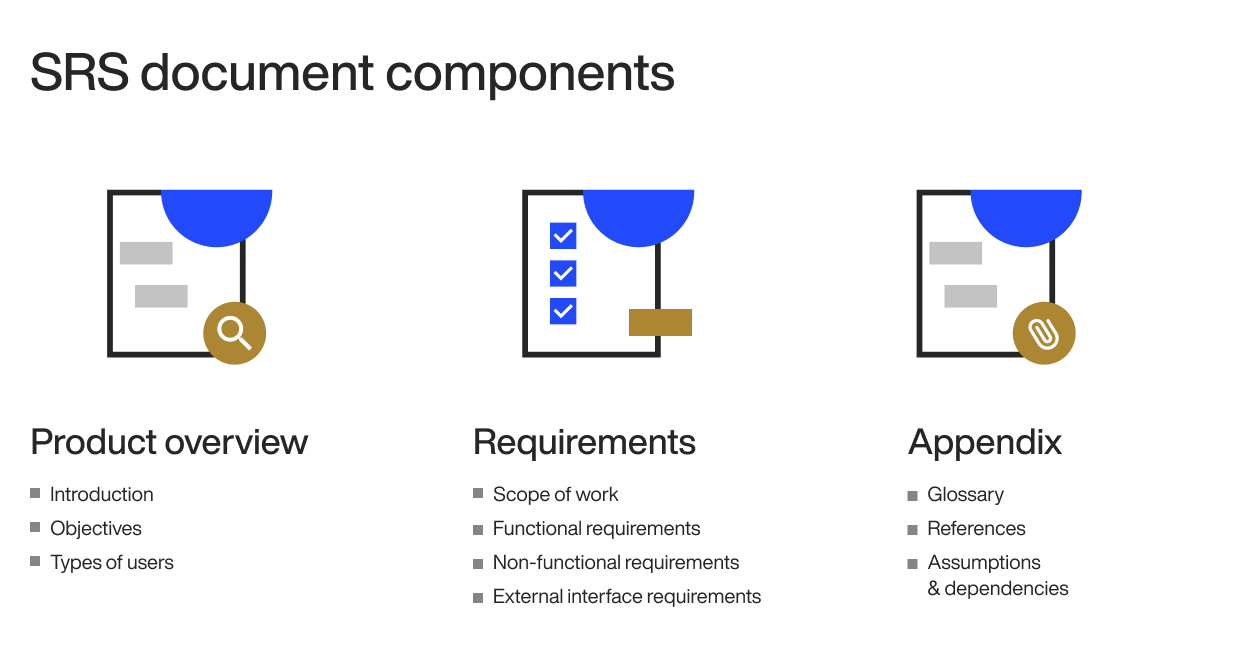
What’s critical here are the project’s functional and non-functional requirements.
Functional requirements refer to what the app should include, such as the features, behaviors, and core functionalities. These are the core elements that make up the app.
Conversely, non-functional requirements are how the app should behave. This includes performance metrics like response time or usability.
Non-functional requirements are important for certain applications.
For instance, a banking app should have a minimum response time, even if it’s handling thousands of concurrent connections.
Which technologies should you use in building your Android app?
This is a critical decision that could affect your app’s success and viability. That’s because the wrong tech stack will cripple or hinder your app’s performance.
Furthermore, using the right tools can make development easier.
For example, if you’re developing a banking app that needs to connect with hundreds of banks, the Plaid API is your best bet.
When developing an Android app, there are four main tech stacks to consider.
First is the programming language. This will mostly be either Java or Kotlin, the de facto picks for Android.
Depending on your app structure, you might also need another programming language to create your back end.
Second is the integrated development environment (IDE), or the main tool you’ll use to code and debug the app.
For most projects, this will be the official IDE, Android Studio. However, there are also third-party IDEs to consider, like Eclipse or IntelliJ IDEA.
Source: Wikipedia
Last are the frameworks you’ll be using.
A framework is a set of tools and libraries for building Android apps in a particular way.
They’re great for creating advanced functionality with relative ease, considerably speeding up your development time.
Wireframes are one of the best app design tools at your disposal.
They’re nothing more than rough sketches that show the layout and navigation of your Android app.
This allows you and your team to visualize your app’s appearance and iterate through it quickly to arrive at a final design.
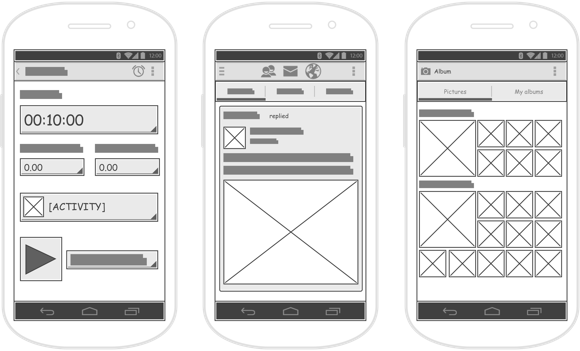
Source: Visual Paradigm
Creating wireframes is simple. You don’t need digital tools—even pencil and paper will suffice.
You use simple shapes to represent the different components in the app layout. For example, you can use boxes with X’s to represent images.
Black and white is also preferable. Only use color when it is functional in your app design, like in the example below.
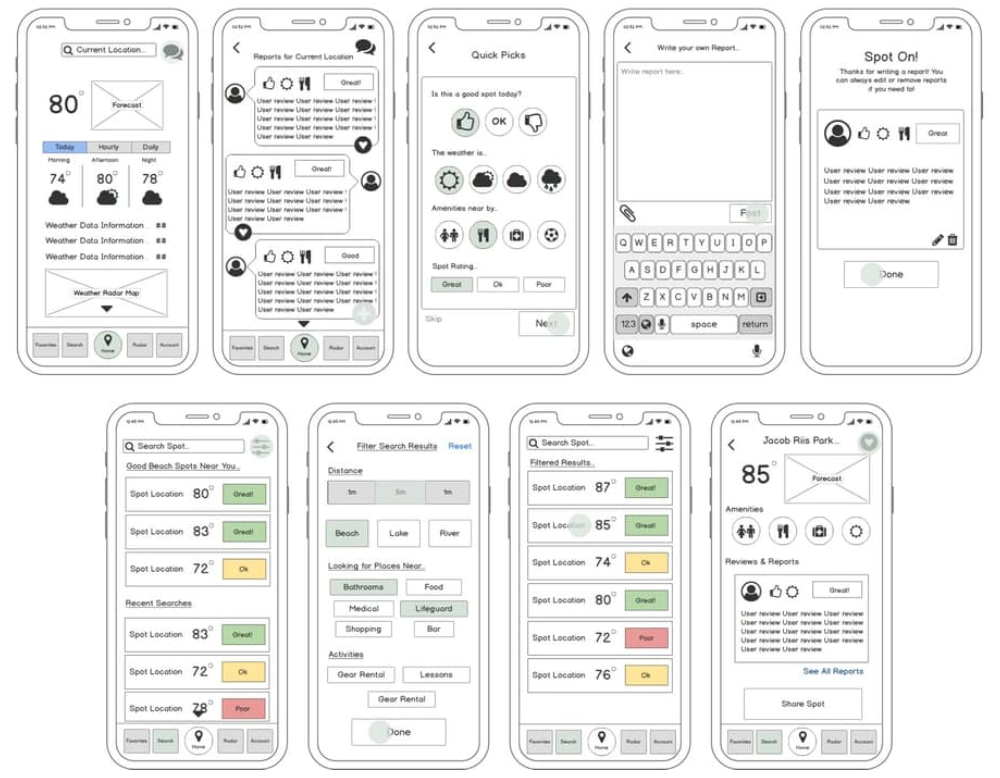
Source: Anami Chan Design
It’s also useful to add annotations to your wireframe. They can help clarify some of its more confusing aspects.
Having them also enables you to describe animations and behaviors that are impossible to depict in a 2D medium.
Once you have a wireframe prepared and layout finalized, you can then use it to flesh out the rest of your app design.
Your app’s design has a significant impact on usability and user experience. UI that is hard to use or unappealing can be a pain, causing your users to drop out and look elsewhere.
Fortunately, achieving this in Android can be straightforward, thanks to an abundance of resources. One of these is Google’s Material Design guideline.
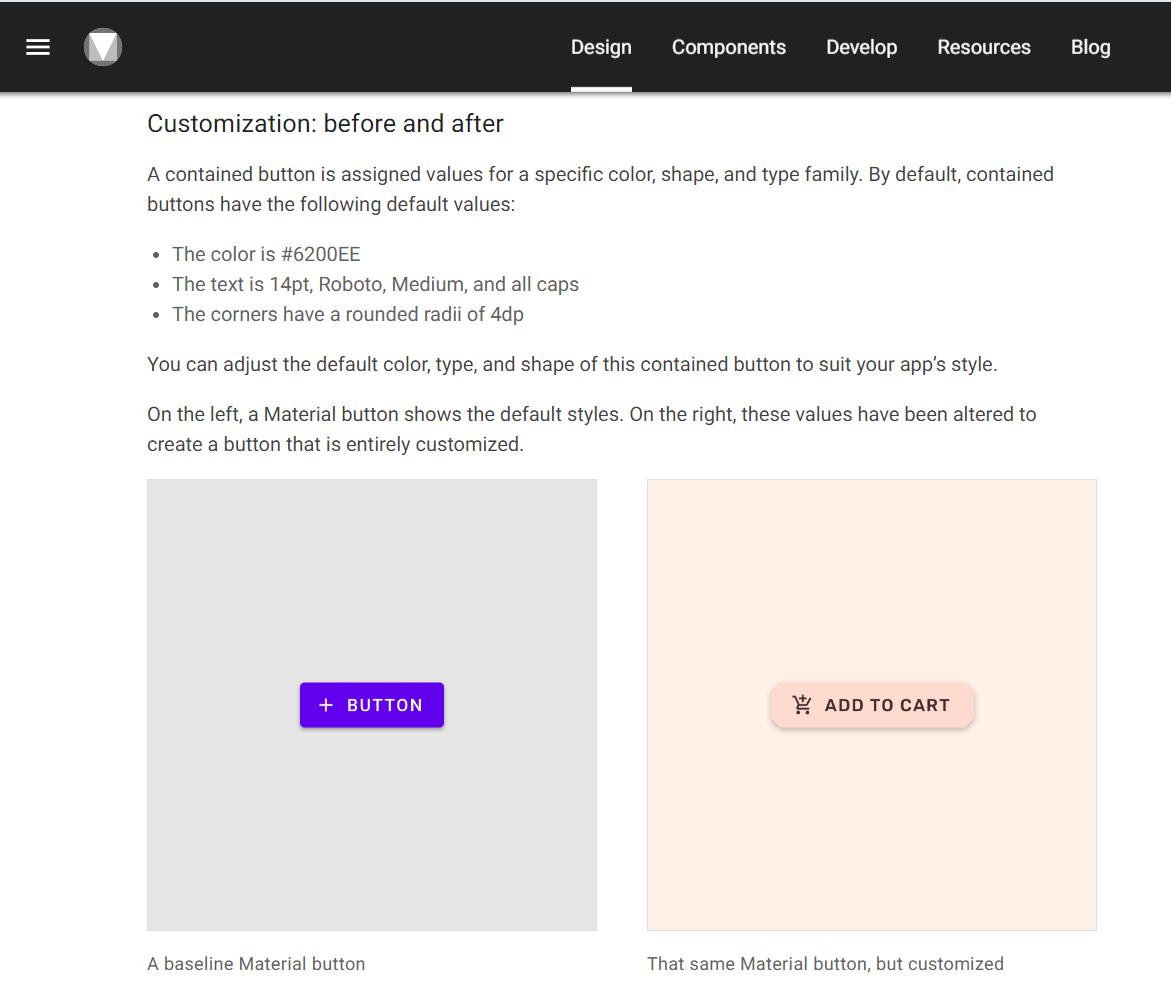
Source: Material.io
The Material Design guidelines contain tips, best practices, and methods for every UI component, from buttons to layouts.
Following these tried-and-tested principles is the easiest way to achieve great UI with minimal guesswork.
Of course, there are some instances where you might want to deviate from the Android look and design your own from scratch.
In these cases, having a proper app design process is paramount. You can check out our design primer here to get you started.
With all the planning and pre-work ready, it’s time to put all the elements together.
In this step, you’ll write the code for your Android app’s front-end and back-end components.
The front end is the part that the user sees—in this case, the app itself. It covers the user interface and the algorithms that control it.
The back end, on the other hand, is where the main app functions and data are processed. This usually sits on a web server, receiving and sending instructions to the front end.
The back end is connected to the front end via an API.

Source: mindphp
Unsurprisingly, this is the most critical part of development and where delays typically happen.
That’s why thorough planning is crucial so that you can anticipate and prepare for any potential bottlenecks during coding.
However, even the best plans will go awry if they are in the hands of incompetent developers.
To avoid this, you’ll need to hire a talented team like DECODE to work on your front-end and back-end code.
Experience plays a critical role in writing your code with minimal issues and delays.
Throughout development and before launching your app, you should never neglect proper testing.
Testing is critical to ensure your app has minimal errors and bugs that could ruin the user experience.
For thoroughness and accuracy, you should implement both automatic and manual testing.
Automated testing evaluates the app by a software tool that executes a test script autonomously.
It’s great for evaluating quantitative metrics like loading time or the number of bugs found.
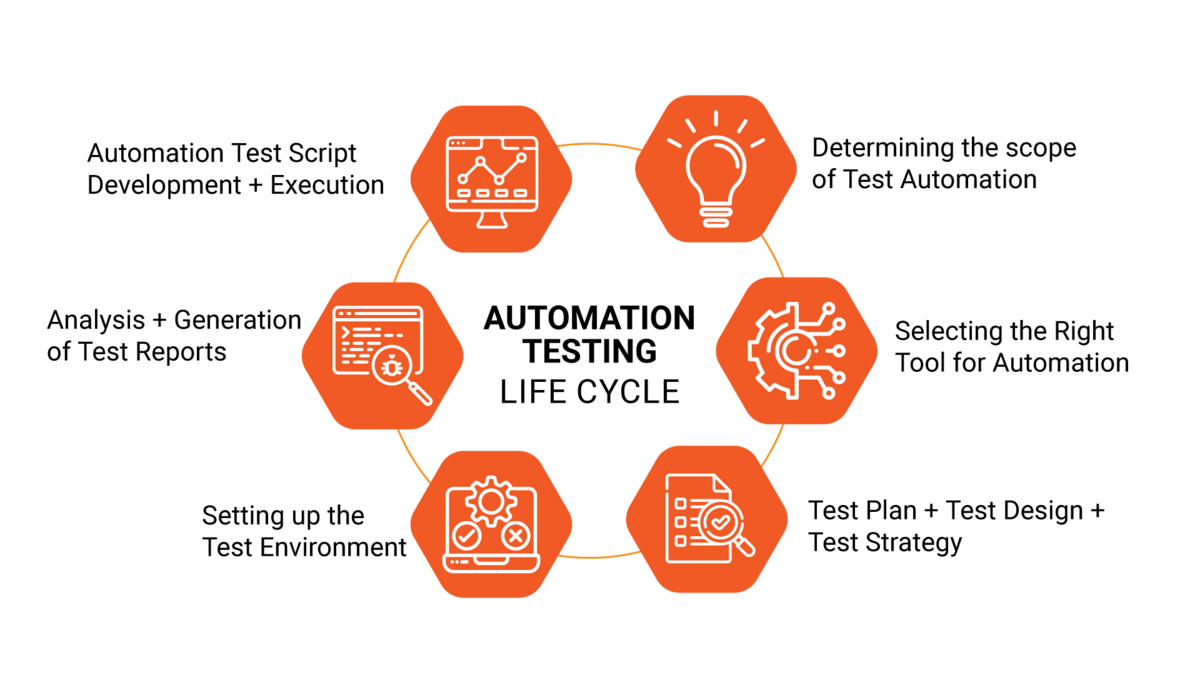
Source: Headspin
However, a machine can’t evaluate qualitative metrics like usability or aesthetics. Thus, these still require manual testing.
You should also use multiple test methods to guarantee that every aspect of your app is analyzed.
For instance, integration testing checks if the different components of the app (which are usually written by different programmers) work well together.
Usability testing, on the other hand, checks how well users like the app from a UX point of view.
But perhaps the most important are the performance testing methods, like load testing, scalability testing, and stress testing.
These will allow you to find the breaking point of your app so you can either fix it or prepare for it.
With everything coded and tested, the final step is publishing your app to the Google Play Store.
This step might sound trivial and easy, but you shouldn’t underestimate it. Publishing still requires plenty of preparation to get right.
Your first goal is to ensure your app follows the Google Play Store policies. That’s because any violations could be grounds for rejection.
So, it’s a good idea to familiarize yourself with and comply with the rules during coding and testing.

Source: Google
But this is just the beginning. Publishing requires a series of steps, and you should get each right.
For instance, you should properly prepare your app bundle or APK for upload to the Play Store.
You should also prepare the content rating, decide on app distribution, and prepare your app store listing. All of this can be done via the Google Play Developer Console.
As you can see, building an Android app is relatively straightforward.
All you need is a great app idea, a solid plan to make it happen, and the willpower to see it through.
But most of all, you need a talented team like DECODE to partner with.
Because while Android development is simple in theory, it’s not so much in practice. You’ll need DECODE’s experience and skills to bring your app vision to life.
So, need help with your next Android project?
Contact us today, and let’s discuss how our team can make a difference!

An Applied Sciences graduate and a true connoisseur of tech, Ivan is a software developer with a genuine love for exploring new technologies. QAs love his code, and his fellow developers always value his input. For Ivan, there is no issue too small to talk over, and no problem that can’t be solved together. When he is not coding, Ivan is usually hiking or playing football. His ideal workspace? Probably a cottage in the mountains, with a serious gaming setup and fast internet connection.
Discover the top frameworks for Android app development that can help you build high-quality, scalable, and feature-rich applications.

When it comes to Android app development, certain programming languages stand out. Discover the top 5 languages that can help you create outstanding applications.

Android app development comes with its own set of pros and cons. Explore the advantages and disadvantages of Android app development to make an informed decision for your next project.