In this blog, we’ll cover the steps we’ve taken to build a reliable and functional CI/CD setup for our iOS project.
This blog post won’t cover the basics of CI and CD, the general understanding of why and how they work, or how they can benefit your iOS projects. There is plenty of reading material about all this on the web, but if you don’t have time for all that then just trust us and use CI/CD.
Why we did (not) choose this stack for our pipelines?
One of the clients we are currently collaborating with at DECODE on a brand-new project turned out to be a hardcore Microsoft fanboy. That’s fine by us, as long as we’re on the same page when it comes to Apple – that it’s the best ? ❤️.
After all, we are iOS devs! On the other hand, this client has a strong technical background, so we’ve been lucky enough to get a significant head start at the beginning of the project to automate the build, the testing and the distribution process of the app in the way we wanted (using the Microsoft stack they wanted, of course).
To be honest, that particular stack probably wouldn’t be our stack of choice. For example, at DECODE, we’ve been using BitBucket, Firebase and Jenkins on multiple projects for a very long time. This is what made it a challenge (along with the fact that the Apple ecosystem tends to be very closed and difficult to operate with any third-party software.)
Luckily, we were in quarantine at the time due to the Covid-19 breakout, so we had plenty of time to play with Azure DevOps and AppCenter, and to build some great pipelines. So, let me share what we’ve learned along the way…
The stack we’ve used for implementation:
Azure DevOps (with virtual machines) as a Version Control and Continuous Integration tool
Before proceeding with the steps we’ll be implementing in our pipelines, let’s mention some basics. We need to underline that we are using MS DevOps as a Version Control tool and git-flow for managing our branches.
Basically, we are using the following branches: master, release, develop, and feature/bugfix.
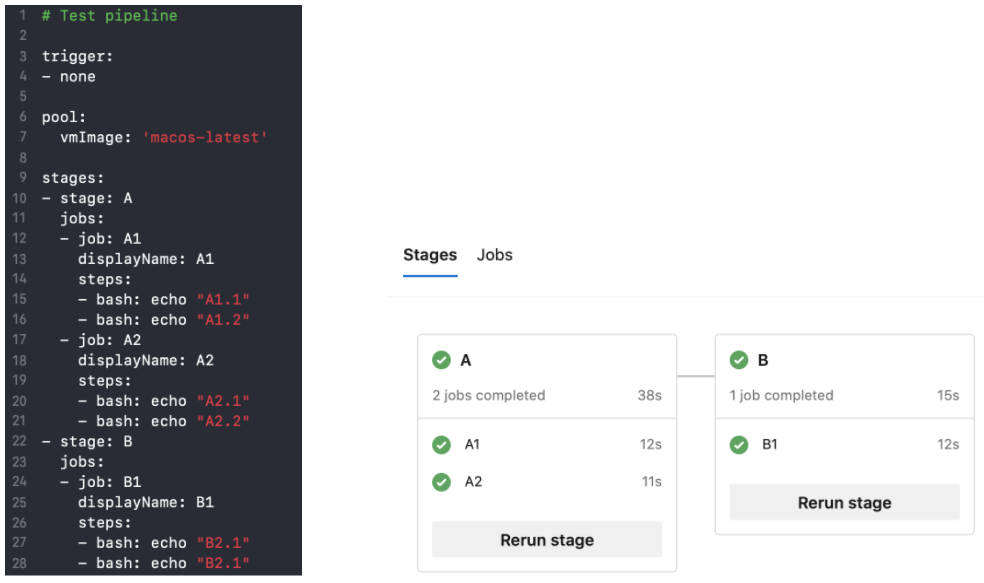
Also it’s worth mentioning, for those not so familiar with CI/CD, that an MS DevOps pipeline is made up of one or more stages (eg. Test Stage, Build Stage, Deploy Stage, etc), while each stage consists of one or more jobs (eg. Deploy stage has two jobs: Generate Changelog & Deploy to AppCenter).
Finally, jobs can have multiple steps (eg. Deploy to AppCenter consists of 2 steps: Download the .ipa & Send the .ipa to the AppCenter).
Take Note
When you define multiple stages in a pipeline, by default, they run one after the other in the order in which you define them in the YAML file and the next stage will run if the previous succeeds. You can also define a various set of dependencies and conditions for the stages!
Every job in a pipeline is run on a different agent. Beware that you can share files between the jobs/stages only by publishing the artifact (eg. .ipa file) into thecontainer and downloading the artifact from the container in the next stage.
An artifact can be a file, or a collection of files or packages.
Tips & Tricks
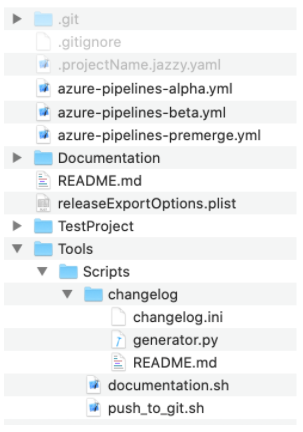
For every pipeline, you need to create a separate YAML file. Here is the file structure we had:
To create a new pipeline in DevOps dashboard select:
Project -> Pipelines
New pipeline
Connect: Azure Repos Git
Select Repository: iOS
Configure: Existing Azure Pipelines YAML file
Branch: develop
Path: azure-pipelines-premerge.yml
Review: Run -> Save
2. Pipelines
This is the most important part of the process. Sit down with your team (in our case we were working on the idea of the pipelines together with the Android team) and think of what you usually do manually when building and distributing your app and then come up with the pipelines and steps you need.
We came up with 3 pipelines we need to start developing and distributing the app:
Premergepipeline: We want to check if the code works before merging it with the develop branch, thus we will check it on every pull request.
Alphapipeline: When the new code is merged to develop, we want to publish the new app version so the QA team can easily download it and test it before we send it to the client.
Betapipeline: Every 2 weeks, we merge the develop branch with the release branch and we send a new version of the app to the client to check it out.
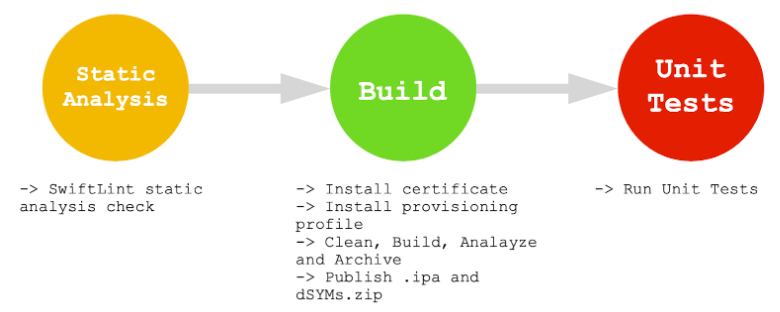
1st Pipeline: Premerge
All the checks we want to do before merging the code to the develop branch!
First, we need to run the static analysis check! We use SwiftLint for that.
Then, we need to check if the code compiles, builds, and archives successfully.
Finally, we run the unit tests to make sure the new code didn’t break anything.
We want to trigger this pipeline on every PR to the develop branch. It should also trigger on every update of the PR. The PR cannot be merged before all the stages in the pipeline have passed (even if the reviewer has approved it)!
The last thing we need to do is to add a branch policy to the develop branch, so that the pipeline actually triggers on every pull request to the branch.
For adding a policy for develop go to:
Repos -> Branches
develop-> more options menu -> Branch Policies
Branch Policies
Require a minimum number of reviewers ON
Minimum number of reviewers 1
When new changes are pushed: Reset all approval votes (does not reset votes to reject or wait)
Check for comment resolution: Required
Limit merge types: Squash merge
Build Validation
Add build policy: Premerge-pipeline
On
Automatic
Required
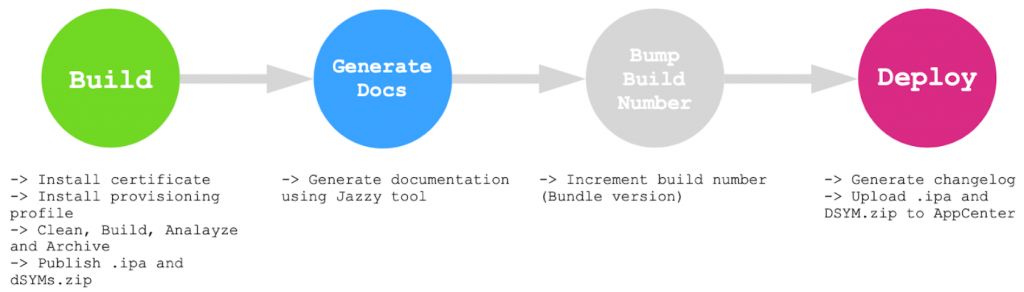
2nd Pipeline: Alpha
Distributing a new version of the app internally on every change on the develop branch
First, we need to build the .ipa (and dSYM files for symbolicating collected crashes).
The next step is to automatically generate the docs from the code comments using Jazzy tool.
At this point, we increment the build number (the version number remains the same). This way we, and the QA team, can distinguish builds between versions.
The last thing we need to do is upload the .ipa and dSYM files to the AppCenter, so the QA team gets notified and can download the new version of the app directly to their devices.
We want to trigger this pipeline on every push to develop branch (trigger: -develop). This version of the app, distributed to the QA and dev team, is considered to be the Alpha version.
Take Note
You can also tell CI to skip running a pipeline by including [skip ci] in the commit message.
3rd Pipeline: Beta
Distributing a new version of the app to the client
Every 2 weeks on the last day of the sprint we merge the develop branch to the release branch (manually). The develop branch was previously tested by the QA team and fixed so we are happy to send it to the client.
The Beta pipeline has the same steps as the Alpha pipeline, but with some tweaks such as the distribution group including the client. In the Beta pipeline, you can add a setup needed for distributing the app to the client (provisioning, certificates, naming, etc).
3. Collecting crashes, bug reports and UI tests
Collecting crashes is covered with AppCenter which has a nice dashboard for inspecting the stack trace and updating the crash status (Open/Done). To include the AppCenter crash reporting in your app please follow the instructions.
Also, note that in order to get a symbolicated crash report you must deploy a dSYM.zip file along with the .ipa file to the AppCenter (symbolsDsymFiles variable in the AppCenterDistribute@3 task).
To add bug reporting capabilities to your app, please follow these instructions to add Shake.
Regarding the UI tests you are probably wondering about, we’ve come to realize that AppCenter, unfortunately, does not support the UI tests, written in Python, which our QA team uses. ? Thus, we’ve added an addition to our setup – Sauce Labs which can successfully run the Python UI test for iOS and Android. You will be able to read more about the Sauce Labs setup in one of our future blogs very soon!
You will be able to read more about the Sauce Labs setup in one of our future blogs very soon!
Retrospective and benefits
Since I’ve previously worked on various projects both with and without the CI/CD, I believe I can finally sum up some strong pros and minor cons based on my experience. Please note that this refers mostly to iOS projects. ?
One of the major benefits I see in CI/CD is the static analysis & testing phase. This phase weeds out all of those obvious bugs and possible code style and conventions violations and, most importantly, forces you to fix it!
This phase can be a real life-saver – especially if you have a junior engineer working on the project (in fact, it saves all of us, let’s be honest!). The main benefit here is that problems and bugs get addressed as early as possible.
Fixing a bug when your code is still fresh can quite speed up the fixing and dealing with it before it comes into QA’s hands can significantly save money and time. On the other hand, the testing phase is pointless if there are no UTs to run. Every new piece of code added should be covered with UTs.
This requires writing a lot of tests, a process that is quite time-consuming. If you are dealing with a simple client-side logic you will probably skip the automated testing part. In that case, the testing phase of the pipeline basically becomes meaningless since the static code check can easily be done (and forced) locally.
Regarding the deployment phase, I can say it’s definitely a game-changer.
When you have a list of simple steps that people need to do, there will always be something that slips through. When you have an even more complicated list of steps that people need to complete, there is probably just one person on the team who knows how to do this properly (the one who wrote the list). In fact, if you are planning to deploy often, it becomes annoying and boring.
With the CD phase, you no longer need to worry if you have forgotten to update that environment variable, or if anybody will know how to deploy the app if you go on holiday. However, be aware that unfortunately there are legacy projects and setups which can’t be automated with MS DevOps.
We were also a bit disappointed to find out that there is no support on MS DevOps for displaying iOS code coverage in the UI. Also, there is no simple way of browsing through automated documentation, which would be a very nice feature. ?
A possible future improvement with our current set up which we would like to see would be an integration with Slack so we could, for example, get notified when something is pushed to a branch, or a pipeline has failed. Also, setting up a custom preview of code coverage in some way would be nice!
Conclusion
At the time of writing, we have already been developing the app, and using the CI/CD setup as described above, for 6 months.
Looking back I must admit we’ve spent a significant amount of time at the beginning of the project building the CI/CD. The important thing to remember is: always analyze the tradeoffs between spending time on the CI/CD setup vs. doing things manually. Automating everything is not always the right answer.
If you are dealing with a short-term project (< 100 man-days) with a small amount of client-side logic, spending ~20% of the total time on automation would be overkill. In that case, consider building a more lightweight CI/CD setup, setting up restrictions on branches, or something similar. Since we are dealing with a long-term project of high risk and complexity, building a robust CI/CD setup was the onlay way to go.
From our experience, we can say that a robust CI/CD will have your back if things get nasty!
Of course, we always communicate our vision to the client and find a way to keep within budget, while meeting project’s milestones and needs.
Luckily, this time our client was almost more enthusiastic about the CI/CD setup than we were! That was a pleasure!
I hope this article was informative – if you have any questions, or want to work with an experienced iOS team, feel free to contact us at business@decode.agency
There are different ways to create your Views: the good old option of creating them programmatically, using XIBs, or the latest Apple-provided format, Storyboard. There’s quite a lot of discord over what the best method is, and there is no universal answer.
Apparently, millennials are getting sick and tired of the carefully manicured social media profiles and are looking to shake things up. Make them more authentic, so to speak.
The media has long been looking for ways to disrupt the industry, and they’ve tried on just about every channel there is: You can get your news via short videos on Instagram, as disappearing snaps on Snapchat or even via Viber.