
Taming the app flow with coordinators
And saying good-bye to the massive ViewControllers.
In our recent post, we went over how we use the MVVM architecture pattern when developing iOS apps, but today we focus specifically on how to create the View in this particular pattern.
There are different ways to create your Views: the good old option of creating them programmatically, using XIBs, or the latest Apple-provided format, Storyboard. There’s quite a lot of discord over what the best method is, and there is no universal answer.
But let’s not get ahead of ourselves.
XIBs (derived from “Xcode Interface Builder”) are XML files that define and configure a set of objects, and are specially designed to manipulate Views. Xcode has a built-in editor, the said Interface Builder, that manages those Views, making it easy to configure and design the app layout.
Even if most developers associate a XIB file with a screen or a view controller, XIBs are actually generic containers of objects and can be used together with other object types as UIViews, NSObjects or just alone.

XIBs have some significant advantages in development, since they enable you to quickly put together a user interface and are a good choice for apps with simpler Views.
On the other hand, merging conflicts is more difficult when working in a team environment, and so is creating more complex screens with dynamic content.
There is no one-size-fits-all solutions, so we tend to create Views programatically, but use XIBs when working on apps with simpler View structure.
So, how would we configure Views in our project to remove all the unnecessary responsibilities from the ViewController?
Let’s pretend we are making a weather app. For simplicity’s sake, we’ll make it look like a list of locations with the corresponding current temperature.
We’ll start building the View programmatically and then recreate the process with XIBs to show the difference.
First things first. Let’s create the View that will hold TableView, add it to subview and put constraints superview.
class WeatherView: UIView {

    let tableView: UITableView

    override init(frame: CGRect) {
        // Initialization
        tableView = UITableView()
        super.init(frame: frame)

        // TableView - Add to stack
        addSubview(tableView)

        // TableView - Configuration + Style
        tableView.estimatedRowHeight = 60
        tableView.rowHeight = UITableViewAutomaticDimension
        tableView.register(WeatherCellProgrammatically.self, forCellReuseIdentifier: WeatherCellProgrammatically.dc_reuseIdentifier)

        // TableView - Auto layout
        tableView.translatesAutoresizingMaskIntoConstraints = false

        let margins = self.layoutMarginsGuide
        tableView.leadingAnchor.constraint(equalTo: margins.leadingAnchor).isActive = true
        tableView.trailingAnchor.constraint(equalTo: margins.trailingAnchor).isActive = true
        tableView.topAnchor.constraint(equalTo: margins.topAnchor).isActive = true
        tableView.bottomAnchor.constraint(equalTo: margins.bottomAnchor).isActive = true
    }

    required init?(coder aDecoder: NSCoder) {
        fatalError("init(coder:) has not been implemented")
    }
}
Now let’s create a cell that will hold the city name and temperature. Nothing complicated.
class WeatherCellProgrammatically: UITableViewCell {

    // MARK: - Properties

    let cityNameLabel: UILabel
    let temperatureLabel: UILabel

    // MARK: - Lifecycle

    override init(style: UITableViewCellStyle, reuseIdentifier: String?) {
        temperatureLabel = UILabel()
        cityNameLabel = UILabel()
        super.init(style: style, reuseIdentifier: reuseIdentifier)

        configureView()
    }

    required init?(coder aDecoder: NSCoder) {
        fatalError("init(coder:) has not been implemented")
    }

    // MARK: Private custom methods

    private func configureView() {
        // Temperature label style
        temperatureLabel.textColor = UIColor.lightGray
        temperatureLabel.font = UIFont.systemFont(ofSize: 16)

        // City name label style
        cityNameLabel.textColor = UIColor.black
        cityNameLabel.font = UIFont.systemFont(ofSize: 16)

        // Add labels to contentView
        contentView.addSubview(cityNameLabel)
        contentView.addSubview(temperatureLabel)

        // Autolayout
        let margins = self.layoutMarginsGuide
        cityNameLabel.translatesAutoresizingMaskIntoConstraints = false
        cityNameLabel.leadingAnchor.constraint(equalTo: margins.leadingAnchor, constant: 20).isActive = true
        cityNameLabel.centerYAnchor.constraint(equalTo: margins.centerYAnchor, constant: 0).isActive = true

        let cityNameLabelMargins = cityNameLabel.layoutMarginsGuide
        temperatureLabel.translatesAutoresizingMaskIntoConstraints = false
        temperatureLabel.leadingAnchor.constraint(equalTo: cityNameLabelMargins.trailingAnchor, constant: 20).isActive = true
        temperatureLabel.centerYAnchor.constraint(equalTo: margins.centerYAnchor, constant: 0).isActive = true
    }
}
We can already see that setting auto layout configuration programmatically creates a lot of unnecessary code, which can be avoided using XIBs.
At last, let’s configure the connection between the ViewController and the View programmatically. The ViewModel is defined through ViewModelProtocol, but we’ll go over why and how in the next blog post, focusing on the MVVM-C pattern.
class WeatherVC: UIViewController {
    private var mainView: WeatherView { return view as! WeatherView }
    private let viewModel: WeatherVMProtocol

    override func loadView() {
        view = WeatherView()
    }

    init(viewModel: WeatherVMProtocol) {
        self.viewModel = viewModel
        super.init(nibName: nil, bundle: nil)
        mainView.tableView.dataSource = self
    }

    required init?(coder aDecoder: NSCoder) {
        fatalError("init(coder:) has not been implemented")
    }
}
That looks nice.
Now we’ll add some dummy data to the TableView for our presentation to work.
extension WeatherVC: UITableViewDataSource {
    func tableView(_ tableView: UITableView, numberOfRowsInSection section: Int) -> Int {
        return viewModel.numberOfRows(in: section)
    }

    func tableView(_ tableView: UITableView, cellForRowAt indexPath: IndexPath) -> UITableViewCell {

        let cell = tableView.dequeueReusableCell(withIdentifier: WeatherCellProgrammatically.dc_reuseIdentifier, for: indexPath) as! WeatherCellProgrammatically

        guard let city = viewModel.item(at: indexPath) else { fatalError() }

        cell.cityNameLabel.text = city.name
        cell.temperatureLabel.text = city.temperature

        return cell
    }
}
The final result should look something like this:

We’re done with creating the Views programmatically, and we’d have a perfectly functional app at this point. However, as you can see from the code, the View is bloated with different constraints and responsibilities which are better off placed elsewhere.
Now let’s get back to the View and try to refactor some things.
We’ll tackle that problem using XIBs.
First, we‘ll create table view cell through XIB. To do that, we need to delete the default View, get the TableView Cell from the list of objects and drag it up as a new main View. We set up all the contraints on it as well.
Now, making two similar cells through XIBs would mean that we’d have to define the look of each cell individually, so to bypass that, we’ll define all additional properties on the subviews programatically, within the weatherview.swift class.

Next we‘ll create a Swift class WeatherXibCell, which will be the subclass of UITableViewCell.
After that we’ll put a custom class property to WeatherXibCell.
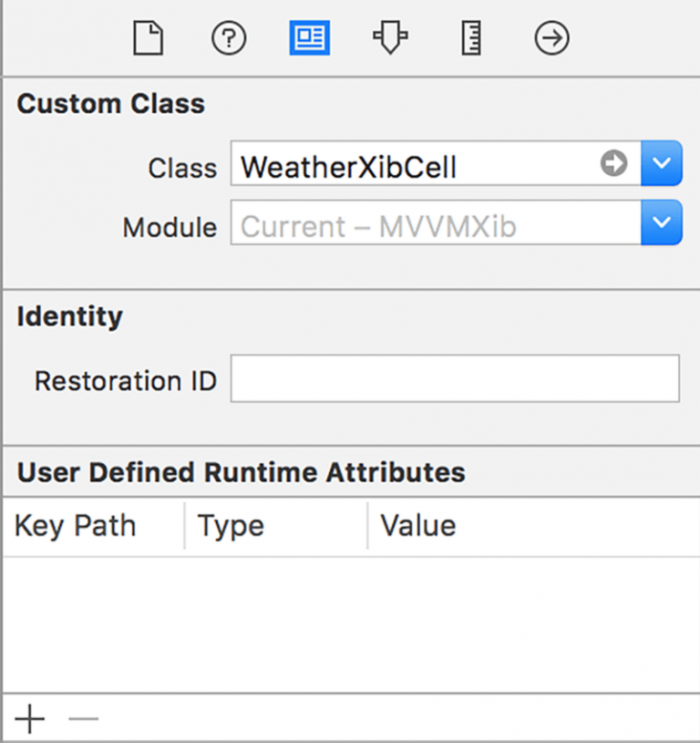
Next, we drag the label outlets from XIB and connect them with the WeatherXibCell.
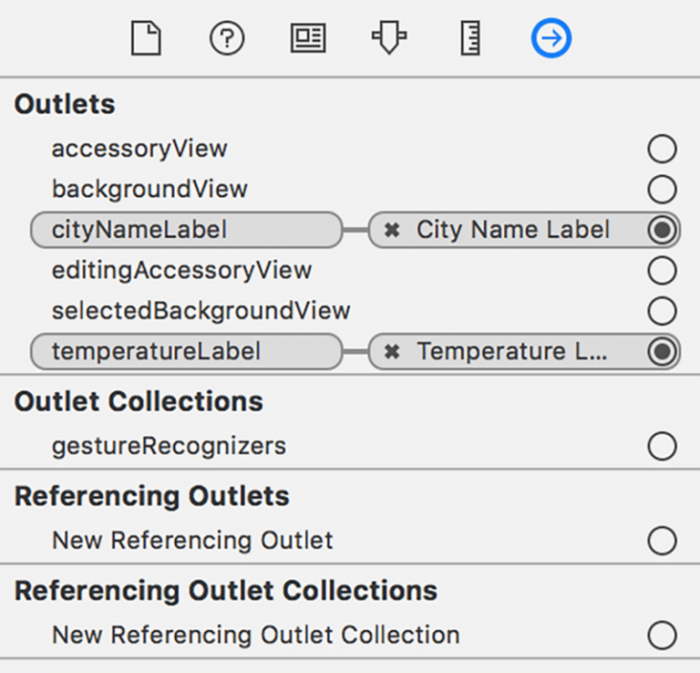
After setting all of the properties, our WeatherXibCell.swift should look something like this:
class WeatherXibCell: UITableViewCell {
    // MARK: - Properties

    @IBOutlet weak var cityNameLabel: UILabel!
    @IBOutlet weak var temperatureLabel: UILabel!

    // MARK: - Lifecycle

    override init(style: UITableViewCellStyle, reuseIdentifier: String?) {
        super.init(style: style, reuseIdentifier: reuseIdentifier)

    }

    required init?(coder aDecoder: NSCoder) {
        super.init(coder: aDecoder)

    }

    // MARK: Private custom methods

    private func configureView() {
        // Temperature label style
        temperatureLabel.textColor = UIColor.lightGray
        temperatureLabel.font = UIFont.systemFont(ofSize: 16)

        // City name label style
        cityNameLabel.textColor = UIColor.black
        cityNameLabel.font = UIFont.systemFont(ofSize: 16)
    }

    override func awakeFromNib() {
        super.awakeFromNib()
        configureView()
    }
}
Now, we need to make changes to tableview so that it loads the cells from the XIB.
In WeathervView.swift we’ll swap this:
tableView.register(WeatherCellProgrammatically.self, forCellReuseIdentifier: WeatherCellProgrammatically.dc_reuseIdentifier)
with this:
let nib = UINib(nibName: "WeatherXibCell", bundle: Bundle.main)
tableView.register(nib, forCellReuseIdentifier: WeatherXibCell.dc_reuseIdentifier)
We’ll also set the cell in WeatherVC in cellForRowAtIndexPath to
let cell = tableView.dequeueReusableCell(withIdentifier: WeatherXibCell.dc_reuseIdentifier, for: indexPath) as! WeatherXibCell
And voila, here you have the exact same result with less fuss:

If we look closely at the code, our cell components look clearer and the separation is more precise.
You can also see that the View is much neater now and all the different constraints are transferred to XIB, where they are set up more quickly and result in cleaner code.
Next, we can do the same with the Weather View. But that we leave to you. ????

When something unusual happens, Vlado is the man with an explanation. An experienced iOS Team Lead with a PhD in Astrophysics, he has a staggering knowledge of IT. Vlado has a lot of responsibilities, but still has time to help everybody on the team, no matter how big or small the need. His passions include coffee brewing, lengthy sci-fi novels and all things Apple. On nice days, you might find Vlado on a trail run. On rainier days, you’ll probably find him making unique furniture in the garage.
And saying good-bye to the massive ViewControllers.

You can just read about it or try to create a simple pp with us. We suggest the latter.

What a difference a ViewModel makes.