
How to create an app step by step
Knowing how to create an app means having a map for a successful project. We’re bringing you a step-by-step guide to creating an app, from inception to launch.
A requirement document is a crucial part of developing your app.
Writing down all the details and specifications into a handy reference document effectively eliminates any miscommunication and misinterpretation.
It ensures that the final app will be the same as the one you imagine in your head.
This article will teach you how to write a great mobile app requirement document. Let’s begin!
A great mobile app requirements document should start with the core idea—the main reason the app is worth building in the first place.
However, this shouldn’t be a detailed, pages-long exposition of your app. Instead, you should be able to distill the essence of your idea into one sentence or a short paragraph.
In other words, it’s your app’s elevator pitch.
An elevator pitch is a quick 30-to-60-second summary of your app and its benefits.
It’s named because it allows you to communicate your idea effectively in roughly the length of an elevator ride.
Here’s an example:
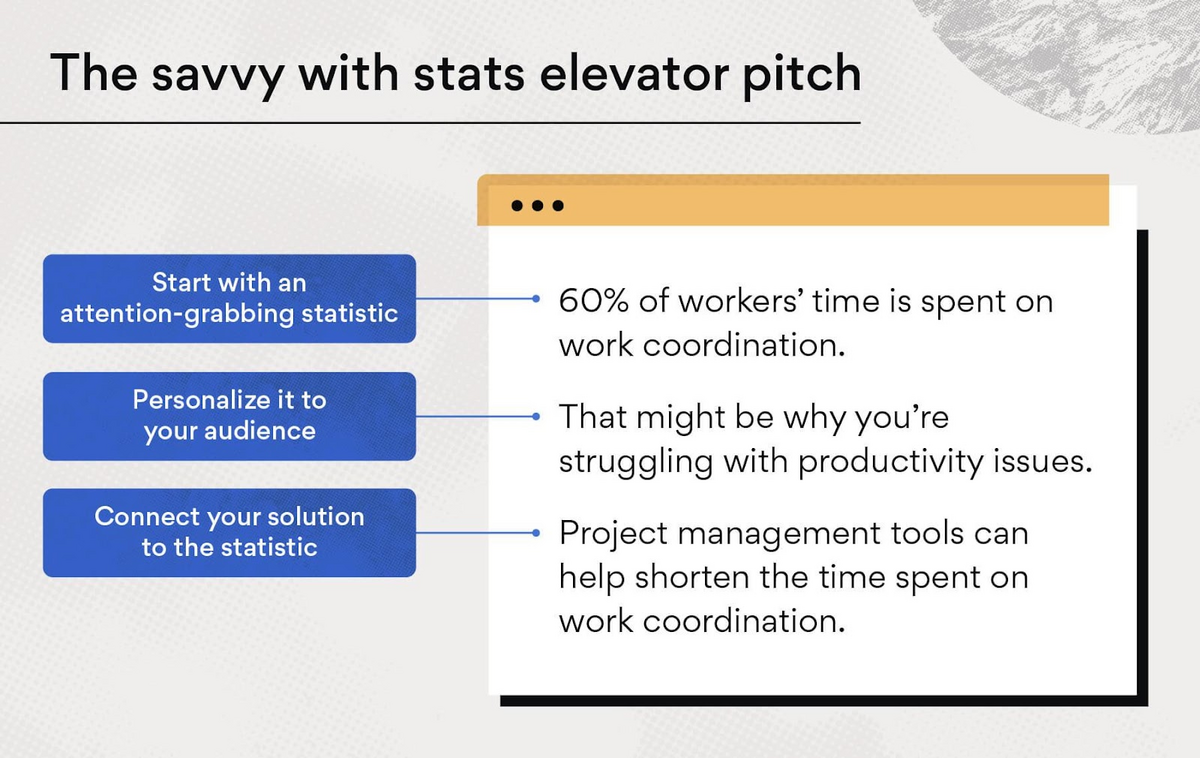
Source: Asana
Capturing your idea in a single sentence or short paragraph lets you immediately catch your reader’s attention without overwhelming them.
Plus, an elevator pitch can be a great barometer. If you can’t compress your core idea into a few lines, it’s probably too complex, and you need to work on it further.
At the minimum, a good app elevator pitch should define the target audience, the problem your app is trying to solve, and the unique approach you’ll take in tackling it.
The folks at the Founder Institute have released a Mad Libs-style template that you can use to formulate your app idea summary.
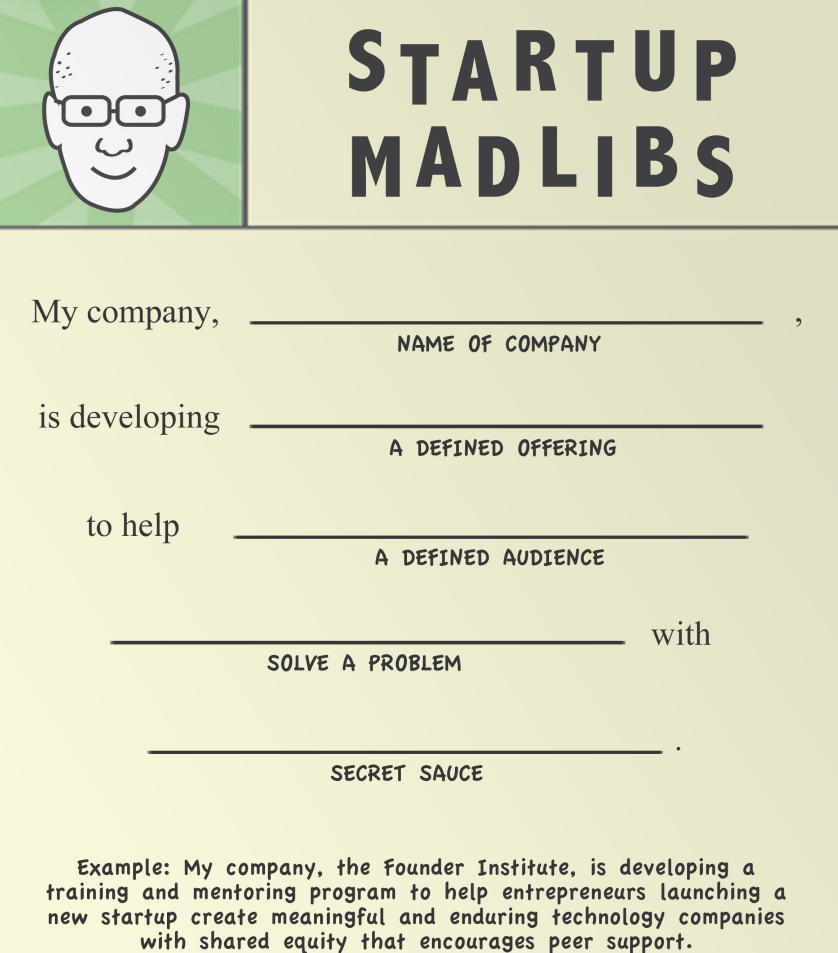
Source: The Founder Institute
The secret sauce in the above template is the unique solution that makes your app superior to your competitors.
It can be an innovative algorithm or technology. But often, it could be a new approach that no one has thought of.
For instance, Airbnb’s secret sauce was connecting homeowners with extra space to travelers who wanted cheaper accommodation.
It was a brilliant model because it simultaneously solved the problems of two different markets.
The founders of DropBox also crafted an effective app summary that communicates the merits of their app wonderfully. You can see it here in their pitch deck.

Source: Visme.co
We recommend taking the time to craft a clear and concise app idea. That’s because it’s the first impression readers will have and sets the tone for the rest of the requirement document.
Once your core idea has been established, the rest of the document should flesh out how you’ll achieve that in the app.
An important aspect to include is your chosen navigation pattern. This refers to how users navigate from one area of your app to another.
Different navigation patterns have their pros and cons. Your choice of one over the other will also depend on the nature of your app.
For example, one popular navigation pattern, especially for iOS apps, is the tab bar.
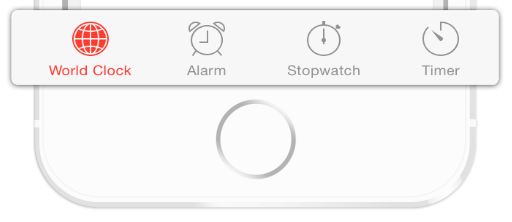
Source: Smashing Magazine
Menu bars are best for apps that have relatively few sub-pages. Their main advantage is that they are always visible, so it’s easy to switch between screens in your app.
However, due to limited real estate, they can’t accommodate too many pages in your app. That’s not ideal for, say, an e-commerce app with dozens of product categories.
In this case, a hamburger icon might be more suited.

Source: Just in Mind
However, it can’t be difficult to choose the right navigation pattern if you haven’t laid out your user flow first.
This process requires you to flesh out all the screens in your app and how they connect, starting from user registration and onboarding.
Here’s an example:
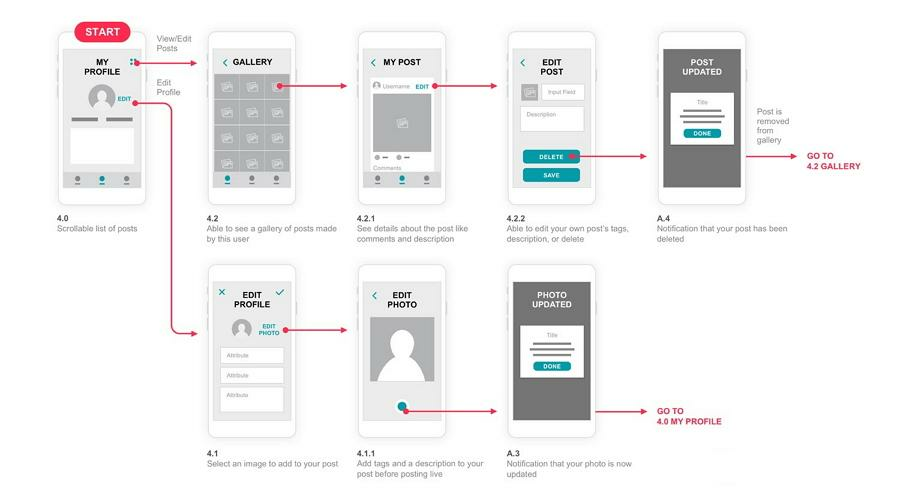
Source: Mockplus
User flows are vital to understanding how users should go through your app.
This insight enables you to choose the best navigation pattern that reduces friction and improves user experience (UX).
The next step is to define the features that should appear in your app.
But rather than include them in one long list, you should identify the core features, as opposed to mere nice-to-haves.
This is important so developers can prioritize what they need to work on first.
First, let’s define what core features actually mean. These are the must-haves that the app needs to fulfill its purpose.
For instance, searching for a ride and booking it are all core features in the Uber app.
But fare estimation—despite being useful—isn’t an essential function. It’s just a nice bonus, which is why Uber didn’t include it in their MVP.
Admittedly, it can be tricky to isolate your core features, especially if everything seems useful to the user. But one tool that can help you is the MoSCoW priority matrix.
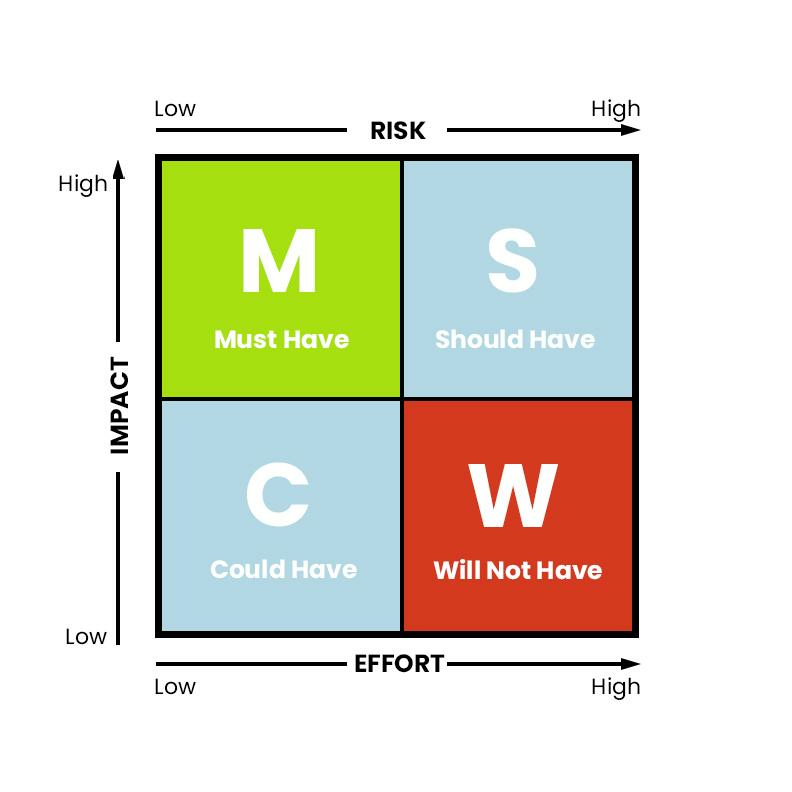
Source: DECODE
As the above diagram shows, the MoSCoW matrix forces you to segregate your features list into four quadrants based on three metrics—risk, impact, and effort.
Features in the must-have and should-have quadrants are your core features. These are the functionality that greatly impacts your app and the user experience.
The only difference is that should-have quadrants involve more effort and risk to implement.
Those in the could-have are features that are nice to have. They generally have a low to medium impact on the app, which means they’re not a priority.
But because they require little effort and risk, they’re easy to implement.
The last quadrant includes will-not-have features that are difficult and risky to implement yet have minimal impact. Avoid them at all costs.
It’s a good idea to mention existing apps similar to yours as a reference point.
Doing this helps the reader visualize the features and navigation patterns you describe.
That way, developers and designers know exactly how to implement them with minimal misinterpretations.
For example, no doubt Lyft used Uber as their inspiration when designing their interface, as these side-by-side screenshots show.
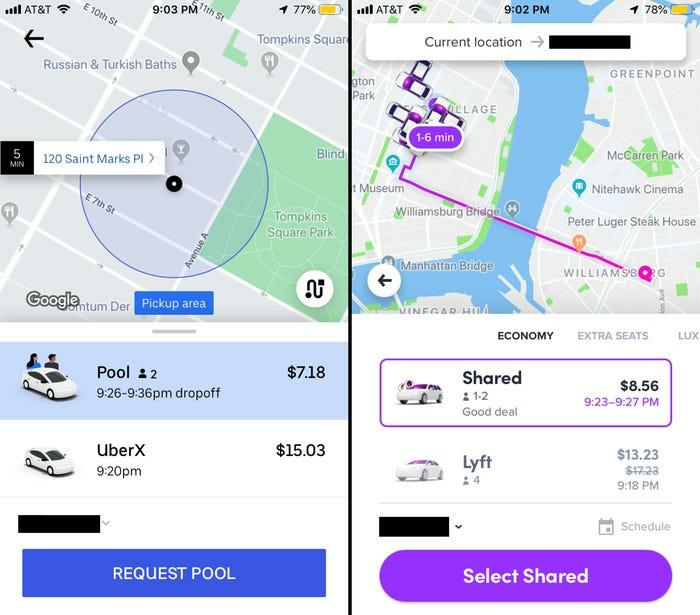
Source: Business Insider
As long as you don’t copy 100%, adopting what’s already out there is actually a good strategy. It can make your app familiar to users, which is great for building trust and enhancing usability.
Moreover, referencing other apps makes communicating your app’s main idea easy.
For example, a peer-to-peer car sharing company like Turo can be described simply as the Airbnb for cars.
No need to elaborate on the specifics because most people already know how Airbnb works.
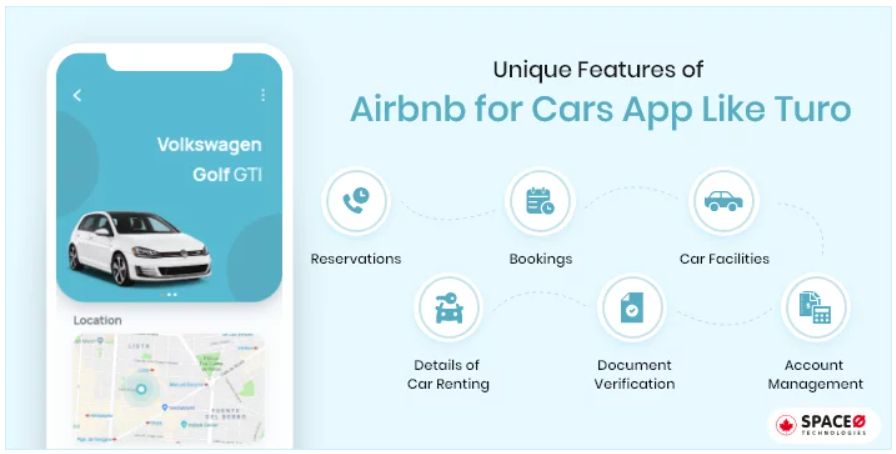
Source: SpaceO
Talking about other apps can also be a good competitive analysis approach.
It can notify the development team of the mistakes they must avoid while thinking of ways to improve on what’s already in the market.
Ultimately, referencing other apps can bring clarity, thus allowing your development team to make the app as intended.
Functional specifications are the aspects of your app that detail how it will solve the user’s problem.
Core features are essential to a functional specification, but you should go beyond that.
You must also consider the infrastructure behind the app, such as development tools and app-server interactions.
It tackles what the system should do to solve the user’s problem. In contrast, non-functional requirements are about how the app does it, mostly including performance metrics like scalability, speed, and security.
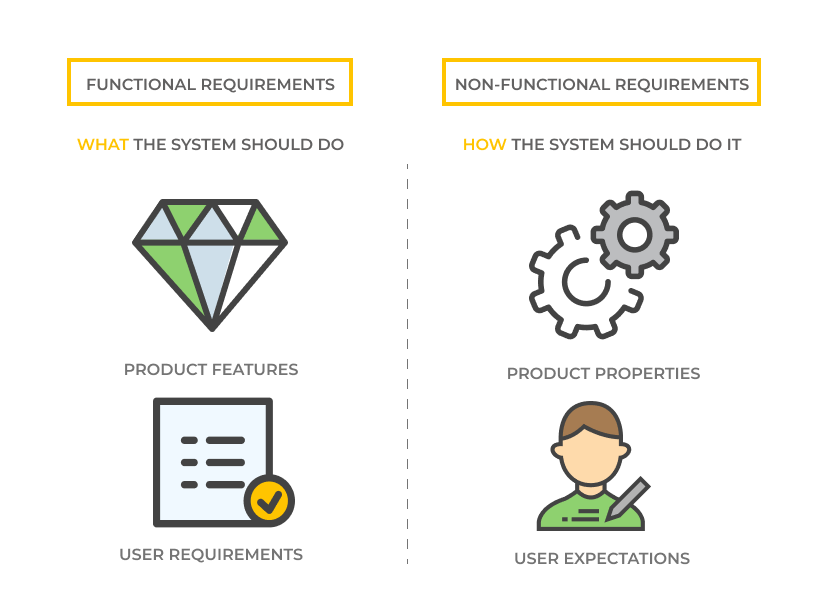
Source: Lvivity
No doubt, non-functional specifications are vital for the user experience. After all, no one wants to use a slow app. But they’re not a priority when writing a requirements document.
The reason is focus.
In the same way you need to define your core features, identifying functional requirements allows your developers to prioritize.
The thing is, non-functional requirements are often flexible and have workarounds. Functional requirements, on the other hand, tend to be static.
Writing down functional requirements also helps you estimate the project’s scope, including timeframes and budgets. It’s also great for defining the roles in your development team.
You should specify the minimum operating system and hardware requirements for the app to function optimally.
For one, various devices have different amounts of RAM, as this infographic shows.
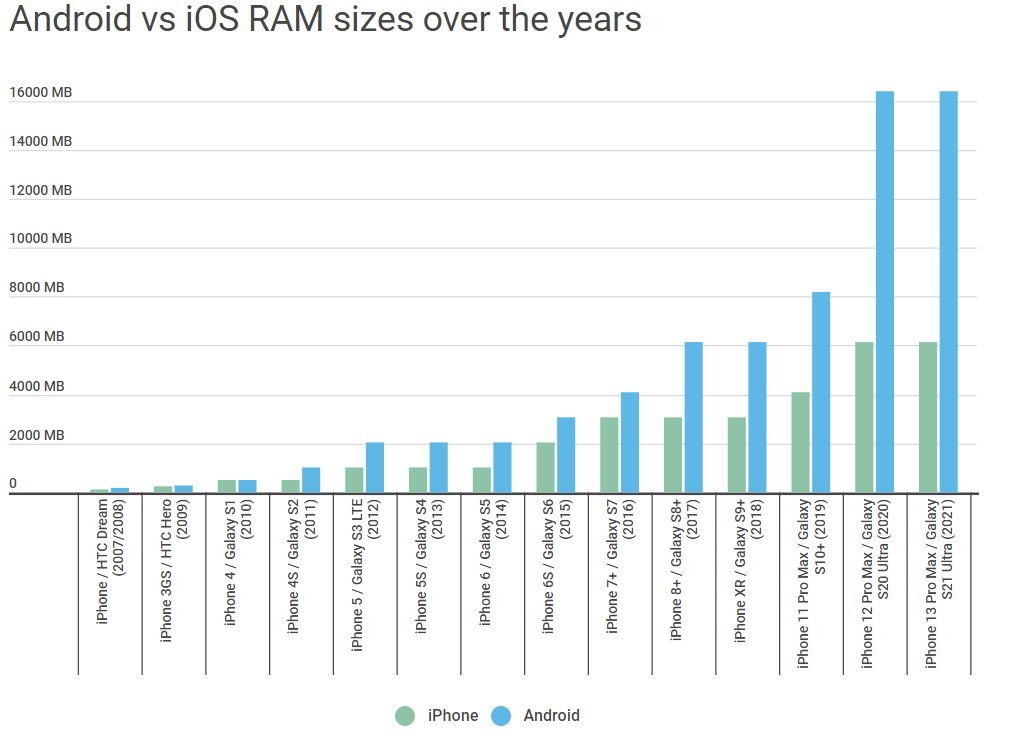
Source: Android Authority
In addition, iOS and Android handle memory management differently.
Android runs on the Java runtime environment, making memory management easier for the developer.
However, the trade-off is that it also consumes more memory. iOS, in contrast, gives developers more freedom to optimize their app’s memory handling.
Pointing out these nuances is crucial in a requirements document. It allows your developers to prepare the necessary tools and approaches when coding.
If your app requires access to any device hardware, such as the microphone or camera, indicate that in this section.
You should also consider that various screen sizes are available in the market, even within the same operating system. The following infographic makes this evident:

Source: Statcounter
Fortunately, iOS and Android include resizing features in their SDK, allowing your UI to be fluid and adaptable. But your developers can only prepare for it if you mention it in the document.
A wireframe is a visual outline of your app’s UI, the equivalent of a blueprint in architecture. Including it in the requirement document is essential because it can give the reader more clarity.
Here’s what a wireframe looks like:
Source: Miro
Wireframes are useful for illustrating to developers and designers exactly what you want the app to look like.
It’s like the reference point of your app project – helping avoid miscommunication and misinterpretation.
You can also use your wireframe to show your app’s user flow and interactive elements.
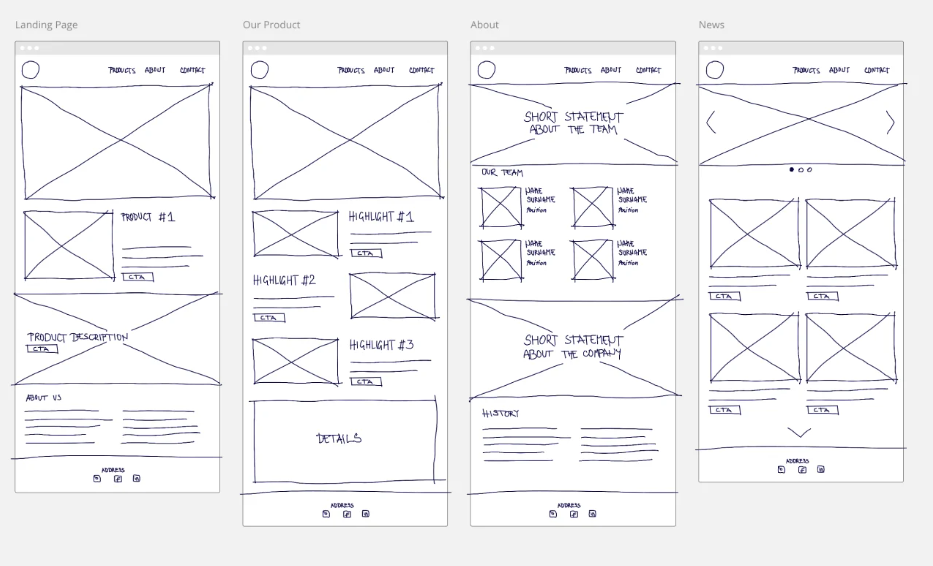
This wireframe by Risa Nakajima is a great example of how you can do it effectively, even in a static medium.
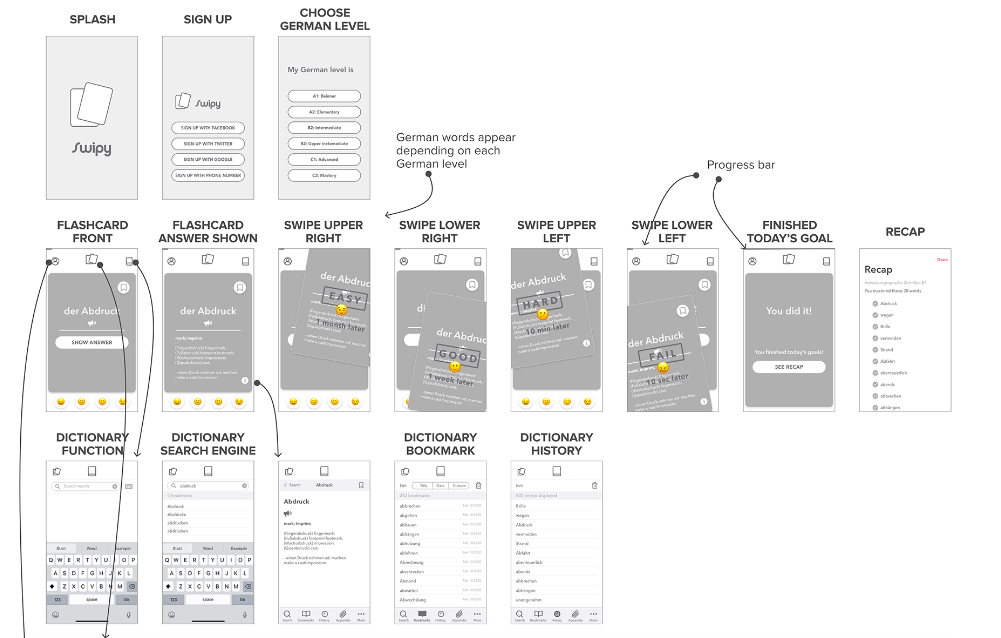
Source: Risa Nakajima
It’s a good idea to annotate your wireframes as you go along. Aside from providing more context, you can also use it to provide additional instructions to your developers.
For instance, take a look at the annotation below.
Instead of simply saying “make this element accessible”, the annotation lays out the exact specifications. That way, there’s minimal guesswork on the part of the developer.
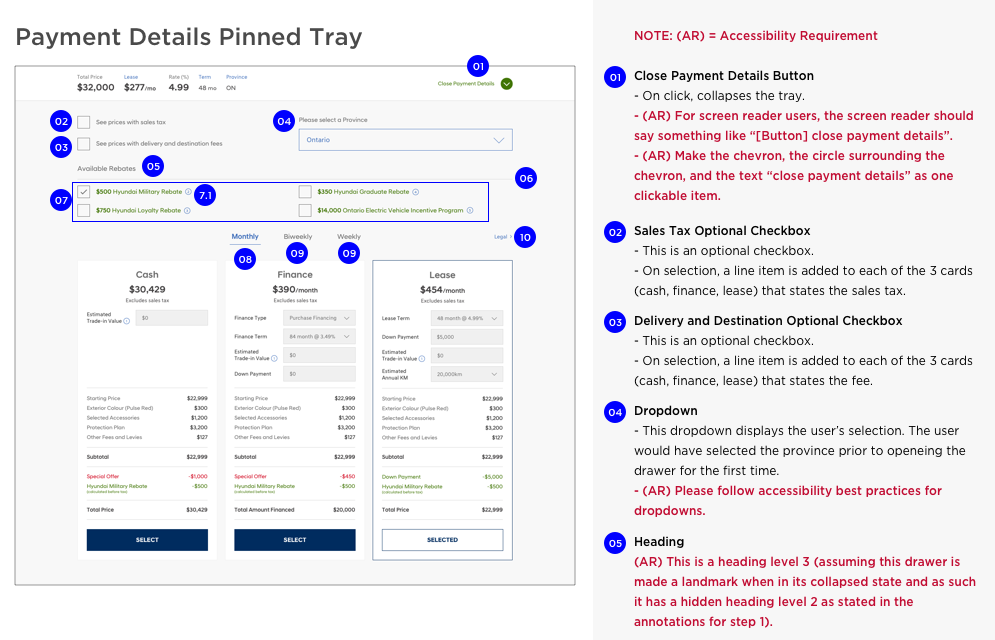
Source: Adobe
The bottom line is that wireframes can make your requirements document much clearer, readable, and even more engaging. Indeed, the best wireframes are those that can speak for themselves.
Once you’ve prepared the content of your requirement document, the last step is to decide on the format.
There are four types to choose from—functional specification document (FSD), user stories, sketches and wireframes, and mixed format.
A functional specification document (FSD) is the standard format where the app’s features and functionality are listed in detail.
They’re similar to an instruction manual for building an app. An FSD is mostly written from a developer’s point of view.
In contrast, user stories are written from the user’s perspective. They list down the things a person can do while in the app.
This approach allows you to look at the business case of your app.
However, because user stories tend to be simple and non-technical, developers need further details to build an app from them.
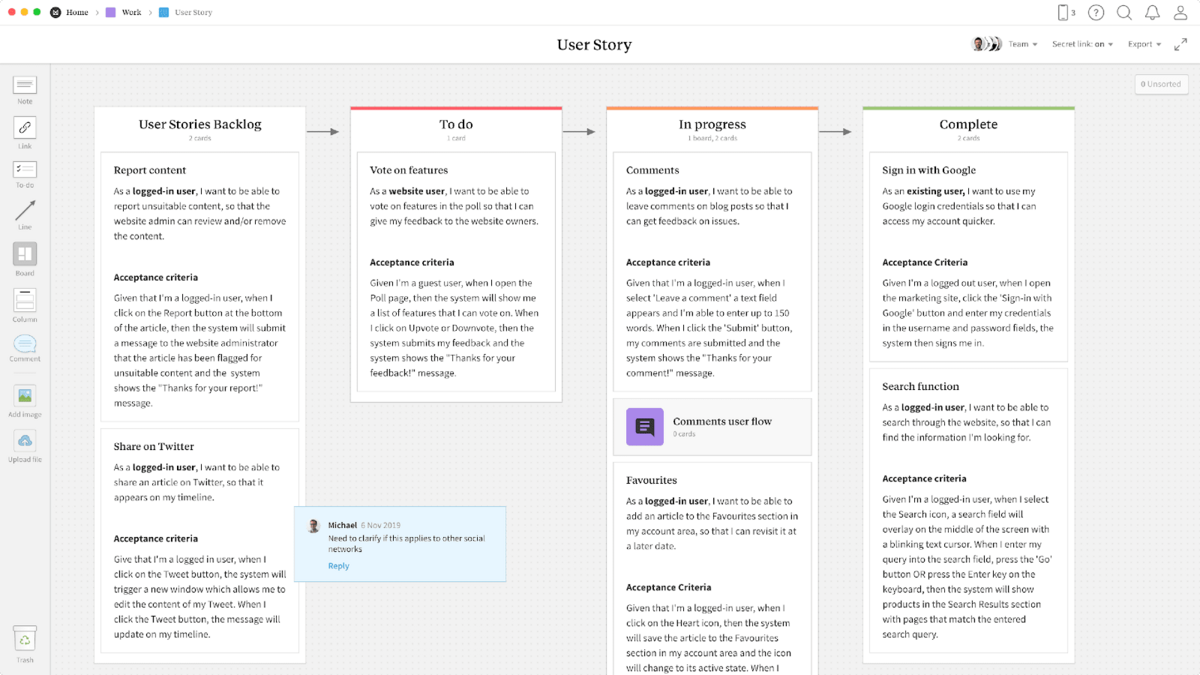
Source: Milanote
Wireframes and sketches is a format where you mostly use wireframes, mockups, and other visual aids to describe your app.
They’re much more engaging and easier to understand than an FSD, but they require more time to create.
The last format is perhaps the one we recommend—the mixed format. This one involves using different formats in your document to paint a clearer picture.
For instance, you can enhance an FSD by adding a wireframe as a visual aid.
We hope you now know how to write a great mobile app requirement document.
When well-crafted, you can easily pass the requirement document to any development team, and they should be able to implement it as intended.
Of course, that’s assuming they have the expertise and experience to do so.
So, take the time to find and work with only a reputable app agency like DECODE. We believe we have what it takes to bring any requirement document to life.
Interested? Schedule a free consultation with us today, and let’s talk!

Marko started DECODE with co-founders Peter and Mario, and a decade later, leads the company as CEO. His role is now almost entirely centred around business strategy, though his extensive background in software engineering makes sure he sees the future of the company from every angle. A graduate of the University of Zagreb’s Faculty of Electrical Engineering and Computing, he’s fascinated by the architecture of mobile apps and reactive programming, and a strong believer in life-long learning. Always ready for action. Or an impromptu skiing trip.
Knowing how to create an app means having a map for a successful project. We’re bringing you a step-by-step guide to creating an app, from inception to launch.

If you’re looking for inspiration, and want to build an app to impress your users, here are the mobile app development trends to know.

There are certain processes and trends you must keep abreast of if you want to successfully turn your app idea into reality.