
Porting android code to iOS: kotlin multiplatform
Reasons why you should consider Kotlin Multiplatform over 2objc and C++ in your next mobile app project.
So, you want to become an iOS developer. Congratulations! Creating applications for Apple products is exciting, challenging but very rewarding.
As an iOS developer myself I know the learning curve can sometimes be steep.
That’s why I’m here to help you get a great grasp of the fundamentals of iOS.
I find it a lot easier to push through challenges if I have a good bird’s eye view of the things I need to learn.
With this post I’ll lead you through all the basics you need to know to call yourself an iOS developer.
Happy learning!
The first step on the iOS developer roadmap is to get familiar with the tools.
You’ll need:
Unlike other branches of development which have a wider range of tools to choose from, iOS development is pretty specific as it requires a Macintosh (or at least a Hackintosh).
After you get your Mac, it’s time to get to know the programming language and framework for iOS.
Swift is an object-oriented language. It’s developed by Apple and it’s diverse enough for beginners who are looking for their first programming language, as well as for experienced developers who want to build complex applications.
It’s relatively new – dating from 2014, its main goal is to serve as a much easier alternative to C-based languages like C, C++, and Objective-C.
It has loads of other great benefits, including:
You can download the latest release on the official website.
More and more apps are made with Swift because of its elegance and practicality.
That’s why I recommend you start working with it first.
Source: Swift Developer Blog
If you plan to find a job as an iOS developer, sometimes you’ll have to work with Objective-C.
We’ll cover this language in the next section.
Before Swift, iOS developers wrote code in Objective-C.
Like Swift, this language is also object-oriented but was ultimately replaced by Swift as the main programming language.
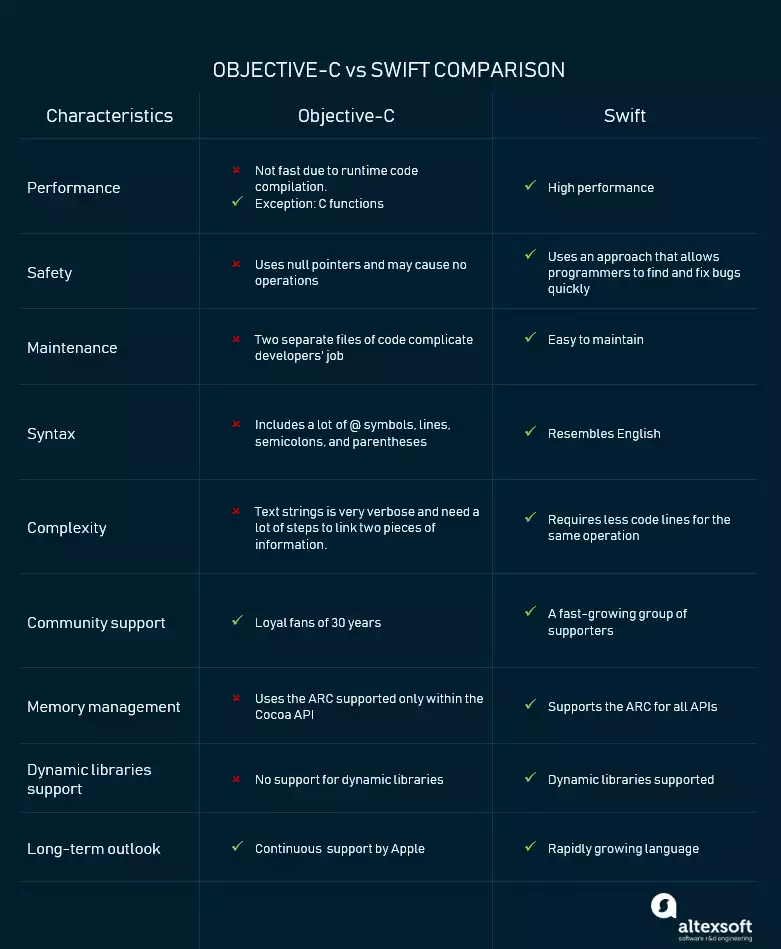
Source: Altexsoft
As you can see in the example above, it’s robust so it’s not easy to learn, unlike Swift.
However, lots of libraries are written in Objective-C and sometimes you’ll have to work on projects already written in that language.
As more apps are made in Swift, Objective-C won’t be used as much, but it’s still useful to learn it.
OK, so now that you know what languages you build iOS apps with, we’ll take a look at where the code building happens.
Xcode is Apple’s official IDE (integrated development environment). An IDE is a software for building applications that combines common developer tools into a single graphical user interface (GUI).
Xcode is used for developing iOS, ipadOS, watchOS, macOS, and tvOS apps, basically anything Apple.
You can write Swift in XCode but also in other IDE-s. However, as a beginner, it’s best to start with Swift
There are a few IDEs. Here I’ll mention just some of them, so you can explore them later:
The good news is that Swift is automatically installed with Xcode. It’s free and available on the App Store. So get your Mac, download Xcode and you are ready for the next step.
Now that you’ve set up your tools, we can get started with building your first app.
We’ll start from the top with some iOS basics to get your app running!
If you’re an iOS beginner, let’s establish a starter kit, just so you can build something simple.
Here’s what you’ll need.
First things first, you need to be able to build user interfaces.
According to Indeed, a user interface is a point at which human users interact with a computer, website, or application.
Or to put it simply, it’s everything the user sees in an app.
UI is the basic requirement of every app, not only an iOS one.
So, after you learn how to build a simple UI, you might want to add some functionality to buttons, text views, or table views.
At this point, everything you’ve built is probably in a single view controller, so it’s time to learn some design patterns.
For starters, you might want to start with MVC (Model-View-Controller). That’s Apple’s recommended architecture pattern.
It makes your code more structured and you can delegate protocols in case you don’t just want a single view app. I’ll talk about it in detail later.
Before we move on to additional steps like networking, creating a complex UI, or perhaps concurrency, I’ll introduce you to a tool you’ll definitely use when coding – third-party libraries.
They are a great tool, especially if you are starting out or want to do something a bit more complex. They make coding much easier.
To integrate third-party libraries into your project you will need a dependency manager.
For iOS you can use CocoaPods, Swift Package Manager and Carthage.
There are tons of third-party libraries out there, so it can be overwhelming, especially for a beginner.
To make it easier for you, have a look at this short list of some useful libraries:
When choosing a library for your app, always make sure they’re regularly updated and maintained so your app can function properly.
Now let’s move on to UI, the visual part of app building.
In case you are a visual thinker like me, it’s a good idea to start with something tangible, like a user interface. As I said before, UI is “what you see” when you open an app.
To make user interfaces you’ll need a UIKit.
This is a framework (but not this one!) that helps you construct and manage a graphical, event-driven user interface for an iOS or tvOS app.
Also, it provides the objects for building your app. With these objects, you can display your content on screen, interact with it, and manage interactions with the system.
As a beginner, you’ll probably like storyboards. Storyboards are visual editors where you can put together a screen from already existing components, such as UIButton, UIImageView or UITableView and instantly see what your app will look like.
However, in case you already have some development experience, you might prefer building UI programmatically or even building some views in .xib so that you can reuse them throughout your app.
This approach has better reusability as well as easier debugging.
But you can only use one XIB file per view. That’s why storyboards are more popular these days.
If all of this is not enough and you want to start with something even more intuitive, I have one more option for you — SwiftUI. I have saved this one for last, as it is the newest and still not as reliable and robust as UIKit.
SwiftUI was first released in 2019 and can be used only if the minimum operating system level is iOS 13, however, it is not recommended to go below iOS 14 since at the time iOS 13 came out, SwiftUI was still in the early stages of development.
SwiftUI is definitely the future of iOS development because it has the best of both worlds.
You build the UI programmatically, but you can instantly preview it in the design canvas where your app is live and running. You can edit it either in code or in the design canvas as well, and all of your changes are synced and recompiled instantly.
Perhaps the best thing about all of this is that you don’t need to pick only one approach.
Theoretically, you can use all of the above in a single app, though it might be a bit more simple to at least choose between UIKit and SwiftUI.
Every app has its architectural pattern. In iOS we use the MVC (Model View Controller).It’s an architectural pattern that separates an application into three main logical components: the model, the view, and the controller.
Along with MVC, there are similar design patterns (MVVM, VIPER, etc.), but basically, they all try to separate logic and data (Model and Controller) from what the user sees (View).
This is done to make the changes easier to implement. Let’s say there’s a request to move the button elsewhere or that he wants to add some new UI and then it is much easier to just move the button without disrupting the logic of the app.
Also, the same logic can be used on multiple different views and vice versa – you can have the same view and multiple different models / controllers depending on the scenario.
It is also easier to divide the work, one dev can do the logic, while the other can do UI.
Let’s learn about how content and data is uploaded into an app.
Why is that important? Because UI is useless without content and data.
Apps are like brains – they memorize data. And just like a brain, they can also get overwhelmed! So they have to forget something to make room for new data.
That’s why data is written on a server and pulled when the user needs it.
For example, when you log into your Facebook app, the feed you see is pulled from the server.
This happens thanks to network requests. As an iOS developer, you can create network connections to send and receive data using transport and security protocols.
An object that helps you with that is URLSession. It’s an API that you can use to download and upload content. Also, it coordinates a group of related, network data transfer tasks.
All content has to be stored in some kind of format in order to be uploaded or downloaded – the most common format is JSON (JavaScript Object Notation).
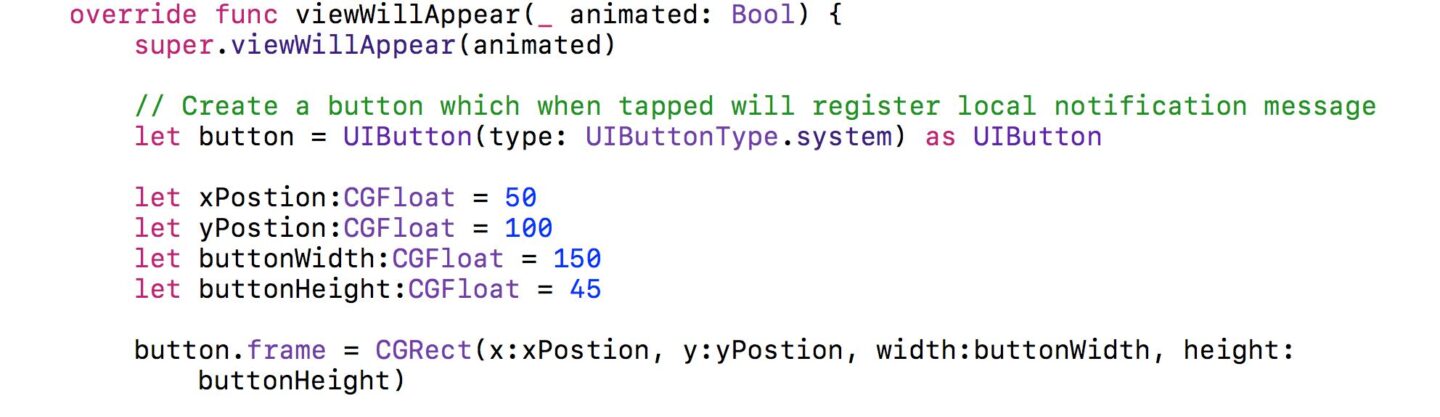
Here’s an example of how you can use an URLSession:
func urlExample() {
  guard let url = URL(string: "https://itunes.apple.com/search?term=taylor+swift&entity=song") else {
    print("Invalid URL")
    return
  }

  do {
    let (data, _) = try await URLSession.shared.data(from: url)
    if let decodedResponse = try? JSONDecoder().decode(Response.self, from: data) {
      let results = decodedResponse.results
    }
  } catch {
    print("Invalid data")
  }
}
First, we create a URL object where we provide a URL string. If the provided URL string is invalid,
guard let ensures that it fails without crashing, aka, that it fails gracefully.
Next, in the do-catch block we try to get the data from the URL. Data received from URLSession is saved to Data structure, that is not decoded yet.
Decoding is done with JSONDecoder().decode method with parameters Response and data. For decoding Response structure needs to conform to Decodable protocol.
iOS’s Protocol Codable codes and decodes the content into appropriate formats so it can be sent or received.
With basic knowledge of UI and Networking, we can start talking about threads, because they should operate on different threads.
Dispatch or Grand Central Dispatch was created by Apple over 10 years ago. It’s an API that helps developers write multithreaded code automatically. That means that the system does the thread management.
When you make changes to the UI they’re always performed on the main thread.
UI changes are made on the main thread because at the time of drawing (rendering) the image on the screen, everything must be ready for drawing.
If we were to use some asynchronous thread, then we can’t know when the asynchronous operation will be over. Then maybe some elements wouldn’t be drawn.
Waiting for an asynchronous response (from a URL session, for example) must go to the background thread. Waiting for a response from a server can take a few seconds. If we were to wait for it while on the main thread, then the UI could be blocked until the response is processed.
When an application receives some data, it should be saved so that it is not lost when the application is shut down.
So when a user downloads a new application, they only log in for the first time, and their data is stored in the mobile phone’s storage so that the login data does not need to be re-entered each time, but is pulled from the application’s storage.
There are different ways to store data.
On iOS we use UserDefaults when we want to save a small amount of data (less than 100 KB). When you write data to UserDefaults, it automatically gets loaded when your app runs so that you can read it back again.
For larger data you can use Core Data or an open source solution like Realm Database (also great for Android).
Core Data is Apple’s own solution for persistence and larger data. With it you can generate class definitions and define data types and relationships.
When you’re dealing with sensitive data use Keychain for saving passwords for credit cards, WiFi passwords etc.
In the third-party libraries section, I’ve briefly mentioned dependency managers.
Now I’ll talk about them in more detail.
Dependency (package) managers are important because they make it simpler for developers to use code from different sources. They also do other things, like:
The most used dependency manager for iOS is CocoaPods. It’s also used for sharing code with other developers.
Since CocoaPods is built in Ruby, first you have to install that programming language.
Let’s move on to version control.
When building code, you’ll be making a lot of changes along the way. So much so that it will be hard to keep track of all of them.
With version control software you don’t need to worry. It will keep track of every change in the source code for you. Even ones made ages ago.
There are different types of version control systems:
Github – let’s start from the most used platform. More than 80 million developers track changes and versions of their code here.
Also, dev teams can seamlessly collaborate in building code. They can also discuss everything about coding on the forums.
Here are some of its best features:
Gitlab – this is another great version control platform. It has lots of features, like:
Unlike GitHub, GitLab has Continuous Integration/Continuous Delivery (CI/CD) and DevOps workflows built-in.
The free version supports all DevOps stages, 5 GiB storage, custom CI runners, and has an unlimited number of repositories.
Bitbucket – this platform is owned by Atlassian (the company behind Jira).
Here you’ll get these features:
If you’re already using Jira, Bitbucket is the best to use, because it’s integrated with other Atlassian products and Slack. Also, visually you can get a better overview of your project.
As a beginner, you’ll probably use the free version. You get 50 build minutes per month, 1GB of file storage, Jira software integration and CI/CD features.
All of these version control softwares have their pros and cons but you’ll eventually figure out which one works best for you.
These are the basics you need to start building your iOS apps. But if you want to learn more, in the next section I’ll share with you some learning resources.
The internet is chock full of amazing (and mostly free!) learning material about becoming an iOS developer. If one of them doesn’t cut it for you, don’t worry – you have plenty to choose from!
Here are some of my favorite resources that have helped me a lot on my own journey.
Ray Wenderlich is the guy behind raywenderlich.com. It’s a great website where you can learn not only programming for iOS, but even for Android.
You can view the first lessons of courses, but to continue watching you have to pay. Luckily, it’s not only about video courses.
Along with them, you get access to books about app development, learning paths and other useful material.
With these easy to understand tutorials, your path to becoming an iOS developer will be smoother.
This next resource is more specific. Swift by Sundell is, you guessed it, all about Swift.
The creator of the site is John Sundell, an experienced Swift developer.
What’s special about this site is that along with educational material like articles, you can also listen to podcasts and check out news about everything Swift.
And last but not least is Avander Lee’s website – https://www.avanderlee.com/.
On a weekly basis, Avander posts all kinds of articles about Swift, iOS and Xcode, all neatly categorized.
You can also subscribe and get additional resources and discounts on all kinds of educational materials.
If you’re more of a bookish type, there’s lots of books available online that can ease your way into the world of iOS.
Here are some reading reccomendations:
01. Prateek Prasad – App Design Apprentice
02. Chris Belanger & Bhagat Singh – Git Apprentice
03. Cosmin Pupăză, Ben Morrow, Eli Ganim, Alexis Gallagher, Ehab Yosry Amer and Matt Galloway – Swift Apprentice
04. Fahim Farook – UIKit Apprentice
05. Caroline Begbie & Audrey Tam – SwiftUI Apprentice
06. Enrique López-Mañas – Living by the Code
07. Robert C. Martin – Clean Code: A Handbook of Agile Software Craftsmanship
08. Neil Smyth – iOS 17 App Development Essentials
Books are great, but programming is a practical skill. So here are some of the best courses to get you started on your iOS development path:
01. Udemy — iOS & Swift – The Complete iOS App Development Bootcamp
02. Educative — Swift Programming for Mobile App Development
03. Coursera — iOS App Development with Swift Specialization
04. edX — CurtinX: Build your very first iOS app
05. Udacity — iOS Developer
With these amazing resources, all you need to do is roll up your sleeves and start your iOS journey.
Through this article I’ve unpacked the basics of iOS development you need for building iOS apps.
When you get a hang of Swift and UIKit, other parts will be easier to learn.
But if you’re still unsure about something or you are looking for more learning resources, there’s plenty of them online – books, online articles, podcasts and videos.
Also, check out these iOS articles some of my colleagues have written, they’re a great way to learn more.

Reasons why you should consider Kotlin Multiplatform over 2objc and C++ in your next mobile app project.

There are different ways to create your Views: the good old option of creating them programmatically, using XIBs, or the latest Apple-provided format, Storyboard. There’s quite a lot of discord over what the best method is, and there is no universal answer.

Yes, you’ve read it right. The title you expected was probably “Continuous integration with Jenkins”. But it isn’t.