
What does a QA engineer do? Everything you need to know
Learn all about the responsibilities of a Quality Assurance engineer in this article.
Selenium is an open-source automation testing framework for web apps. It helps testers and developers to automate tests across browsers and platforms.
But as web apps and testing scenarios become more complex, a single Selenium server might struggle to handle the load.
That’s where Selenium Grid comes to the rescue.
It’s a powerful extension that enables parallel test execution. It does so by distributing test cases across multiple nodes with unique browser configurations.
This speeds up testing and reduces execution time. Here we’ll explore Selenium Grid’s crucial role in cross-browser and cross-platform testing.
We’ll also talk about its architecture, setup, CI/CD integration, and a comparison between Selenium Grid 4 and its predecessors.
Let’s get into it!
Selenium Grid is an advanced testing framework for developers and testers.
It helps them perform tests across various web browsers and platforms simultaneously.
By distributing testing across multiple machines, it significantly reduces the time needed for comprehensive testing.
Selenium Grid is made up of a hub and nodes architecture.
The hub acts as a central control point that manages and delegates test execution to multiple nodes. Each node represents a different browser and platform configuration.
The Latest Selenium Grid 4 represents a significant upgrade to its predecessors.
It introduced components and capabilities that enhance its testing efficiency.
Now that we got the definition out of the way, let’s talk about the key components of Selenium Grid.
The core of Selenium Grid’s architecture is the Hub.
It’s a central unit of the testing process.
It efficiently manages incoming test requests and directs them to individual Nodes for execution.
Unlike Selenium Grid 3, Selenium Grid 4 improves the Hub with features like distributed tracing and improved communication with Nodes.
It does so through the introduction of components such as:
These components show an evolution in Selenium Grid’s capabilities.
Nodes are distinct execution environments where tests are carried out.
Each Node is configured with specific browser and platform settings. It enables parallel test execution across various combinations.
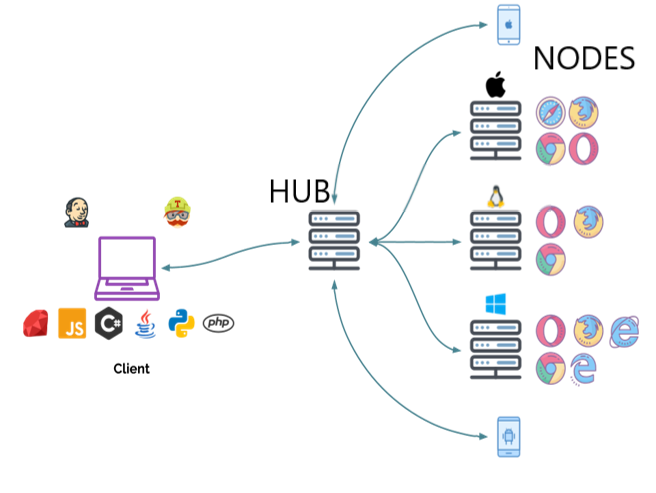
Source: Selenium Grid
In Selenium Grid 3, Nodes played a similar role, executing tests based on the Hub’s instructions.
And here’s how Selenium Grid 4 is designed, for comparison:
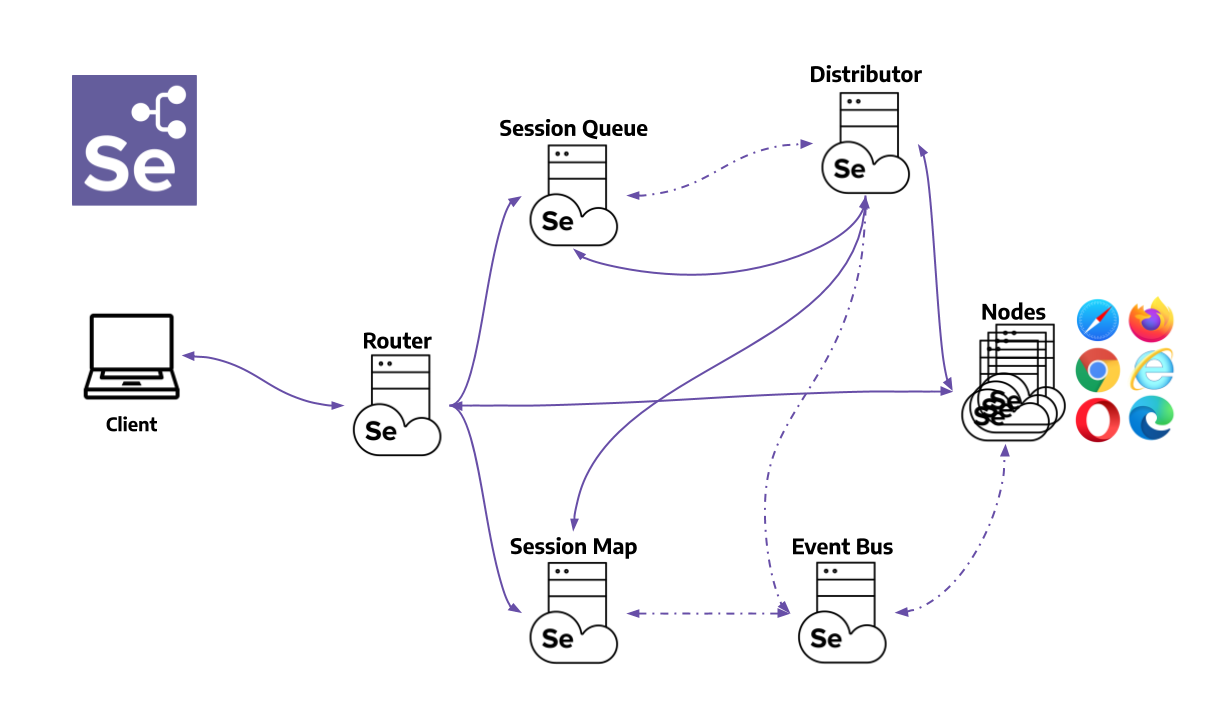
Source: Selenium Grid
Selenium Grid 4 Nodes continue this role, but with enhancements that include:
These upgrades enable Nodes to handle complex testing scenarios more efficiently.
A notable addition in Selenium Grid 4, the Router, improves the overall architecture.
It serves as the gateway to the Grid, receiving all external requests and directing them to the appropriate component.
This dynamic allocation optimizes the distribution of test execution.
And that contributes to load balancing and efficient resource utilization.
By ensuring test task allocation to the most suitable Nodes, the Router significantly enhances the speed and efficiency of testing.
The Distributor in Selenium Grid 4 handles two main tasks.
First, it manages the registration of Nodes. Nodes communicate their presence by sending registration events through the Event Bus.
The Distributor validates them via HTTP requests and keeps a record of their capabilities in the GridModel.
Second, the Distributor oversees session management.
It keeps an eye on the New Session Queue, where the Router directs the pending session requests.
When a request appears, the Distributor takes charge.
It identifies a suitable Node for session creation and maintains the relationship between the session and the executing Node in the Session Map.
The Session Map is a data repository responsible for maintaining the correlation between session IDs and the specific Node where the session is active.
It plays a crucial role in assisting the Router when it needs to route a request to the appropriate Node.
When needed, the Router will inquire with the Session Map to determine the Node linked to a particular session ID.
The New Session Queue stores incoming session requests in a FIFO order. That allows customization of request timeout and retry intervals.
The Router adds new session requests to the queue and monitors for timeouts, removing expired requests.
The Distributor checks for available slots and attempts to create sessions for matching requests.
If slots are full, it returns requests to the queue. It rejects requests timing out during retries or while at the front of the queue.
On successful session creation, the Distributor sends session information back through the queue to the Router and then to the client.
The Event Bus is a communication mechanism that improves interaction between different parts of the Selenium Grid architecture.
This enhanced communication leads to smoother data exchange between components. And that contributes to improved efficiency and coordination.
When initializing the Grid in the distributed mode, the Event Bus should be the very first component put into operation.
Selenium Grid is a game-changer in the world of automated testing.
There are several reasons why you should consider add it to your testing workflow.
Selenium Grid helps you scale your test infrastructure effortlessly.
By distributing tests across multiple nodes, it enables parallel testing across different browsers and platforms.
This leads to faster test execution and reduced test cycle times.
Selenium Grid uses resources effectively.
By sharing browser instances across multiple tests, it minimizes hardware and software costs. This makes it a budget-friendly choice for teams with diverse testing needs.
Selenium Grid ensures consistent performance across different browsers.
It enables simultaneous testing on different browser setups. This makes cross-browser testing seamless and reliable.
Selenium Grid improves test coverage by running tests at the same time on multiple nodes.
This allows you to find issues across different environments, increasing the accuracy and scope of your test suites.
The inclusion of VNC support in Selenium Grid allows you to monitor test execution in real-time.
This feature simplifies debugging and fosters better collaboration among team members.
Setting up Selenium Grid will revolutionize your test automation efforts.
It’ll do so by enabling parallel test execution across browsers and platforms.
Latest Selenium Grid 4 offers 3 modes:
Standalone
Hub and Node
Distributed
In this step-by-step guide, we’ll focus on the standalone Selenium Grid mode. We’ll walk you through the process of setting it up using Python.
By following these steps, you’ll be able to streamline your testing efforts. This will lead to improved efficiency and more robust test automation.
Visit Getting started with Selenium Grid for deeper understanding of each mode and their setup processes.
Let’s get started!
Make sure you have Python installed, along with the Selenium library. You can install Selenium using pip:
pip install selenium
Download the latest Selenium Server (Grid 4) JAR file from the official Selenium website: https://www.selenium.dev/downloads/.
Save the JAR file in a directory of your choice.
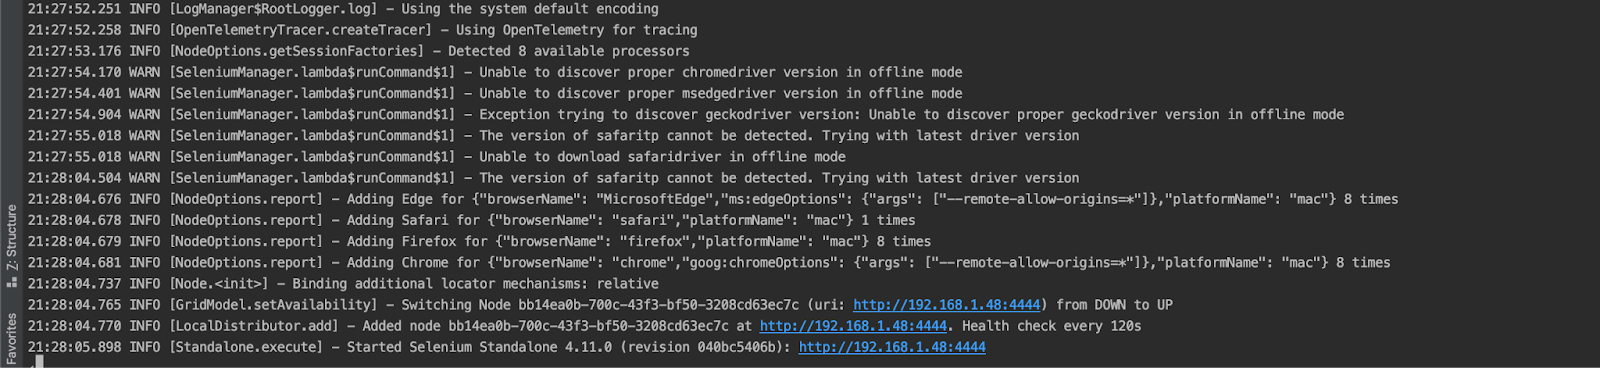
Open a terminal and navigate to the directory where you downloaded the Selenium Server JAR file. Run the following command to start the Selenium Grid Hub:
java -jar selenium-server-<version>.jar standalone --selenium-manager true
Note: Make sure to replace <version> in the command with the actual version number of the Selenium Server JAR file you downloaded. Adding –selenium-manager true will configure the drivers configuration automatically. You don’t have to download them manually.
Your terminal should look similar to the screenshot below:
Now let’s write a simple test script.
The test script will:
all of this happens concurrently for multiple web browsers using the ‘multiprocessing’ module, enabling parallel testing.
import logging
import multiprocessing

from selenium import webdriver
from selenium.common.exceptions import WebDriverException
from selenium.webdriver.chrome.options import Options as ChromeOptions
from selenium.webdriver.common.by import By
from selenium.webdriver.edge.options import Options as EdgeOptions
from selenium.webdriver.firefox.options import Options as FirefoxOptions
from selenium.webdriver.support import expected_conditions as EC
from selenium.webdriver.support.ui import WebDriverWait

# Configure logging
logging.basicConfig(level=logging.INFO)
# Define browser options and URLs
browser_options = {
    "chrome": ChromeOptions(),
    "firefox": FirefoxOptions(),
    "edge": EdgeOptions(),
}
hub_url = 'http://localhost:4444/wd/hub'


# Use 'http://localhost:4444/wd/hub' for local testing.
# If running tests on a remote hub, replace 'localhost' with the hub's IP address.
def setup_driver(browser):
    try:
        options = browser_options.get(browser)
        driver = webdriver.Remote(command_executor=hub_url, options=options)
        return driver
    except WebDriverException as e:
        logging.error(f"Error setting up {browser} WebDriver: {e}")
        return None


def test_check_stable_python_version(browser):
    driver = setup_driver(browser)
    if driver is None:
        return
    try:
        driver.get("https://www.selenium.dev")
        downloads_link = WebDriverWait(driver, 10).until(
            EC.element_to_be_clickable((By.LINK_TEXT, "Downloads"))
        )
        downloads_link.click()
        WebDriverWait(driver, 10).until(
            EC.presence_of_element_located((By.XPATH, "//p[contains(text(), 'Python')]"))
        )
        # Take a screenshot when the condition is met
        driver.save_screenshot(f"{browser}_screenshot.png")
        logging.info(f"Screenshot taken for {browser}")
    except Exception as e:
        logging.error(f"Error in {browser} test: {e}")
    finally:
        driver.quit()


if __name__ == "__main__":
    browsers = ["chrome", "firefox", "edge"]  # Define the browsers to test
    processes = []
    for browser in browsers:
        process = multiprocessing.Process(target=test_check_stable_python_version, args=(browser,))
        processes.append(process)
        process.start()
    for process in processes:
        process.join()
Execute the script using a Python interpreter (Python 3.x) from the command line or your preferred development environment:
python your_script_name.py
If you’d like to run the script in headless mode, modify the browser options accordingly:
# Enable headless mode for Chrome

browser_options["chrome"].add_argument("--headless")

# Enable headless mode for Firefox

browser_options["firefox"].add_argument("-headless")

# Add headless mode for Edge if supported

browser_options["edge"].add_argument("--headless")
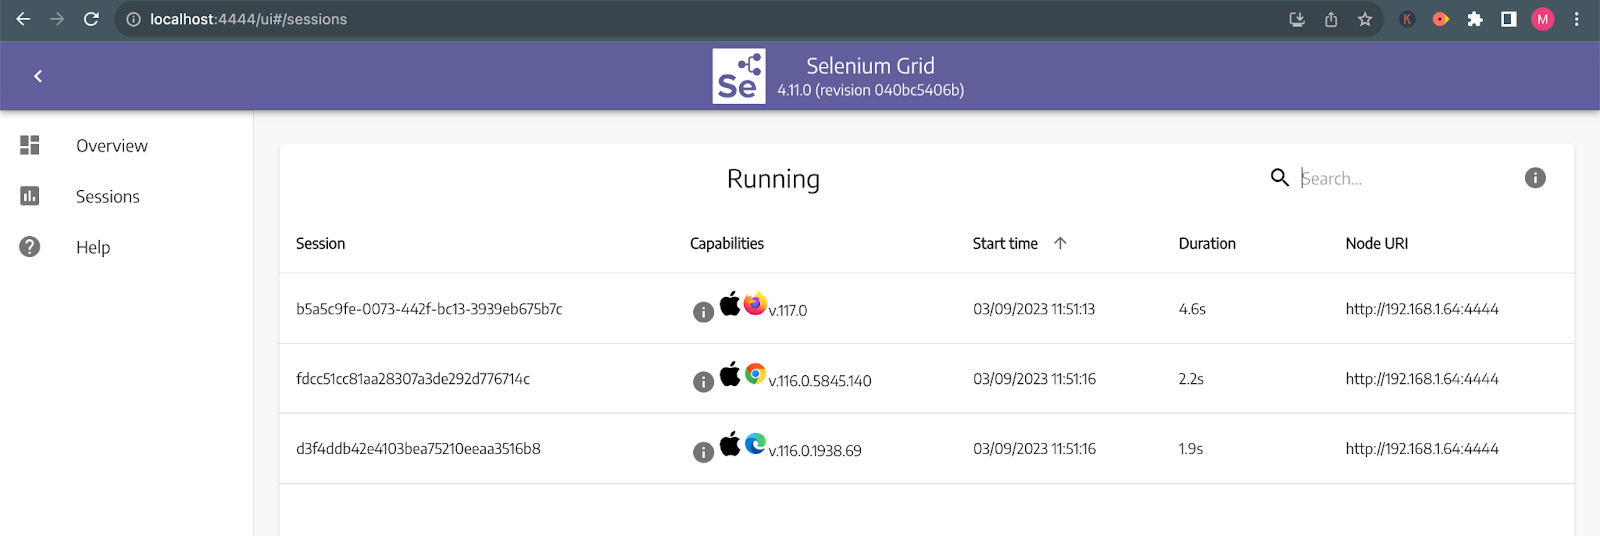
As you execute tests on the Selenium Grid, you can monitor and manage them using the Selenium Grid Console.
Access the console by opening a web browser and navigating to the following URL:
http://localhost:4444/ui#/sessions
Replace localhost with the hostname or IP address of the machine where you started the Selenium Grid Hub.
The console provides graphical insights into connected nodes, active test sessions, browser configurations, and the overall status of your Selenium Grid setup.
Here you can see the parallel runs of your tests:
Now let’s take a look how you can use Selenium Grid with your CI/CD tools.
If you want to improve your testing and achieve faster, more reliable software delivery, integrating Selenium Grid with CI/CD tools is a must. Here’s how to do it:
Selecting the right CI/CD tool that suits your team’s workflow is the first step. Whether you opt for Jenkins, GitLab CI, or another tool, it’s essential to find the perfect fit.
Ensure you have a robust Selenium Grid in place with the hub and nodes ready to roll. With a diverse set of browser configurations, your Grid is all set for parallel test execution.
Craft a seamless CI/CD pipeline, including the test stage. Trigger the execution of your Selenium test scripts during this phase to activate automated testing.
Use test runners like TestNG , Cucumber or Behave to execute your Selenium tests. Use the Selenium Grid URL to distribute tests across the registered nodes for simultaneous execution.
Capture and analyze test results to gain valuable insights into the stability and performance of your web applications. Swiftly identify and address issues to maintain a robust and resilient product.
In addition to these steps, consider using Docker Selenium to further enhance your integration.
Docker provides an efficient way to provision and scale Selenium Grid infrastructure using containers.
Selenium project maintains Docker images for both Firefox and Chrome nodes. This makes it easy to set up and manage your Selenium Grid within Docker containers.
You can find detailed instructions on provisioning a grid in the Docker Selenium repository.

Source: LinkedIn
By integrating Selenium Grid with your chosen CI/CD tool you can significantly improve your testing process.
This powerful automation solution will:
All at an accelerated pace.
In conclusion, Selenium Grid is a game-changer in test automation, especially for cross-browser testing.
It speeds up tests and makes them more efficient by running them simultaneously.
The integration of Selenium Grid with CI/CD tools presents a powerful approach to optimizing software delivery processes.
Embracing Selenium Grid can make your testing process smoother, ensuring websites work well for users everywhere.
So, whether you’re testing big or small, Selenium Grid is a tool worth considering for top-notch results.
If you’d like to read more about all things software, check out our blog!

Specializing in QA automation and usability testing, Marko ensures every project he works on meets the highest standards of quality. With his keen eye for detail and years of experience he's the go-to expert to call when you need to fix any software issue, big or small. And can you believe it all started with another student job? When he's not fixing the latest bugs, Marko enjoys hiking and exploring the great outdoors and dreams about working from a peaceful nook by the sea, enjoying the gentle breeze.
Learn all about the responsibilities of a Quality Assurance engineer in this article.

Here we explore the key differences and benefits of TDD, BDD, and ATTD.

Our mobile app usability testing guide will teach you what a usability test is and how to conduct one correctly so that you can develop the best app.