
App MVP development best practices
What do many successful apps have in common? They started with an MVP. We will list some MVP best practices to help you create your own app.
In 2023, there were a record 257 billion app downloads. That seems like a good sign for app developers.
Except that failure rates are also high. More than 80% are abandoned after one use.
The conclusion?
It’s getting harder to build the next killer app these days. And that’s leading to shorter development times as developers race to put their apps to market.
That’s why an MVP—or minimum viable product—is crucial to surviving in this environment.
Building an MVP might seem like an anything-goes process, but there’s a proper workflow involved. In this article, we’ll give you a detailed guide to building your own MVP.
So let’s get into it.
An MVP is the first version of your software product. It contains only the essential features it needs to solve your users’ main pain points.
And the main purpose of an MVP is to test how viable the app is. Instead of spending thousands of $ on polishing the product before reaching the market, you reach the market as quickly as you can.
That way, if the product fails you’ll save a lot of resources.
On top of that, you’ll be able to create a feedback loop. That means you’ll get feedback directly from the market instead of playing a guessing game with your team.
The sooner you get to the feedback loop, the sooner you can give users what they actually want.
Marko Strizic, DECODE co-founder and CEO
Now let’s get into our detailed guide to building your MVP.
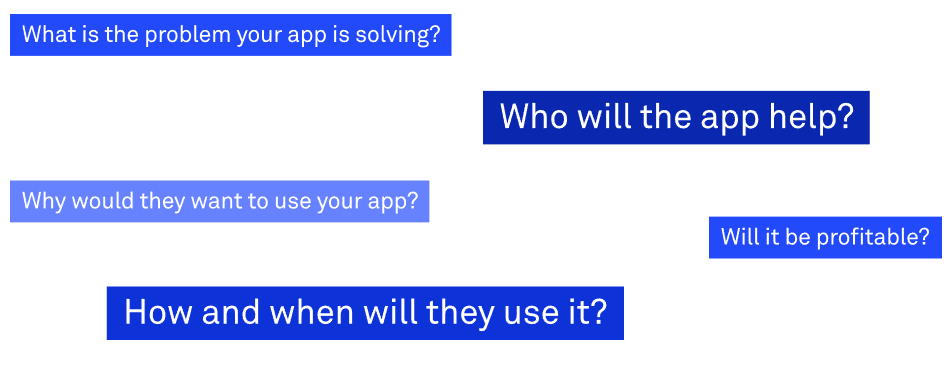
Before you build your MVP, you must ask a critical question—is your product needed?
In other words, what problem is it trying to solve? Because if that problem is irrelevant or nonexistent, creating an MVP will be a waste of time.
Every app idea should be built on an existing market problem that enough people care about. Even the most innovative app won’t fly if no one uses it.
In fact, a lack of market need is the number one reason that apps fail:

An easy way to identify a possible app problem is to follow the steps we’re about to describe.
First, determine the niche that you want to tackle. In reality, every major app category will always have problems, so there will be plenty of potential areas for you to tackle.
But at this point, it’s wise to narrow your focus to maximize your effort.
A niche based on your passion is always a good place to start.
After all, the fintech space might have million-dollar problems that need solving, but if you hate that niche, then you won’t see that much success.
The next step is to ask questions. Once you’ve narrowed down a niche, you should ask users in that niche what their biggest problems are.
You can do this by joining relevant Facebook groups or Reddit boards and talking with members there.
Once you have a set of possible problems, the next step is to analyze them. Evaluate how severe each is and if enough people are affected.
What do you think is the cause of the issue? And more importantly, are you equipped to solve it?
At this point, you should already have a clear picture of which problems are worth solving. So, the last step is to shortlist and define the problem you want to tackle.
This should give you a rough idea of the direction in which you should take your future app.
Remember, though, that this is just your initial problem statement. You still need to back it up with further market research.
Once you’ve arrived at the core problem and your app idea that will solve it, it’s time to conduct formal market research.
Remember, you only did preliminary research in the previous step. Now, you’ll want to go in-depth. Specifically, you want to define your target audience and market size.
Let’s start with the target audience. Here, you need to find out everything you can about your ideal users, preferably in these four categories:

The geographic category refers to where your target markets are located. You can get as specific as your app requires here.
For example, if you’re developing an app for a local business, you only need to consider users within that neighborhood.
Next is demographics, which refer to the tangible characteristics of the user. These are metrics that can be measured quantitatively, such as their age, gender, household size, and income.
Demographics will be your foundation when defining your target audience. Because, for most apps, you’ll want to get deeper into the next category—psychographics.
Psychographics are the non-tangible characteristics of a user that simple metrics can’t measure.
They include preferences, interests, lifestyle choices, hobbies, and beliefs. While harder to measure, those characteristics allow you to hone in on your audience much better.
For example, say you’re developing an app for car enthusiasts.
Using demographics alone won’t allow you to define the audience because being into cars is not limited by age, gender, and other physical factors.
Rather, you want to use psychographics to uncover people who have a proven interest in cars.
In other words, it’s hard to make assumptions with demographics alone because they’re often based on stereotypes.
For example, see how many stereotypes are broken in the below comparison:

The last category is behavioral, which defines what products the person is using. For example, you can use this to determine how loyal a user is to a particular brand.
Once you have your raw data, you begin to find commonalities among users. You can then compile this into a representation of your ideal audience, called the user persona.
Here’s an example:
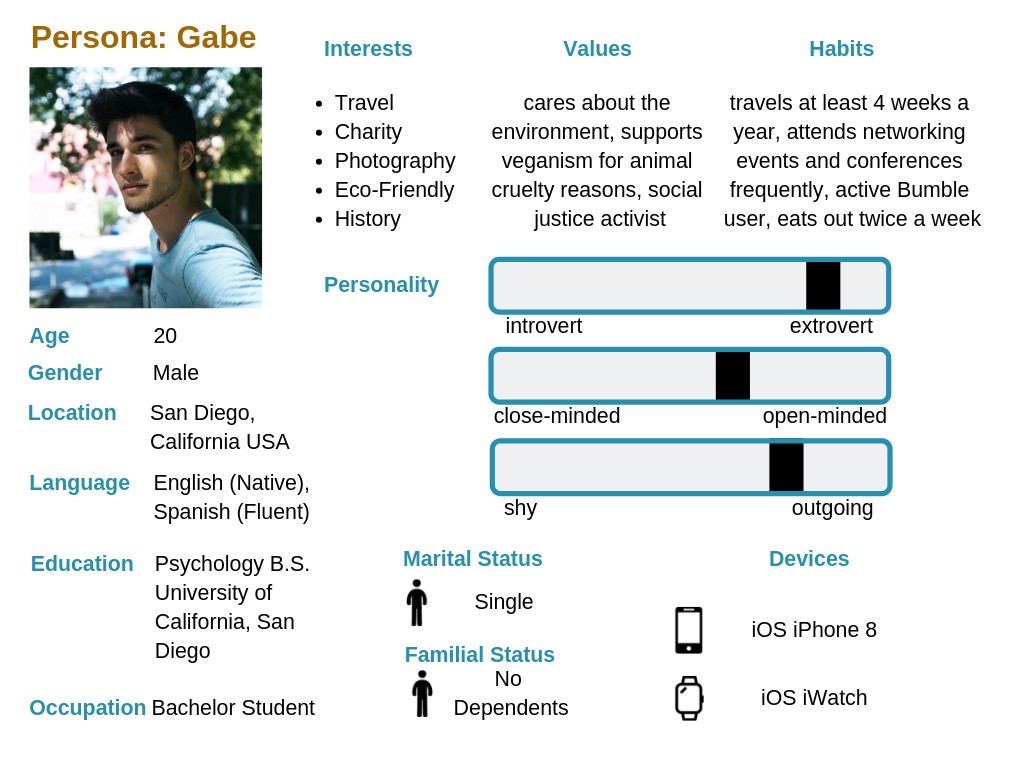
Source: App Radar
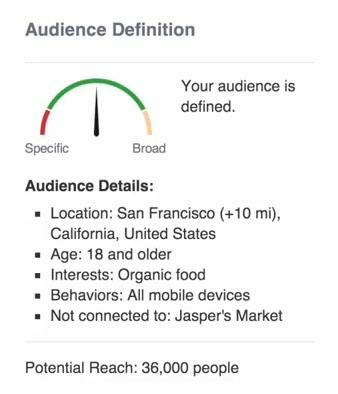
The other thing you should do is determine the market size for your app. This is, admittedly, tricky, since there’s no accurate way of doing it.
However, you can get a reasonable estimate using Google or Facebook Ads.
For instance, Facebook Ads allow you to estimate the reach of your ads based on demographic and psychographic factors. That should give you a rough idea of your market size.
At this point, you’re almost done with your market research. There’s only one thing left to evaluate—your potential competitors.
Competitor research is a vital step before building your MVP.
Think of it as a free lesson. You get to learn from the mistakes and successes of other apps in the market without spending a dime.
You can also read reviews on other apps to spot pain points and opportunities that your app can cover.
Finding your competitors is easy. Simply head to the Apple App Store or Google Play Store and go to the relevant category.
You can also come up with a list of keywords related to your app, then search using them.
You can also head to crowdfunding platforms like Kickstarter to find upcoming app projects.
The great thing about such platforms is that you can discover how many people pledged, which helps you gauge user sentiment and market potential.
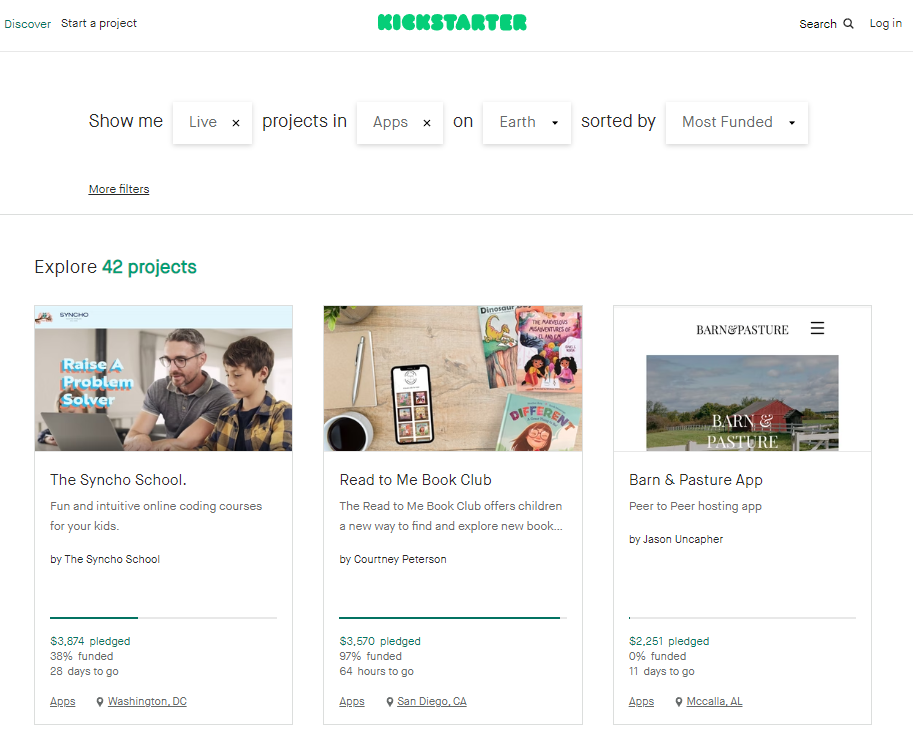
Source: Kickstarter
Once you have a list of potential competitors, it’s time to analyze them. Look at their features lists, monetization methods, and overall UX.
You can then list your findings in a comparison table for easy reference. Here’s an example:
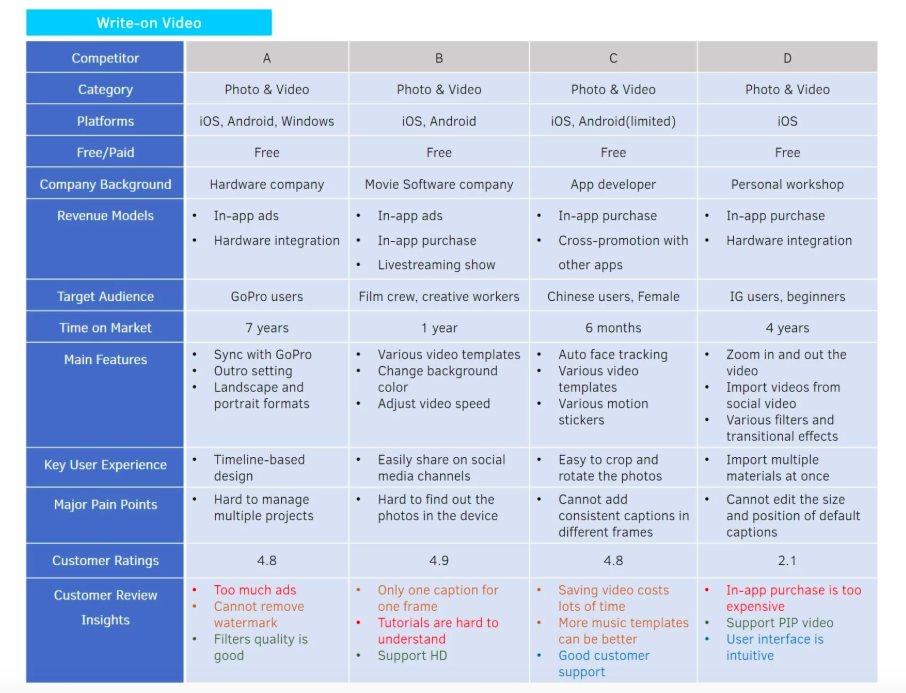
Source: Clear Bridge Mobile
After this, ask yourself questions. What did you like best about each app? Where did it fall short? How can you improve on it?
Combine these insights with your market research, and you should be able to refine your app idea further.
With your core problem in place, it’s time to list the features in your app that will solve it.
Remember, though, that this is an MVP. Thus, you must include only the minimum features required to test your app idea in the market.
Putting in too much will only waste time and resources.
Admittedly, shortlisting features in an MVP is tricky. But the feature priority matrix, also known as the MoSCoW matrix is a good tool to use while doing that.

To use the matrix, evaluate each feature using three metrics—impact, effort, and risk. Then, place them in the appropriate quadrant.
Impact is the overall value the feature brings to the app. Core features, such as booking a ride on Uber, will have the highest impact.
On the other hand, things like changing the UI colors will have a lower impact.
Effort determines the time, labor, and resources necessary to implement the feature.
For instance, features needing a special algorithm will require more effort than simply getting a third-party tool.
Risk refers to the potential difficulty and challenges when developing a feature. High-risk features will generally require more time and cost to solve.
Generally, you should only include features in the must-have quadrant with high impact, low risk, and minimal effort.
Items on the nice-to-have and can-be-done lists can be implemented later in the final app.
At this point, you’re ready to flesh out your MVP. But you must start with a prototype first.
Now, many people often confuse a prototype with an MVP. While both are used to validate your app idea, they’re not the same.
Here’s an infographic that shows you a better picture of the relationship between the two:

The biggest difference between the two is the intended audience.
An MVP is mostly aimed at an external audience. At its core, an MVP is a launch-ready app but only with the bare essentials. That means users can download and use it just like any other app.
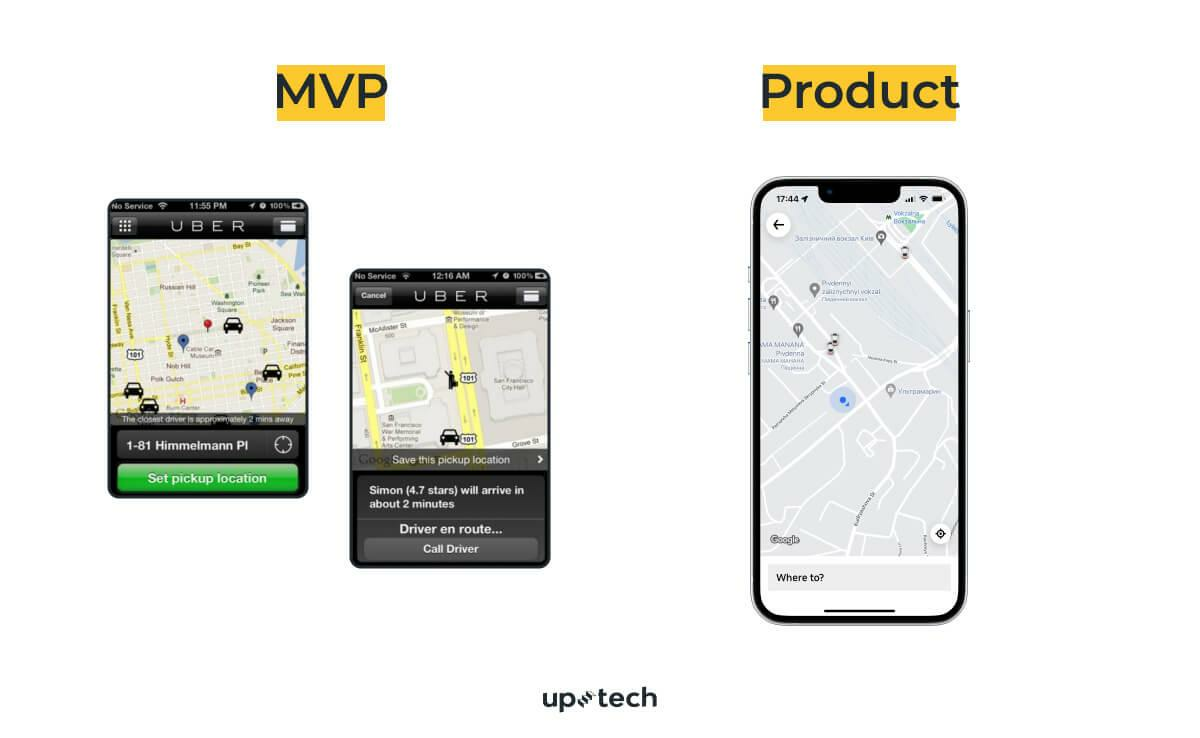
Source: UpTech
On the other hand, a prototype is mostly an internal tool. You build it to visualize your UI and UX, which you can use to gather feedback from team members and shareholders.
Prototypes are a necessary step when building an MVP. They allow you to spot potential problems earlier, which leads to a more polished MVP.
You’ll also get much more accurate feedback as a result.
For more information about building prototypes, check out this excellent guide.
We now come to the main event—building the MVP.
Following the steps thus far, you should already have a working prototype. You can then build upon this and turn it into a working MVP.
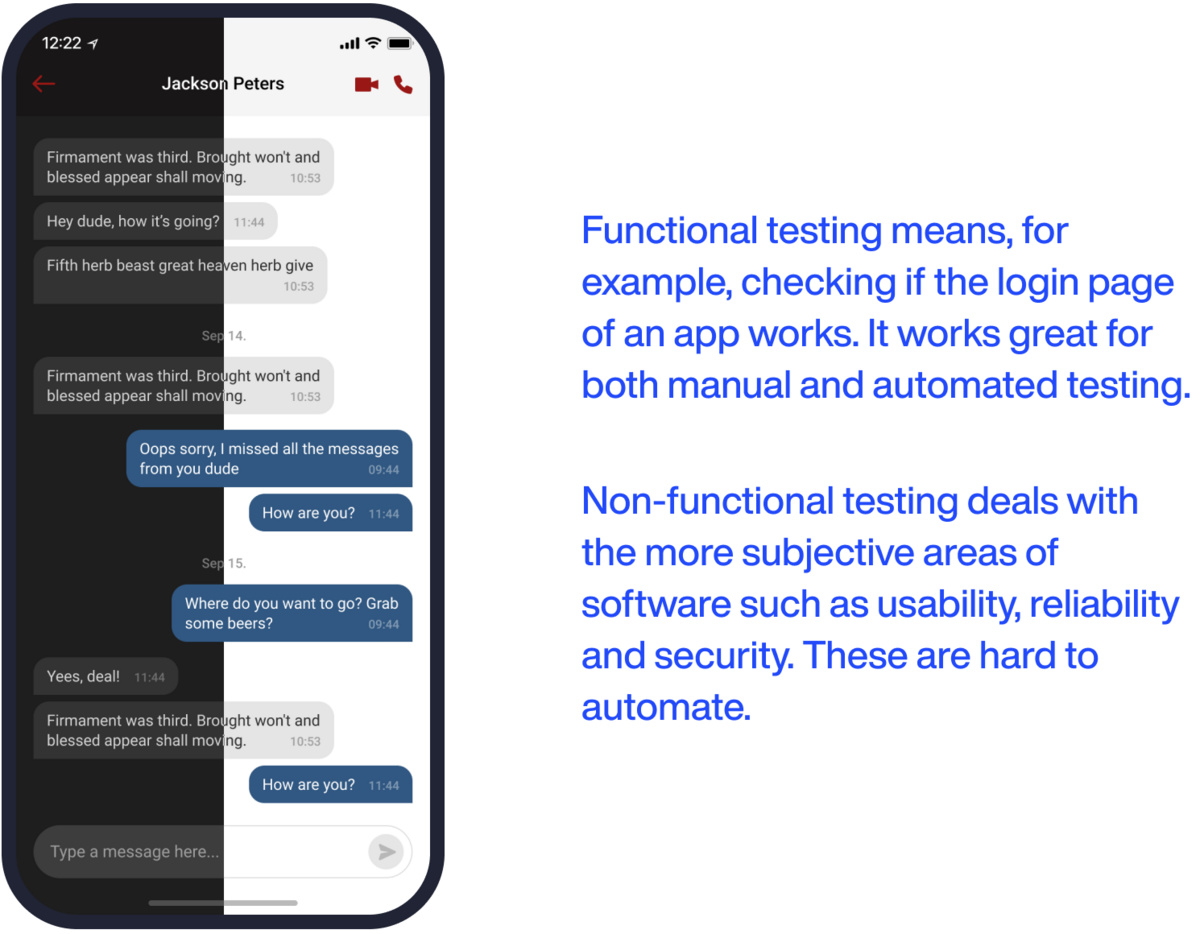
One thing to remember is that an MVP is a launch-ready app. That means you should give it the same care and attention as you would the final product.
For one, rushing through an MVP is not an excuse to come up with a dangerous or unstable product. That’s why you should never neglect both functional and non-functional testing.
You should also work on the stability of your app, specifically loading times. This is because users are prone to immediately drop apps that take a long time to load.
That prevents them from further evaluating the rest of your MVP, which beats the purpose.
Not to mention that slow loading times can cause users to rate your MVP lower.

However, you need to balance all of these with your development time. Generally, MVP app development time shouldn’t take more than three months.
That means the entire process from app idea to MVP launch should be around 4–6 months at best.

Finally, you launch an MVP like any other app in the Apple App Store and Google Play Store. You should also market it sufficiently to get enough users to try it out.
That sets you up for the final step of MVP app development.
An MVP’s main benefit is the feedback you’ll get, which you can use to iterate your app further.
Now, be aware that there are lots of metrics and channels to measure your app with. Some of the more important ones are listed below:
These metrics can be early indicators if your app is gaining traction or encountering problems.
For example, if you have a high sign-up rate and churn rate, you might have a problem with engagement.
However, for anything more insightful, you need to dig deeper into actual feedback from users.
Reading reviews on your app store page is the easiest way to go about it. In-app feedback is also a good avenue if you have it.
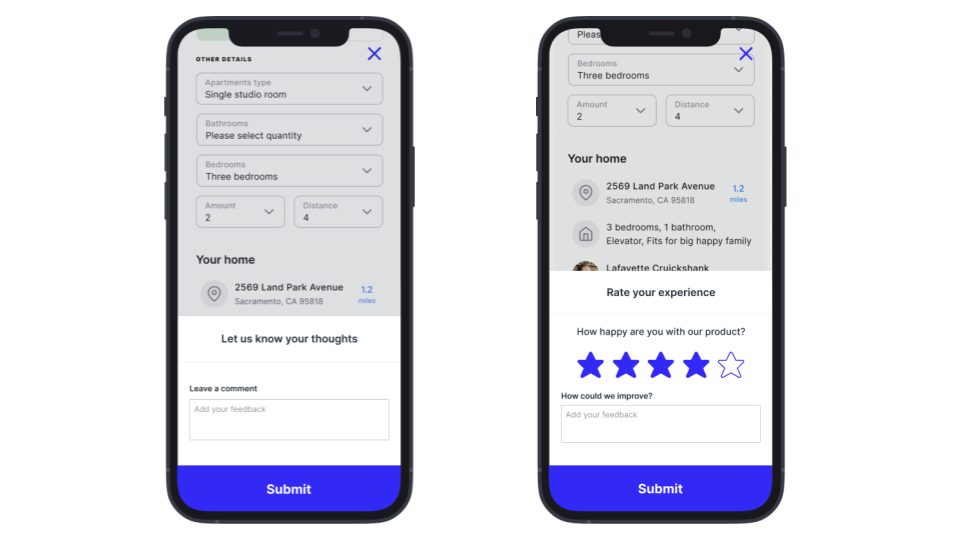
Source: Usersnap
Once you have the feedback, analyze and prioritize which ones you should implement, then do it immediately.
This will get you further feedback, which drives a feedback loop that eventually leads to a polished app.

The important thing to keep in mind here is to be objective. Of course, it’s only natural to be defensive or even offended when receiving criticisms from users.
This is where having a be glad to fail mindset is handy. Realize that the purpose of an MVP is to expose the flaws in your app idea.
Thus, negative feedback is not only expected but welcomed as an opportunity for growth.
As you can see, MVP app development is no walk in the park.
An exceptionally short timeline, limited features, and grueling research are just some of the challenges you’ll face.
But you can overcome these obstacles if you partner with an experienced mobile app agency like DECODE.
With dozens of successful projects under our belt, we have the expertise to guide you through MVP app development.
Interested? Get in touch with us today, and let’s start a conversation.

Marko started DECODE with co-founders Peter and Mario, and a decade later, leads the company as CEO. His role is now almost entirely centred around business strategy, though his extensive background in software engineering makes sure he sees the future of the company from every angle. A graduate of the University of Zagreb’s Faculty of Electrical Engineering and Computing, he’s fascinated by the architecture of mobile apps and reactive programming, and a strong believer in life-long learning. Always ready for action. Or an impromptu skiing trip.
What do many successful apps have in common? They started with an MVP. We will list some MVP best practices to help you create your own app.

This article will talk about the humble beginnings of successful apps. We hope that these app MVP examples will inspire your own success story.

In this article, we'll discuss the importance of the mobile app MVP. Find out why big-name apps used it and why you should as well.